[By Age Group] Goldfish Craft Ideas! Enjoy Fun Time with Kids

As the weather gets warmer, we tend to imagine summer-themed motifs for our crafts.
Bright red goldfish often evoke the image of goldfish scooping at summer festivals, so many of you may be thinking of incorporating them into your summer projects.
Craft activities need to be tailored to children’s ages and developmental stages, which can make it tricky to decide on the tasks and steps.
In this article, we’re introducing goldfish craft ideas by target age group.
We’ll cover a wide range—from decorations you can enjoy displaying to ideas kids can actually play with.
We hope you find them helpful.
Note: Since the items children make are treated as “works,” we use the term “seisaku” (制作) in the text.
- Fun Fish Craft Ideas to Make at Daycare and Kindergarten
- [For 5-year-olds] Crafts to try in July! Ideas that capture the season
- [July] Recommended for 1-year-olds! Fun summer craft ideas
- [For 4-year-olds] Crafts to make with preschoolers in July and August: Creative activities that let kids feel the summer
- [For 3-year-olds] A roundup of craft ideas to enjoy in summer! Introducing various motifs and techniques
- [For 5-year-olds] Let’s enjoy summer! Summer craft ideas for 5-year-olds
- [Childcare] A roundup of summer craft ideas to enjoy with 2-year-olds
- [Craft] Make and Display! A Special Feature on Ideas for Making Koinobori (Carp Streamers)
- [Crafts] A special feature on ideas to try with three-year-olds in August! Choose from a variety of motifs
- [For 2-Year-Olds] Craft Ideas to Enjoy in August! Incorporate Summery Motifs and Techniques
- [Childcare] Fun craft ideas and craft activities perfect for summer
- August Craft Ideas for 5-Year-Olds
- [For 4-year-olds] Recommended for August! Craft ideas: Enjoy a variety of motifs
[By Age Group] Goldfish Craft Ideas! Have Fun with Kids (21–30)
Puffy, three-dimensional goldfish

Let’s make a fun twist on the classic origami balloon! Here’s a puffy, three-dimensional goldfish idea.
All you need is one sheet of origami paper in your favorite color, a black pen, and a white pen.
It’s a unique, playful idea that makes the goldfish look adorably puffed up! Fold a balloon-like goldfish from a single sheet of paper, then use the black and white pens to draw the eyes and patterns.
It will look as if the goldfish has leapt right out of an aquarium.
This idea is sure to make anyone go “Whoa!” the moment they see the finished goldfish!
plump goldfish

Here is a three-dimensional goldfish you can make from a single sheet of origami paper.
Because it has a 3D finish, there are quite a few steps where you create creases first and then assemble, but watching a goldfish take shape from a flat sheet makes an excellent way for children to develop spatial awareness.
It’s also nice to work through the tricky parts together with a parent or guardian.
Making goldfish in different colors or adding water plants to recreate a pond or fishbowl is fun, and it would look cute pasted onto a fan as well.
Wobbling Goldfish

This goldfish origami can be moved to recreate the gentle swaying motion of swimming.
The folding process is similar to the yakko-san, pinwheel, and trick boat models up to a certain point, so it should be easy to get started.
Every part is three-dimensional, and when you move the tail fin, it looks as if the fish is actually swimming, so you can enjoy not only making it but also playing with it.
You can also make it cute by adding eyes with round stickers or a felt-tip pen.
Be sure to give it a try!
Simple goldfish
Let’s make it with scissors! Here’s a simple goldfish craft idea.
All you need is origami paper in your favorite color and a pair of scissors.
It’s a fun activity for both kids and adults to enjoy together! The process of making a goldfish with your favorite colored origami paper and scissors is simple yet helps build concentration.
In particular, after cutting the origami, it’s important to fold carefully so you don’t tear the paper—this is a key point.
This step will help develop dexterity and focus.
The finished goldfish is adorable and fun to display!
Goldfish with fluttering tail fins

This origami is a goldfish with fluttery, very glamorous tail fins.
It looks even cuter when combined with a heart-shaped origami, so be sure to make them as a set.
You’ll use two quarter-size pieces of origami paper to make the goldfish.
One piece is for the body, and the other is for the tail fin.
Once both are folded, glue them together.
For the eyes, use round stickers or similar.
After making the heart pocket, the back side of the goldfish can be inserted into the pocket—slide it in, and it’s complete.
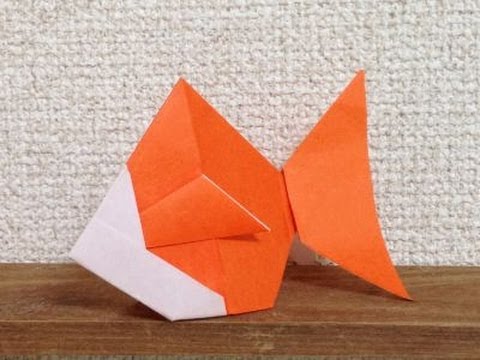
goldfish with a triangular tail fin

This goldfish is relatively easy to fold compared to other goldfish origami.
Because the shape is quite simple, drawing the eyes and scales might make it look more realistic.
To fold it, first make two diagonal folds along the corners.
Then fold the tip slightly, and fold it in half in the perpendicular direction to make a crease there.
Fold the triangular section at the bottom upward.
Finally, fold up the opposite edge from the head to form the tail along that line, and you’re done.
Goldfish viewed from above
Let’s make it with origami in your favorite colors and patterns! Here’s an idea for a goldfish seen from above.
What you’ll need: one sheet of origami paper, a quarter-size piece of origami paper, and round stickers.
It’s an idea that’s full of cuteness! Use the full sheet to make the goldfish’s body, and the quarter-size piece to make the tail fin.
By gluing them together, you’ll create a goldfish with a three-dimensional look.
Add round sticker eyes and it will look just like a goldfish swimming! Since you can freely choose the colors and patterns of the origami paper, each goldfish will have its own unique personality—and it’s fun just to look at them.