[For Seniors] March Origami: Ideas to Brighten Your Room with Seasonal Flowers and Events

March, when the warmth grows little by little, is the season that makes you happy to feel the breath of spring.We’ve gathered origami ideas perfect for this time of year.Folding spring-themed motifs like Hina Matsuri decorations, bush warblers, and tulips will instantly brighten up your room.You can enjoy them in many ways—use them as wall decorations or stand them on a desk.They’re also recommended as gifts for your grandchildren.These are all projects that let seniors enjoy the season while moving their fingers, so please try whichever ones catch your eye.
- For Seniors: Recommended Wall Decoration Ideas for March
- [For Seniors] Crafts to Make in March! Recommended Project Ideas
- For Seniors: Come, Spring! Recommended March Craft Ideas for Daycare Services
- [For Seniors] Perfect Finger Exercises! Seasonal Flower Origami
- [For Seniors] Spring Wall Decorations: A Collection of Ideas to Brighten Up Your Room
- [For Seniors] Origami Crafts to Brighten Hinamatsuri: A Collection of Decorative, Festive Ideas
- [For Seniors] Enjoy Something New Every Day! Today’s Origami
- [For Seniors] Making a March Calendar: Introducing Spring-Themed Motifs and Arrangements
- [For Seniors] Enjoy Cherry Blossoms Indoors: Wall Decoration Ideas
- For seniors: Heartwarming and cozy. Recommended handmade Hina dolls
- Easy origami that delights the elderly. Enjoy a heart-lifting time with seasonal origami.
- [For Seniors] Introducing Fun Crafts Made with Plastic Bottle Caps
- [For Seniors] Recommended September Origami to Feel the Autumn Season
[For Seniors] March Origami: Ideas to Brighten Your Room with Seasonal Flowers and Events (101–110)
Hinamatsuri wreath

This article introduces how to fold a wreath for displaying Hina dolls.
These days, many households display only the Emperor and Empress due to limited space, but if you use origami, you can also enjoy displaying the three court ladies and the five musicians.
Prepare both solid-colored and patterned origami paper, then make the parts one by one.
Once the parts are ready, assemble them so the colors and patterns alternate.
Attach one sheet of origami to the back, and your wreath is complete.
Make the Emperor and Empress or the three court ladies and display them together.
By changing the colors and patterns of the origami you use, as well as the motifs you attach, this piece can be adapted for many different occasions.
Please make the most of it!
paper lantern (especially small decorative festival lantern)

Bonbori lanterns really bring out the beauty of Hina dolls, don’t they? One reason for having bonbori is that weddings used to be held at night in the past, so without lights, nothing could be seen.
It’s said that this is why lights came to be placed with Hina dolls.
Let’s make these bonbori out of origami.
All you need are cherry-blossom-patterned origami paper and black origami paper.
The folding steps are simple, so it’s easy for seniors to try as well.
It’s recommended to display the finished bonbori together with your Hina dolls.
Swaying Cherry Blossoms
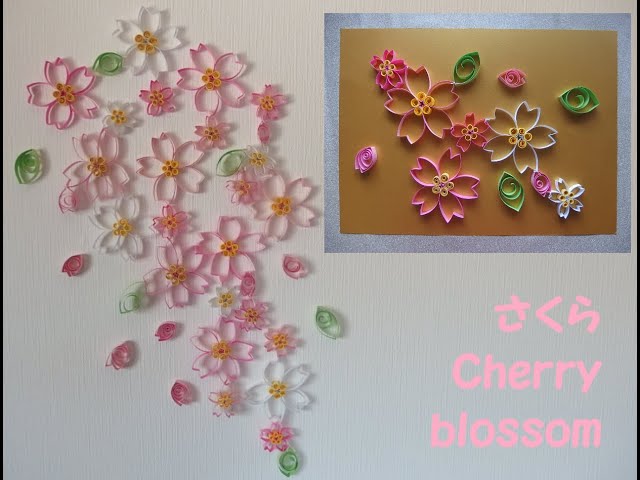
Here’s an idea for a wall decoration that evokes cherry blossom petals swaying in the wind.
Make petals by cutting origami paper into rectangles and forming each piece into a loop.
Combine four to five petals and glue a yellow piece in the center to create a three-dimensional cherry blossom.
If you press the inside of the flower and leaf pieces with a bamboo skewer to add curvature, they’ll gain a soft, rounded 3D look.
Connect the finished blossoms and leaves with thread and attach them to the wall so the design sways when a breeze passes through.
It’s a decoration that’s both visually striking and dynamic, letting you feel the arrival of spring.
white clover

White clover, often seen in spring in parks and gardens, is a plant that evokes gentleness and lightness.
Cut a rectangular sheet of origami paper into small pieces and round them to create petal shapes.
By adding a curve to the tips of the petals, you can achieve a realistic-looking flower.
Use long, thin strips of paper to make the stem, and represent the distinctive leaves of white clover.
Arrange heart-shaped pieces of origami in green gradient tones to create the clover.
Finally, decorate with a ladybug made of origami to finish.
Combining white clover and clover makes for a decoration that conveys the arrival of spring, even from the wall.
Tulip
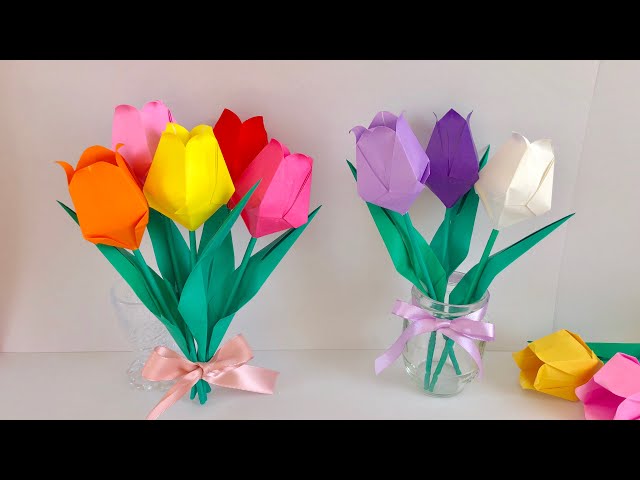
Let’s make tulips, the flowers that symbolize spring, out of origami.
Fold the flower part into a three-dimensional shape so the inside is hollow, and curl the tips of the petals outward.
Create the stem by wrapping origami paper around a bamboo skewer, then insert it into the center of the flower to secure it.
Attach a leaf piece partway up the stem, and your three-dimensional tulip is complete.
Gather several together and tie them with a ribbon for an adorable tulip bouquet! It also looks great displayed in a vase or a stylish glass.
[For Seniors] March Origami: Ideas to Brighten Your Room with Seasonal Flowers and Events (111–120)
Tulips and windmills

The wall decorations of tulips and windmills that evoke a spring atmosphere feature a bright, warm design.
Cut red and yellow origami paper to make the tulip petals.
Add small slits at the tips of the petals and glue them overlapping to create a three-dimensional effect.
Make the stems and leaves with green origami, and when arranged on the wall, it gives the impression of a field of spring plants spreading out.
For the windmills, cut out the base and cross-shaped parts and assemble them into a windmill.
Finely cut the propeller section, add windows and embellishments, and glue them on to enhance the three-dimensional look.
The vivid colors of the tulips and the windmill design create wall decorations that convey the warmth of spring.
Tulip hina

Tulips are one of the essentials of spring, and the way their brightly colored flowers bloom so vigorously conveys the joy of the season.
This craft combines tulip blossoms with Hinamatsuri (Girls’ Day) motifs to create a project that feels distinctly springlike.
The base is construction paper cut into a tulip shape; onto this, you add origami clothing and decorations to complete the Hinamatsuri theme.
For the two main figures, make slits and then glue them together to give them a three-dimensional look so they stand out from the rest—that’s the key point.
Finish it off with leaf parts and surrounding tulips to create an overall festive look.