[For Seniors] Crafts to Make in March! Recommended Project Ideas


March is full of delightful motifs like peach and cherry blossoms, as well as fun events such as Hinamatsuri (Girls’ Day).
In this article, we’ll introduce craft ideas recommended for seniors to enjoy in March! By mainly using soft colors like pink, white, and pale green for origami and construction paper, you can create bright, cheerful pieces—making both the crafting process and the finished display exciting.
When making origami crafts, adding patterned paper can change the atmosphere and give your work a unique touch! Feel free to use these ideas as references in care facilities such as day service centers.
- For Seniors: Come, Spring! Recommended March Craft Ideas for Daycare Services
- For Seniors: Recommended Wall Decoration Ideas for March
- For seniors: Heartwarming and cozy. Recommended handmade Hina dolls
- [Day Service] Spring Take-Home Crafts: Ideas to Warmly Brighten Your Room
- [For Seniors] Spring Wall Decorations: A Collection of Ideas to Brighten Up Your Room
- [For seniors] Enjoy spring: April craft ideas
- For Seniors: Simple and Lovely Crafts – A Collection of Take-Home Project Ideas for Day Service
- [For Seniors] Color Your Care Facility’s Spring: Wall Decoration Ideas
- [For seniors] A handmade calendar you’ll want to make in February
- [For Seniors] Have Fun Making Things Based on Today’s Mood! Today’s Recommended Craft
- For Seniors: Feel the Arrival of Warm Spring. Cherry Blossom Wall Decoration Ideas
- [For Seniors] Introducing Fun Crafts Made with Plastic Bottle Caps
- [For Seniors] Making a March Calendar: Introducing Spring-Themed Motifs and Arrangements
[For Seniors] Crafts You’ll Want to Make in March! Recommended Project Ideas (21–30)
Hinamatsuri wreath decoration

Introducing an idea for a Hina Matsuri wreath made entirely from origami parts! The parts you’ll make are the Emperor doll and Empress doll, lanterns, hishi-mochi rice cakes, cherry blossoms, a folding screen, a fan, a ritual baton (shaku), a stand, and a circular base to which all these parts are attached.
The base is made by combining 12 identical pieces.
Each individual part is created through simple steps, so although there are many pieces, it’s a project you can likely finish in a day.
For the Emperor and Empress kimonos, use washi-patterned origami paper—choose your favorite designs while imagining the final look.
Cone-shaped hina dolls
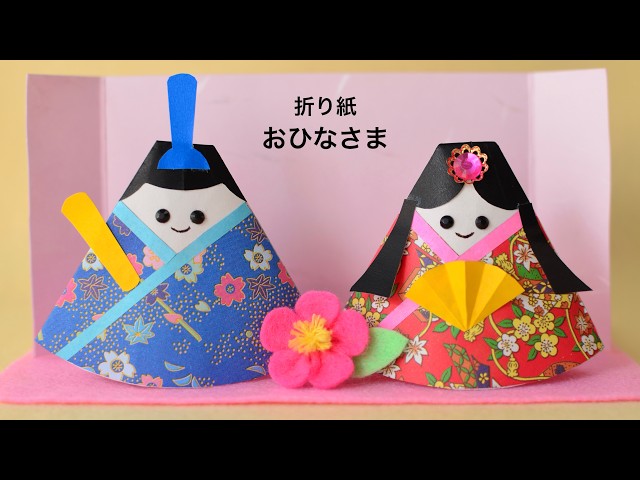
Perfect for Doll’s Day displays! Let’s make cute triangular hina dolls.
First, cut white paper into a half-circle and roll it into a cone.
Then wrap washi-patterned origami around it to represent the kimono.
Use the pointed tip of the cone as the face: add hair with black origami, and use rhinestones for the eyes and hair ornaments.
For the base, glue a U-shaped piece of thick paper upright onto a felt rectangle you’ve cut as the platform.
The look will vary depending on the origami and rhinestones you use, so prepare materials that match your image.
[For Seniors] Crafts You’ll Want to Make in March! Recommended Project Ideas (31–40)
Hina dolls with distinctive kimonos

Let’s make a perfect set of the imperial couple (the emperor and empress) for Hinamatsuri.
First, mark the origami by folding it in half, then into quarters, in order.
Create creases at the corners and around the edges to form the shape of the kimono.
For the hair, take a small square of black origami paper, fold it into a triangle, then fold both sides toward the center to shape the hairstyle.
Attach the empress’s body and hair, then add the fan to finish.
For the emperor, the key is to make a crisp fold at the collar and fold the sleeves of the kimono upward to create the right angle.
Fold a crown from black origami paper to complete the emperor.
Feel free to draw the facial expressions in your own original style.
Self-standing Hina Dolls you can make even if you’re super clumsy

Let’s make some cute hina dolls that will look adorable even displayed at the entrance.
Cut a sheet of origami paper in half, fold it in half, then overlap and fold the left and right sides to create the kimonos for the empress (ohinasama) and the emperor (odairisama).
Tuck the triangular flap inside to finish.
For the face parts, prepare one sheet of black origami paper, fold it in thirds, then fold one third in half; as you fold the corners, shape the hair while checking the balance.
Finally, fold up from the bottom to complete the face parts.
For the odairisama, make the crown by shaping the tip to a point, then fold the corners to give it a rounded form.
Once you make the fan, ladle, and crown, it’s complete.
A simple Hina decoration you’ll want to display

Easy Hina Doll decoration you can make by downloading the template! Just paste the bonbori lanterns, hishi-mochi, and Hina dolls onto the background illustration to complete it.
First, mount the background illustration on thick paper and trim off the excess.
For the bonbori, cut several circular pieces from colored paper of your choice, fold each in half, then glue them together to form a hemisphere.
For the hishi-mochi, prepare pink, white, and green colored paper, cut them according to the template, and stack/glue them in layers.
For how to make the Hina dolls, check the video linked in the description and try folding along with it.
Tsumami-zaiku

Tsumami-zaiku is also ideal for training your concentration and finger dexterity.
Tsumami-zaiku is a craft in which square-cut pieces of fabric are folded with tweezers to create works.
Think of it as something like origami, but with very small pieces of cloth.
Because it involves very delicate work, you need to sharpen the sensitivity of your fingertips, and of course it also requires concentration.
By the way, you can make many different items with tsumami-zaiku, but dolls and earrings are recommended for beginners.
flower ball

Since March is still quite chilly, why not try a craft that brings a sense of warmth? Let me introduce felt flower balls.
When you think of felt, you might imagine having to poke it with a needle or sew pieces together.
But this method doesn’t use any needles at all.
It’s so easy that you can make lots of them, link them together, and turn them into wall or hanging decorations.
Just note that there’s a step where you’ll use a hot glue gun, so please be careful with that part.