Recommended November craft ideas for day service centers


November, when autumn deepens and you can finally feel the approach of winter.
As this season arrives, the iconic sights of autumn—starting with the colorful leaves—are coming to an end.
Because of that, some people may want to go out and soak up as much of autumn as possible, but find it difficult to leave home.
In this article, we’re introducing craft ideas recommended for November that allow seniors to enjoy the feeling of autumn without going out! We’ve gathered a variety of crafts, including ones that evoke fall foliage and seasonal flavors.
Please make use of them for craft activities in day service programs.
- [For Seniors] Let’s Make It Together! Wonderful November Wall Decoration Ideas
- [For Seniors] Day-service activities also recommended! Craft ideas for November
- [For Seniors] Simple crafts that feel like autumn: a fun creative activity
- Simple, Recommended Autumn Crafts for Seniors
- For Seniors: Simple and Lovely Crafts – A Collection of Take-Home Project Ideas for Day Service
- [For Seniors] Fall Wall Decoration Ideas
- [For Seniors] Simple Craft Ideas to Feel the Autumn Season with Fall Foliage
- [For Seniors] Recommended for day services! Simple and cute small craft ideas
- [For Seniors] Small craft ideas: for yourself and as gifts!
- [For Seniors] Introducing Fun Crafts Made with Plastic Bottle Caps
- Craft ideas with a maple-leaf theme. Fun craft activities for seniors.
- [Day Service] Craft Ideas for Seniors to Make in October
- [Theme: Persimmons] Recommended for seniors! Simple and fun autumn craft ideas
Recommended November craft ideas for day service (71–80)
Pinecone Hedgehog
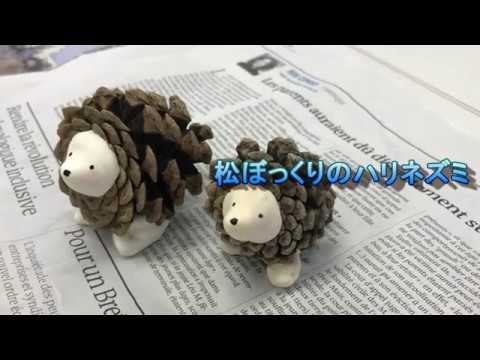
Let’s make a hedgehog using pinecones you find on the ground in autumn parks and along walking paths! First, attach some paper clay from the bag to the bottom of the pinecone.
Use a brush or similar tool to draw the eyes, then extend the tip of the clay to form the nose.
Next, attach the feet pieces and adjust the shape, and you’re done.
It’s an easy, three-dimensional craft, so it’s great even for people who don’t usually do crafting.
Capture the hedgehog’s features and finish it as a piece you can be proud of!
Persimmons and maple leaves

Here’s an idea for a wall decoration that combines persimmons and maple leaves, both classic tastes and symbols of autumn.
The key is to create a sense of depth, which can make even a plain wall look vivid and colorful.
Since the process involves plenty of fine motor work—cutting and pasting origami paper, crumpling it into balls, and more—it’s a great project for large groups in day-service craft activities.
By firmly creasing the maple leaves and persimmon leaves, you can easily add a three-dimensional effect, so be sure to give it a try!
Sweet potato made of resin clay

Let’s make miniature sweet potatoes using polymer clay.
Knead yellow and red acrylic paint into the clay to color it and form the potato flesh.
For the skin, knead in red and blue, then roll it out to a thin sheet about 1–2 mm thick.
Wrap the pre-made flesh with the skin and shape it.
Use a toothpick to draw patterns and press in small dents to create a bumpy texture, then let it dry.
Your tiny sweet potatoes are done! Once they are completely dry, try cutting them with a craft knife—you’ll see a realistic cross-section of the potato.
It’s an easy craft that you can keep enjoying even after it’s finished.
Autumn Postcard

Through my connections with haiku and tanka, I often receive illustrated postcards from elderly people.
At first glance they may look similar, but each has its own distinctive features, and it always reminds me that individuality shows up in places we ourselves don’t notice.
So, why not try making autumn-themed illustrated postcards that would make anyone happy to receive? There’s even a term, “heta-uma” (so-bad-it’s-good), so beginners are absolutely fine! Even mistakes can become part of your unique style.
Autumn offers plenty of perfect subjects for postcard art—persimmons, chestnuts, grapes, and maple leaves.
Start by drawing them up close! Keep any words you add to the postcard short.
Lampshade of autumn leaves

You can easily handcraft a soothing lampshade with soft, gentle light using washi paper and a milk carton! Draw colorful autumn leaves on the washi with water-based markers, then trace over them with a water-loaded brush to create a blurred effect.
Once the washi dries, cut out the shapes along the outlines of the leaves.
Next, peel off the outer film of the milk carton to make a pure white box.
Then simply attach the leaf cutouts to both the inside and outside of the carton, and place a lamp inside.
The milk carton’s perfectly thin material lets the light seep through beautifully, creating a charming, atmospheric lamp!