[Childcare] November wall decorations and autumn craft ideas

As the days when we feel a slight chill gradually increase, November overflows with the cozy charm of autumn.
This time, we’re introducing recommended wall decorations for November, along with creative autumn craft ideas.
From pieces that incorporate natural materials like vividly colored leaves and acorns, to delicious seasonal foods like chestnuts and grapes, and familiar autumn creatures such as bagworms and hedgehogs—these projects are packed with ideas that capture the essence of fall.
Make the most of children’s individuality in their creations and enjoy the autumn season to the fullest!
Because the items children make are treated as artworks, we refer to them as “seisaku” (creations) in the text.
- Preschool: Autumn-Themed Craft Ideas Recommended for November
- Ideas you can use for autumn wall decorations
- [For 4-Year-Olds] Recommended in November! Autumn-Themed Craft Activities
- Craft Activity Ideas for 5-Year-Olds: November Edition
- [Autumn] Easy Origami Ideas for November
- [Childcare] Autumn craft ideas
- Fun November craft ideas for 1-year-olds!
- Even 1-year-olds will be captivated! A collection of craft ideas to enjoy the art-filled autumn
- Get kids excited in November! A collection of play and craft ideas using autumn’s natural treasures
- [October] Craft ideas for fall you can use in childcare
- [November] Enjoy with 3-year-olds! Craft activity ideas recommended for autumn
- [Childcare] For 2-year-olds! November craft activity ideas
- Ideas for October wall decorations: an autumn wall display that makes use of children’s artwork.
[Childcare] November Wall Decorations and Autumn Craft Ideas (41–50)
Cute parent and child owls

First, fold the paper up to the crane’s basic form.
Take the two open tips (the side that isn’t closed) and fold them toward the center edge to make crease lines.
Next, using those creases, perform an inside reverse fold on both open tips so they align with the center crease.
Fold the closed bottom corner up on both the front and back.
Then fold the bottom corner upward and squash it open like a balloon fold.
Turn it over, and fold the lower tip up along the edge.
Fold the top tip down.
Finally, fold up a little bit to create an owl’s head that slightly sticks out.
Add cute decorations, and you’re done!
[Childcare] November Wall Decorations and Autumn Craft Ideas (51–60)
Wobbly fun! Paper-cup bagworm

Hang these on the wall to meet lots of colorful, fun bagworms! First, prepare two sheets of origami paper in your favorite colors, then tear each one vertically into roughly four strips.
Next, apply glue to one end of a torn strip and randomly stick it onto the side of a paper cup near the bottom.
You can alternate the two colors or group the same color together—either is fine! At this point, also attach the bagworms’ eyes made from construction paper or origami.
Finally, use an awl to make a hole in the bottom of the paper cup, thread through some kite string for hanging, and secure it—that’s it! Please make sure that a kindergarten or nursery teacher, or a guardian, handles the hole-punching with the awl.
Make a cute bagworm with kraft paper and washi tape!
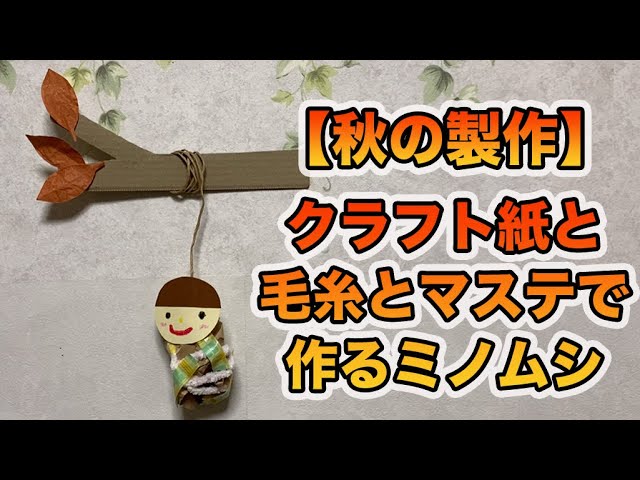
I’ll show you how to easily make a bagworm using kraft paper, yarn, and masking tape! First, roll up the kraft paper to form the body.
Wrap yarn around it and stick pieces of masking tape on randomly.
Next, draw a face on the face parts you made from colored construction paper, then attach it to the body with double-sided tape.
Finally, tape a string to the back of the face with clear tape, and you’re done! If children will be handling it, twine is recommended.
It looks super cute if you also make a tree branch out of cardboard and hang it, so give it a try!
How to fold realistic autumn leaves

Let’s make a realistic maple leaf using a single sheet of origami.
Fold the paper into a triangle twice, squash the pocketed section into a square, then add creases and squash it into a diamond.
Up to this point, it’s the same process as making a crane.
With the side where the corners are not split at the top, fold down the top layer on the front, then flip the paper top-to-bottom and turn it over.
Crease the two-pronged corner, open it up, and squash this part into a small diamond.
Make a cut in the bottom corner to split it into two prongs as well, squash it into a diamond the same way, then fold the tips to create small leaves.
Turn the paper over, fold the left and right corners of the remaining section inward, and make a step fold on the bottom corner.
Finally, fold the left and right corners once more, and you’re done.
You can make the whole body! Squirrel origami

Let’s make a cute animal squirrel with origami.
First, fold the paper diagonally to make a crease.
With the white side facing up, fold the left and right corners in to meet at the center.
Open it once the creases are made, then fold again along those creases in the same way.
Fold the paper in half along the horizontal center line so that the white side is on the outside.
Next, take the top layer of the top corner and fold it down to match the height of the upper corners of the triangles on the left and right.
Fold the remaining top corner to the back.
Fold the left and right sides at positions about 1 cm outside the vertical center line, then fold the left, right, and bottom corners to align with the slightly visible triangular corners.
Now the squirrel’s face is complete.
We also introduce how to make the body, so please try making it too!
Perfect for walls, too! Chrysanthemum origami

Here’s an idea for making a chrysanthemum using an accordion fold.
Prepare two sheets of origami paper: 15 cm for the flower and 7.5 cm for the leaves.
First, accordion-fold the paper for the flower.
Once folded, take both pieces, align the ends, and fold each in half.
Trim off the two corners at the ends to shape the petal tips.
Open the paper once, apply glue along the center line on both sides, then fold it back in half.
Also glue the inner edges of the folds to form a fan shape.
Glue the two pieces together while spreading them into a circle, and place a round sticker in the center to complete the flower.
Make leaves from green origami paper and attach them to the back of the flower.
Make it with handprints! Wobbly bagworm
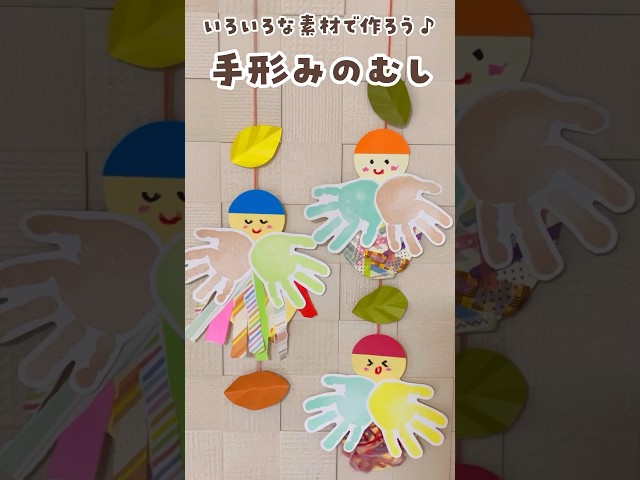
Here’s a craft idea for making bagworms using children’s handprints and footprints! First, create the bagworm’s body out of colored construction paper.
Next, take origami paper in your favorite colors and tear it into long, thin strips.
Paste the strips onto the body with glue, and use the child’s handprints to make a cute outfit.
Draw the face, attach a piece of yarn to hang it, and you’re done! You can also decorate with yarn instead of or in addition to origami paper.
Making lots in different colors and displaying them looks super cute, so it’s highly recommended.
Be sure to have fun tearing and pasting together with the kids!