[For Kids] Let’s Make Ghosts! A Collection of Craft Ideas

Even though they’re scary, you just can’t help wanting to look… Ghosts are such mysterious beings, aren’t they?
In this article, I’d like to share some ghost craft ideas that are perfect for little kids!
They’re all super cute, so even children who scare easily will be totally fine!
They might even end up thinking, “Ghosts? No big deal!”
Give them a try and have fun making them during the summer, the test-of-courage season, or around Halloween!
They’re also perfect for craft time at daycare or kindergarten!
- [For toddlers] Simple but amazing craft ideas — including toys they can play with
- Handmade haunted house ideas: from ways to darken a room to props
- Irresistible for 5-year-olds! A collection of recommended craft ideas for Halloween
- [For 4-Year-Olds] Fun to Make! A Collection of Halloween Craft Ideas
- Irresistible for 3-year-olds! A collection of fun Halloween craft ideas to make
- Fun for 1-year-olds! A collection of Halloween craft ideas you can make while playing
- [Fun] A Collection of Picture Books Featuring Ghosts [Scary]
- Recommended for Halloween! How to make an easy origami ghost with a 3-year-old
- [Preschools & Daycare] Costume and Cosplay Ideas for Halloween
- [Age 2] Have fun with Halloween crafts! A collection of ideas perfect for October
- Fun crafts using straws
- Easy to make! DIY ideas for Whack-a-Gator
- Paper cup crafts that elementary school kids will love! A collection of fun project ideas
[For Kids] Let’s Make Ghosts! Craft Ideas Roundup (21–30)
Perfect for Halloween! Ghost origami

After folding the origami into a triangle, open it, then fold the two left edges in to meet the crease.
Rotate the paper so that the newly formed point is at the bottom, and open the two opposing corners along the crease outward into triangles.
Fold the upper left and right edges in to meet the crease, then fold the top point down to the base of the triangle.
Slightly tuck the two top corners inward, then fold the bottom corner up to the left diagonally.
Unfold to set the crease, then fold the left edge of the triangle beneath the crease in to meet the crease.
Finally, fold up along the crease, and your ghost is complete.
Rainbow Ghost Lantern

Recommended for anyone who wants to make a cute ghost lantern! First, open a clear plastic file and apply glue in the shape of a ghost outline.
Once the glue dries, fill the inside of the glued outline with slime in your favorite colors, placing it randomly.
After drying for a few days until it becomes crispy, peel it off the clear file and shape it into a ghost.
Next, take a round food container like the kind used for deli items, insert a light and thread through it, and combine it with the ghost.
Finally, stick on facial features made from round stickers or construction paper, and you’re done! Try hanging it up as a decoration.
ghost mop
A ghostly yarn mop that looks like a witch’s broom.
Make it by attaching bundled yarn to a chopstick wrapped with masking tape.
To create the yarn bundle, wind yarn around an empty milk carton or thick cardstock, then cut through the center—this gives you an easy bundle.
Add eyes to turn it into a Halloween mop, and you’re done.
Using yarn instead of plastic cord makes it soft and fluffy.
Use orange yarn for a jack-o’-lantern look.
It’s also great as a pretend-play cleaning toy for kids, not just for Halloween.
Monster Donuts
A Halloween-themed monster donut that combines a donut and a ghost.
Let’s make a ghost donut by attaching yarn and facial parts to donut-shaped construction paper.
Lots of kids love donuts, right? If it’s a craft of their favorite donut, they’ll probably feel excited while making it.
Besides construction paper, you could also use scrap cardboard, felt or fabric scraps from the dollar store.
Try making it using things you have around the house.
If you have children at home, you can also play pretend shop with the donuts you make.
Swirly Ghost made with Yarn and a Paper Carton
A swirly ghost made with yarn and a paper carton gives off a warm, cozy look.
Its tactile feel is part of the charm, too.
Adjust the size of the ghost you want to make using the paper carton and create the base.
Then wrap your choice of yarn around it from the top.
By wrapping more times, the ghost gains volume and turns into a plump, gentle-looking figure.
Mixing yarn colors or adding sparkly beads and shiny stickers is also recommended.
Finish by attaching eye stickers, and it’s complete.
Ghost hanging ornament

Speaking of Halloween, what comes to mind are cute ghosts like jack-o’-lanterns.
To enjoy Halloween even more, how about decorating your room with adorable ghost ornaments? They’re very easy to make.
Draw a ghost face on a paper cup and make a hole in the bottom of the cup.
Then, cut out jack-o’-lanterns, candies, and other treats from colored paper, attach strings to them, and hang them from the paper cup—that’s it! If you like, create a matching background as well to enhance the atmosphere even more.
Moving wobbly ghost
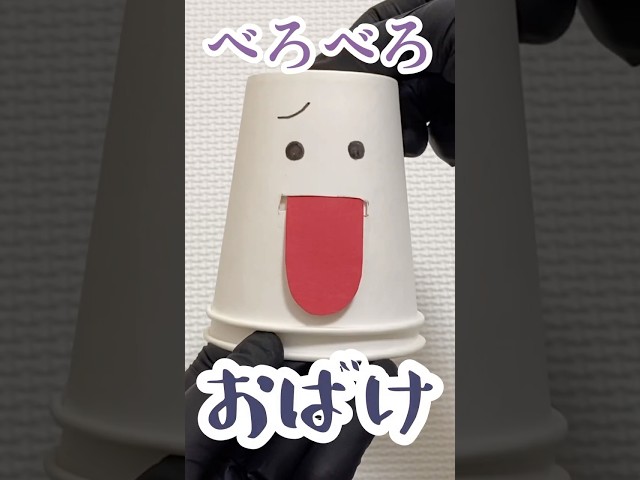
A cute little ghost whose tongue moves up and down and is totally addictive.
You can make it easily with everyday materials.
First, draw the ghost’s face on a paper cup and cut out the mouth with a craft knife.
Prepare some red construction paper, cut a strip slightly narrower than the mouth, and round off one end to make the tongue.
Take another paper cup, tape the tongue to it, and fold the tongue upward.
Place the cup with the cutout mouth over the top, then thread the tongue through the mouth, and you’re done.
When you raise and lower the cups, the ghost’s tongue moves up and down, giving it an adorably lifelike expression.