Older kindergarteners will be captivated! A collection of October origami ideas to enjoy autumn

October is a month when you can make all kinds of origami that capture the feeling of autumn.
Children in their final year of kindergarten have become more dexterous with their fingers and are ready to actively take on origami challenges.
Together with the kids, you can enjoy creating autumn-themed pieces like cute Halloween ghosts, fallen leaves, and acorns.
This time, we’ve gathered origami projects that let older kindergarteners experience the nature and events of autumn as they work.
With each child’s individuality shining through in their wonderful creations, your classroom is sure to come alive!
Captivating ideas for October origami to enjoy autumn: a collection that will fascinate older kindergarteners (1–10)
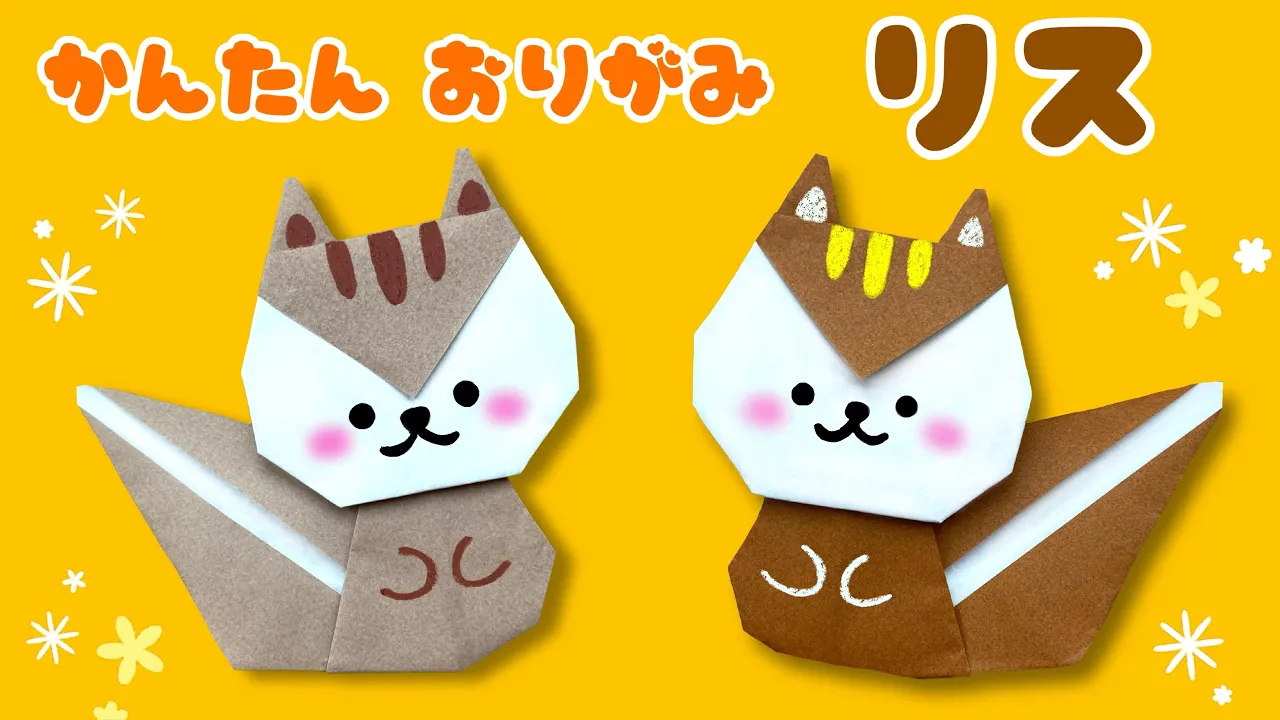
Easy and cute! How to fold a squirrel (origami)

After folding the first sheet of origami into a triangle to make a crease, open it up.
Place the paper so the crease runs vertically, then fold the bottom corner up about 5 cm.
Flip the paper over and fold the opposite corner down to meet the very bottom edge of the paper.
Turn the paper upside down, then fold the base to meet the center crease; it will form a heart shape.
Fold both sides of the two top corners inward to make the squirrel’s ears.
Fold the remaining corners inward to round them off, and the face is complete.
For the second sheet, also fold it into a triangle and open it.
Offset slightly from the crease, fold the two left edges inward.
On the right side, fold the two edges along the center crease.
Take the corner created on the right side and fold it up diagonally.
Flip the paper over, then fold the right corner of the square section up to meet the crease.
Finally, fold up the corner on the opposite side as well to complete the body.
Finish by drawing the face and patterns with a pen.
Origami fox to make in autumn
https://www.tiktok.com/@hoiku.labo/video/7293046496612650242Fold the first piece of origami into a triangle, then fold the left and right corners up to meet the top corner.
Fold the same parts back to create the fox’s ears, then flip the origami so top and bottom are reversed.
Fold the remaining top corner downward, turn the paper over, and make a step fold with the top layer of the bottom corner.
Tuck the remaining bottom layer to the back.
Fold in the left and right corners by about 5 mm to round them, and the face is complete.
For the body, use the second sheet and follow the same steps as the head up to folding the left and right corners to the top corner.
From there, fold back only the upper left corner to make the tail, then tuck in the remaining corners to shape the body.
Attach the head, draw the face, and you’re done.
Easy way to make mushrooms

Open the paper after folding it twice to make a square.
Fold the top two corners in so they meet at the center of the paper.
Turn the paper over, then fold the bottom edge up to meet the horizontal crease.
Turn the paper over again, and fold the left and right sides in to meet the vertical crease in the center.
Fold the bottom edge up to meet the top corner, then fold it back down at the point where the color changes, making a valley fold.
On the rectangular section, tuck the top left and right corners inward to make creases, open them, then squash-fold those sections into triangles while aligning both side edges with the center.
Finally, tuck the remaining corner inward and round the overall shape slightly—your mushroom is complete.
Saury Origami

Fold the rectangular origami in half lengthwise to make it long and narrow, crease well, then unfold.
Fold the top and bottom edges toward the center crease, leaving a small gap.
Fold the two left corners to the center crease, unfold them, then invert the corners along those creases and squash into triangles.
Turn the paper over, fold the left triangular edge to the center crease to make it narrower, then fold the lower right corner up diagonally to meet the top edge.
Fold it back along the first crease you made.
This will be the fish’s tail, so fold the other side as well and adjust the shape.
Fold the origami along the center creases, draw eyes on the face with a pen, and you’re done.
Origami bat

Fold the origami paper twice to make a small triangle, then make a slit under the top corner, parallel to the base.
Make the slit from the side opposite the fold, being careful not to cut it off.
The upper triangular section you slit will become the bat’s head, and the lower part will be the wings.
Open the paper back into the large triangle, and fold the slit section toward the central crease to form the head shape.
Fold the same parts back to create the bat’s distinctive ears.
Use a zigzag (mountain–valley) fold for the junction between the head and body.
Finally, fold the remaining wings several times to add creases and give it a three-dimensional finish, and you’re done.
Perfect for Halloween! Ghost origami

After folding the origami into a triangle, open it, then fold the two left edges in to meet the crease.
Rotate the paper so that the newly formed point is at the bottom, and open the two opposing corners along the crease outward into triangles.
Fold the upper left and right edges in to meet the crease, then fold the top point down to the base of the triangle.
Slightly tuck the two top corners inward, then fold the bottom corner up to the left diagonally.
Unfold to set the crease, then fold the left edge of the triangle beneath the crease in to meet the crease.
Finally, fold up along the crease, and your ghost is complete.
Cute when lined up! Owls

After folding the origami in half into a triangle twice to make creases, open it up and fold the bottom corner up to align with the center.
Then, fold the bottom edge up along the horizontal crease to form a triangle.
Fold the top corner down to the point where the color changes, and turn the paper over.
Fold the left and right bottom edges toward the vertical center crease, then fold the two top edges so they align just slightly outside the center line.
Fold the two top corners down, and fold the tip up so it sticks out slightly at the top.
Finally, fold the bottom corner up, draw patterns and a face with a pen, and you’re done.