[For Elementary School Kids] Handmade Toy Craft Ideas

There are plenty of opportunities to make handmade toys, like indoor play items or independent research projects.
Some of you might be thinking, “Isn’t there a toy I can make with things I already have at home?”
In this article, we’ve compiled a bunch of handmade toy ideas for elementary school children.
These are not only fun to make, but also fun to play with once they’re finished.
It’s also great to incorporate your favorite characters or designs when making them.
Be sure to check out these handmade toy ideas that you can enjoy with family and friends.
- Simple yet amazing crafts: craft ideas that elementary school students will want to make
- Handmade games: DIY craft ideas you can make and play
- Paper cup crafts that elementary school kids will love! A collection of fun project ideas
- [Indoor Activities] A Collection of Craft Ideas Recommended for Elementary School Students
- [Let’s Make and Play!] Handmade Toy Ideas You Can Create Yourself
- DIY science projects that elementary school boys will love: ideas you can make with everyday materials
- Made of paper! A fun collection of DIY toy ideas you can play with
- Let's make toys with paper cups! Simple and fun handmade toys
- Let's make toys with straws! Easy and fun DIY toys
- For summer vacation homework! Simple and amazing crafts for elementary school students that you’ll want to make after seeing them
- Make It with Pipe Cleaners! A Collection of Simple, Fun, and Playable Toy Ideas
- Fun for Kids! A Collection of DIY Musical Instrument Ideas Using Everyday Materials
- [For Kids] Today’s Handmade Craft Ideas
[For Elementary School Students] Handmade Toy Making Ideas (161–170)
Scrap-wood Archery

Make and play with everyday materials! Here are some ideas for upcycled archery.
You’ll need: a paper tube, an awl, a straw, rubber bands, paper cups, tissue paper, and scissors.
First, use the awl to make a hole in the paper tube.
Cut off the accordion part of the straw, then ball up some tissue paper and attach it to the tip.
Cut a notch at the back of the straw where you can hook a rubber band, and you’re done! Stack paper cups to make a target.
Insert the straw into the hole in the paper tube, hook the rubber band, and launch.
Try experimenting with different ways to shoot!
Tree-climbing little monkey

Play with full enthusiasm! Here’s a fun idea for a climbing monkey craft.
You’ll need a paper cup, straws, scissors, a picture/illustration, glue or double-sided tape, and kite string.
First, cut out the bottom of the paper cup.
Prepare two straws cut to 5 cm each, attach them parallel to each other on the inside of the cup, and thread the kite string through them.
Once you stick the illustration onto the cup, it’s done! When you pull the kite string alternately, the monkey appears to climb—it’s a delightful idea.
Give it a try!
[For Elementary School Students] Handmade Toy Craft Ideas (171–180)
Pinwheel hat made from a milk carton

A windmill attached to a hat! Here’s an idea for a windmill hat made from a milk carton.
You’ll need a milk carton, scissors, a bamboo skewer, duct tape, and a straw.
Wear the hat made from the milk carton and run—the windmill’s propeller will spin.
It’s a unique idea, perfect for kids who love running and being active.
It’s also fun to customize the design by drawing illustrations of cats, dogs, or monkeys.
Give it a try and have fun making and playing with it!
paper plate

This is a hand-spun top you can easily make by combining a paper plate and plastic bottle caps.
Lightly fold the paper plate in half to create a crease, then use the intersection of the creases as a guide to find the exact center.
Next, attach a plastic bottle cap to both the top and bottom of the plate at the center, and you’re done.
After that, decorate it however you like.
Since changing the weight will affect how it spins, it’s best to add decorations like pen-drawn patterns rather than heavy items.
Try experimenting with different hand and finger movements to see how they change the way it spins.
You can enjoy matching pictures too! A plastic bottle toy
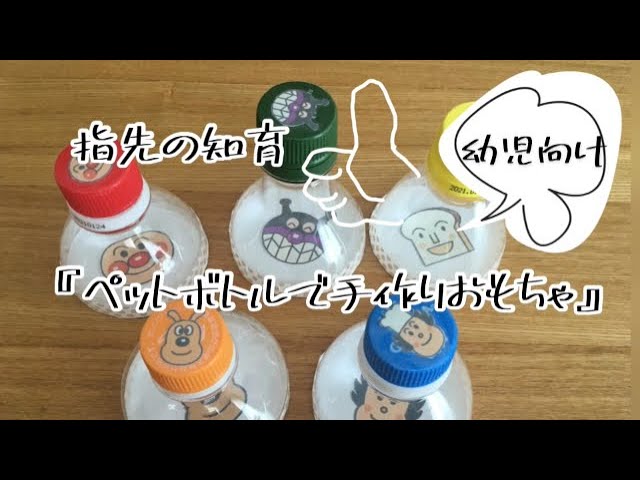
Here’s an idea for a PET bottle toy that’s perfect for educational play.
First, prepare several plastic bottles.
Next, cut each bottle at about one-third from the top.
Then, insert a piece of thick paper with a character drawn on it into the open section.
Finally, stick a sticker of the same character on the bottle cap, and it’s complete.
Kids can enjoy opening and closing the caps and matching the character designs.
Using caps in different colors makes it look colorful and extra cute.
Automatic-firing chopstick gun

Why not try making a unique chopstick rubber band gun with an automatic launcher? When you turn on the power, the screw part rotates, causing the hooked rubber band to move upward and eventually slip off and fire—it’s a simple mechanism.
Kids who are interested in how batteries and motors work, or who are good at assembling plastic models, will likely be eager to take on building a chopstick rubber band gun with this kind of mechanism.
If they first understand the simple construction and how the rubber band is launched, they’ll probably enjoy each step of the process even more.
Pitfall Game

Let’s make a simple pitfall game you can enjoy using an empty tissue box.
Mark both ends of the box, cut them, then tape them back together to restore the original box shape.
Draw circles on the surface of the box and cut holes with scissors.
These holes become pitfalls, and the key to the game is to carefully maneuver so the marble doesn’t fall in.
If you set a rule to cover the marble with a case and move it from start to goal, it becomes a simple yet deep game.
The fine hand movements help train finger dexterity, and you can also expect benefits for concentration and decision-making.
By adjusting the crafting method, you can tune the difficulty, making it a game with a wide range of enjoyable ideas.