For summer vacation homework! Simple and amazing crafts for elementary school students that you’ll want to make after seeing them


A fun summer vacation homework project for kids: crafts! But as children move into the upper grades, they can run out of ideas and worry about making something that doesn’t end up being the same as their friends’.
So here, we’re introducing craft ideas recommended for elementary school students from lower to upper grades.
Many use materials you already have at home or can buy at a 100-yen shop, so they’re easy to try.
The ideas are designed to help kids discover their own unique projects and express their creativity.
Use these as a reference and make some wonderful summer vacation memories!
- Simple yet amazing crafts: craft ideas that elementary school students will want to make
- Elementary School Students: Simple One-Day Science Project and Craft Ideas
- Simple but awesome! Craft ideas for upper-grade girls
- Recommended for elementary school students! Science fair topics & craft ideas
- DIY science projects that elementary school boys will love: ideas you can make with everyday materials
- For upper-grade boys! Simple yet awesome craft project [Don’t call it lazy]
- Paper cup crafts that elementary school kids will love! A collection of fun project ideas
- Fun crafts using straws
- Toys you can make from cardboard crafts! Authentic ideas you can build and play with
- Simple and cute summer project crafts! A collection of ideas for girls that will make you want to create
- Crafts parents and kids can enjoy together. Recommended craft ideas to keep children entertained.
- [For Adults] Simple yet Impressive Crafts: A Stylish, Eye-Catching Collection
- Craft ideas using plastic bottle caps [for boys]
[For Summer Vacation Homework!] Simple and Amazing Crafts for Elementary School Students That You'll Want to Make When You See Them (141–150)
stone art

Let’s make stone art using materials close at hand, like those from rivers and parks.
Start by collecting stones and twigs.
Choosing stones without sharp edges will help you create cute pieces.
Also, selecting twigs with branches is a key tip for making a lovely work.
Arrange the stones and twigs you found on a frame or cork board, which you can also buy at a 100-yen shop.
As children think, design, and create on their own, it boosts their imagination.
You can paint the pieces, and it’s also nice to add pinecones, leaves, and other items besides stones and twigs.
Animal clay

This craft involves dividing paper clay into parts, then assembling them, painting them, and finishing them in the shape of an animal.
First, check what combination of shapes makes up the animal you want to create, and make parts that match the appropriate sizes and shapes.
After that, attach the parts, refine the overall form, and add colors and patterns to complete it.
If you use a paper plate as a base and attach the pieces onto it, it will look like a three-dimensional picture—highly recommended, too.
Mini violin made of clay

There are many kinds of musical instruments with different shapes, and those differences heighten our expectations about what kinds of sounds they can produce.
Focusing on the shapes of instruments, this activity has you use paper clay to make a violin shape.
A real violin has a unique form made by combining pieces of wood, so let’s carefully reproduce the details, such as the indented areas.
Once the overall shape is refined, paint it and attach separate parts like the strings to finish it as a realistic-looking violin.
Let’s make a tomato with paper clay

Let’s make one of the classic vegetables—tomatoes—using paper clay.
Knead red paint into the paper clay, shape it into a ball, then stick it onto a stand with a wire post.
Paint it further in red, and layer yellow at the top center to capture a tomato’s coloring.
Knead green paint into another piece of paper clay to make the calyx, attach it to the red fruit, and adjust the size and shape.
Add green coloring, and finally paint the stand to finish.
Mounting the tomato on a stand makes it easier to paint and to submit as a finished piece.
Snowflakes made of yarn
@hoikushisatomi [From around age 4] Snowflakes with yarnNursery teacher / Childcare workerKids will love it#NurseryTeacherDailyLifeHand gamesworkTranslation#NurseryTeacherThingsKnitting yarn#YarnPlay
♬ Stylish cafe-style BGM – Hiro Hattori
After cutting three disposable chopsticks short, use two of them to make an X shape, then place it over the remaining stick set vertically and secure them with yarn.
Next, wrap more yarn around them to create a snowflake.
When wrapping, go one stick at a time: loop the yarn once around a stick, then move on to the next chopstick.
The yarn doesn’t have to be the same color—switching to a different yarn partway through creates a pretty pattern.
You’ll get a variety of snowflakes depending on how many wraps you make and the types of yarn you use, so try making several kinds.
How to Make an Easy Guitar

A simple guitar you can make with paper cups lets you easily live out the dream of strumming a ringing guitar.
First, glue the bottoms of two paper cups together.
Then stack another paper cup on each side with slits cut into them, and attach rubber bands into those slits—done.
The key here is the length of the rubber bands.
By choosing which slit to anchor them in and lining up rubber bands of different lengths, you can create differences in sound just like a real guitar.
Think about what kind of sound will make it feel cool, and fine-tune it into your ideal guitar.
For demon-slaying only! Bean-throwing rubber band gun
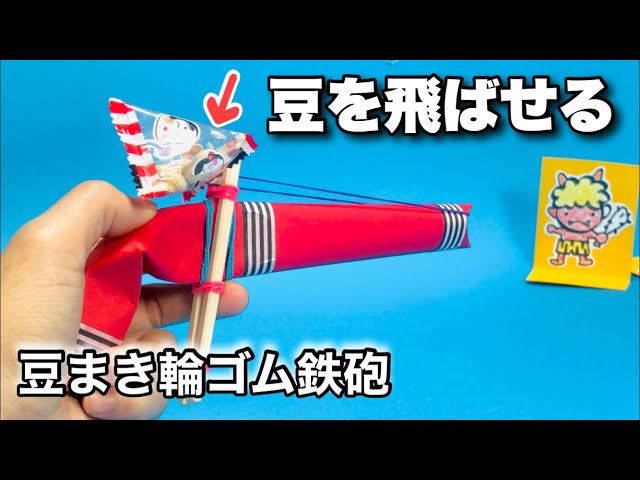
Oni-busting only! Here’s how to make a bean-throwing rubber band popper.
Prepare chopsticks, roasted soybeans (fukumame), construction paper, tape, scissors, and rubber bands.
Roll the construction paper into a tube, then secure the tube with rubber bands by clamping it between a pair of chopsticks folded in half.
The key is to wrap the rubber bands tightly so they don’t loosen.
Be careful not to cut your hand on the ends of the chopsticks.
When launching, dent the tip of the paper tube, hook on a rubber band, set it, and play.
When playing, don’t aim at people and make sure to play safely.