Simple origami that can be folded from a single sheet

Origami is a type of recreation that people of all ages—from young children to seniors—can enjoy together, and it’s fun whether you’re in a group or on your own.
You may not remember the very first origami you folded as a child, but in this article we’ll introduce ideas that are easy to fold and can be made with just one sheet of paper.
No cutting or gluing needed—these are all simple designs that you can complete with a single sheet of origami paper.
They’re perfect for kids trying origami for the first time, and also great as a warm-up for anyone who hasn’t folded in a while!
- Children’s Origami: Easy Single-Sheet Flower Ideas
- Kids will love it! Easy origami ideas—great as gifts too!
- [Origami] She’ll love it if you fold these! Simple ideas for girls
- Cool origami that boys will love and want to fold
- Popular characters that are easy to make with origami. A collection of creations you can enjoy with children.
- Origami ideas boys will want to make!
- Cute Origami Ideas for Girls
- [For Kids] Let's Fold! Today's Origami Idea Collection
- Easy flower craft ideas you can make with a single sheet of origami paper
- Cute origami ideas
- Let's make it with origami! Ideas for simple 3D creations
- [Origami] Have fun with kids! A collection of easy snowman origami ideas
- [Recreation] Summary of Recommended Origami Ideas for Seniors
Simple One-Sheet Origami (91–100)
Love Cats Pocket
If you’ve been thinking, “I wish there were a simple heart-shaped origami to hold Valentine’s chocolates…,” this is the one for you.
First, place the origami paper front side up with one edge facing you.
Fold it in half, then fold the left and right edges to meet at the center.
Fold the two corners on the closed side up toward the center and open them back up.
Use the creases to make mountain and valley folds to set the lines.
Open it up and fold in sequence so it forms a heart shape.
Next, fold the white section down.
The bottom edge will become the ears, so fold diagonally with that in mind.
Do the same on both sides.
Fold the top up and the cat is complete! If the chocolate is thin, you can tuck it into the pocket, so this is recommended.
How to fold a long, slender heart
A long, slender heart you can enjoy making with kids.
Fold 5 times to form the heart shape, then fold 4 more times to round it out.
First, fold the origami paper into a triangle.
Flip the triangle upside down, reposition the paper, and fold the left and right edges to meet the center crease.
Next, turn the paper over and fold the protruding tip into a small triangle.
After that, tuck in the top and the left and right corners slightly to finish! If you fold it 3 more times, you can turn it into a regular rounded heart, so shape it into the style you like.
Simple One-Sheet Origami (101–110)
How to fold a winged heart
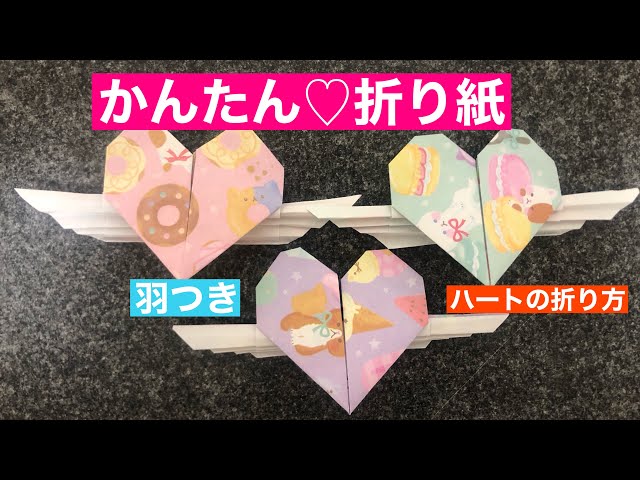
A simple heart with wings design boosts the cuteness and playfulness in no time! First, fold the paper in half twice to make creases.
Fold the near edge up to the center.
Flip it over, fold the left and right edges to the center, then fold the near edge like making a boat, pressing in fine folds to set the lines.
Open it and continue folding in an accordion style.
Next, fold both bottom corners up into triangles.
Shape the corners into a heart, and your winged heart is complete! By changing the angle and size of the wings, the look changes, so you can enjoy creating your own original design.
Foldable with a single sheet! How to fold a round tube

The bottom is octagonal, but viewed from directly above, it’s a cute box with a perfectly round rim.
First, place the color you want on the sides of the box on the back, and the color you want on the inside and rim on the front.
After folding the paper into thirds, fold the outer edge inward to align with the inner crease.
Repeat the same fold for the other three sides.
Make creases by folding in half vertically and horizontally.
Once you’ve added the finer creases, open it up and, using those creases as guides, fold all sides from the edges so the paper takes the shape of a box.
Finally, round the areas where two layers overlap firmly, and you’re done! Since the rim shows the front side of the paper, using double-sided origami will give the box an even more stylish look.
How to fold a two-color heart
Let’s make a larger heart that can be displayed on a wall using two colors of origami paper! First, align the top and bottom edges of the paper and make a crease mark by pressing only the left edge.
Unfold the paper, then fold the bottom edge up to meet the mark and make another crease in the same way.
Next, fold the top edge down to align with the second mark you made.
Fold both sheets the same way, and on just one of them, fold the left corner up to meet the crease made by folding the top edge.
Stack and combine the two sheets, then fold the corners to shape the heart.
Rose Heart

An unbelievably high-quality rose heart made from a single sheet of origami! Not only can you see the petal pattern, but it also forms a three-dimensional shape that rises toward the center—this is the key feature of this method.
Because you shape it starting from a grid of fine creases both vertically and horizontally, the difficulty is a bit high.
However, many who’ve tried it say the sense of accomplishment is incredible! For those who enjoy detailed work and crafts, it’s a project well worth the challenge.
Give it a try!
ornament ball

Let’s make a striking ornament using a single sheet of origami paper.
First, fold the paper in half by bringing the top and bottom edges together.
Open it, then fold the top and bottom edges to meet the center crease.
Fold once more along the new outer lines to reinforce the creases.
Rotate the paper 90 degrees and repeat the same process to create three creases; do not make the final crease.
Turn the paper over, and fold both the top and bottom so that the outer creases line up with the center crease.
Rotate the paper 90 degrees and flip it to the front, then fold up the bottom edge along the outer crease.
Flatten the pocketed section into a triangle, bring only the square section forward, and fold both corners of the square—and both corners of the origami—into triangles to form the pattern.
Repeat the same steps on the other side.
Turn the paper over, make a “cushion fold” (zabuton fold), and round off the corners to finish.
Glue down the patterned sections so they don’t lift.