Recommended for elementary school students! Science fair topics & craft ideas


Speaking of summer vacation, choosing a topic for the independent research project can often be tough.
Science experiments and crafts are both fun! If your child is good at crafts, we recommend crafts because they can enjoy the process as they go.
When they get absorbed in it, they might even finish in just a few days.
Here, we’ll introduce a variety of ideas for independent research and crafts! If you’re struggling to pick a theme, please use these as a reference.
To create fun summer memories, make a one-of-a-kind project of your own!
- For summer vacation homework! Simple and amazing crafts for elementary school students that you’ll want to make after seeing them
- Simple yet amazing crafts: craft ideas that elementary school students will want to make
- Elementary School Students: Simple One-Day Science Project and Craft Ideas
- DIY science projects that elementary school boys will love: ideas you can make with everyday materials
- [For Upper Elementary Students] Simple but Awesome! A Collection of Summer Vacation Craft Ideas
- For upper-grade boys! Simple yet awesome craft project [Don’t call it lazy]
- Fun crafts using straws
- Recommended for lower elementary school students! A collection of plastic bottle craft ideas made with everyday materials.
- Simple and cute summer project crafts! A collection of ideas for girls that will make you want to create
- [Middle School Students] Easy One-Day Science Projects and Crafts Ideas
- Toys you can make from cardboard crafts! Authentic ideas you can build and play with
- Simple but awesome! Craft ideas for upper-grade girls
- Crafts parents and kids can enjoy together. Recommended craft ideas to keep children entertained.
For upper grades (61–70)
Observation of cicada eclosion

When you think of summer, you think of cicadas.
You can see them everywhere in the summer, but the way they are born and become adults is full of the mysteries of life, making them a wonderful subject to observe.
The moment they emerge from the nymph into an adult is especially remarkable.
They basically molt in the early morning, so it’s hard to witness it in everyday life.
I was a bug-catching kid myself, and seeing it back then moved me deeply.
How about observing them with your family during summer vacation?
Vocal vibration patterns

Voices have unique voiceprints, allowing individuals to be identified by their voice, and the vibrations of the voice also change depending on pitch and volume.
This experiment observes those changes using salt.
Comparing different people’s voices and volumes could make for an interesting report.
Let’s observe the types of clouds
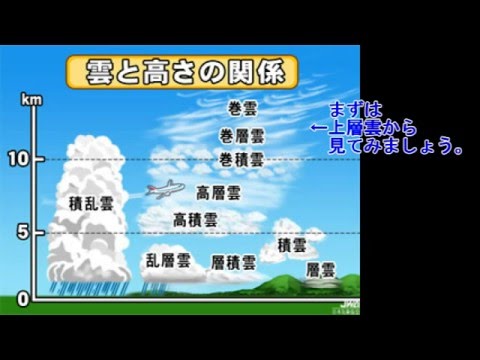
When you look up at the sky, you’ll see clouds floating gently.
If you look closely, they come in many different shapes, and each one has its own name.
Let’s observe what kinds of clouds appear in the sky and explore how those clouds relate to the weather, temperature, humidity, and more.
Remaking a 100-yen shop clock
https://www.tiktok.com/@nantomokuzai/video/7265645972984827143The part you can see from the back of a table clock or wall clock—the section with the battery compartment and the knob for setting the time—is called the movement.
You could say it’s the heart of the clock.
In fact, clock movements are sold on their own at 100-yen shops and home improvement stores, and you can use them to make your own original clock! If you’re good at woodworking, try starting from scratch by buying a wooden board and cutting a groove to fit the movement.
If that’s not your strong suit, there are also assembly kits with pre-cut grooves available, so you can use those instead.
Fizzy Ramune Experiment

Why not try making fizzy ramune tablets for your summer break science project and enjoy their colors and sounds when dropped into water? After thoroughly mixing ingredients like powdered sugar, cornstarch, and food-grade citric acid, add food coloring to make them visually fun.
Press the mixed dough with two spoons to shape it just right.
Let them dry for about half a day to finish the ramune.
When eaten, they fizz in your mouth, letting you experience the curious chemical reaction of carbonation.
It’s a safe project even for children, using the carbon dioxide produced by the reaction between lemon juice’s acid and baking soda.
You can boost originality by changing the colors and flavors.
It’s a great idea for learning chemistry with familiar materials.
Let’s learn about sugar crystallization while making canelés.

Let’s make an experimental piece using a canelé mold for sweets.
Put powdered gelatin into a container filled with water and heat it in the microwave.
After heating, add sugar, color it with edible food coloring, and heat it in the microwave again.
Pour it into the canelé mold, and once it sets, remove it from the mold.
Your beautiful, colorful sugar canelés are ready.
At first, they look jiggly, but after a week, the sugar crystallizes and they turn into sparkly, crystal-like pieces.
You can enjoy watching the sugar change over time.
Experiment where ham melts with kiwi

Here’s a curious and fun science project using kiwifruit and ham.
Get your materials ready: kiwifruit, ham, paper, and felt-tip pens.
Place a sliced kiwifruit on top of a halved piece of ham.
By timing this setup, you can find out how many minutes it takes for the ham to start breaking down.
If you photograph the changes over time, your project will gain more depth.
You might discover something new by comparing heated kiwifruit with unheated kiwifruit.
Write down the purpose of the experiment and your results to complete your summer science project.