[For Elementary School Kids] Craft Ideas Using Tissue Boxes

When you think about doing crafts with things you have at home, what materials come to mind?Plastic bottles, food trays, and toilet paper rolls are some obvious examples.And an empty tissue box is likely another candidate.In this article, we’ll share craft ideas that use tissue boxes!From fun, decorative art projects to practical creations you can keep using long after you finish.These are great for independent research projects or school recreation time!
- Let's make a handmade tissue case: a collection of stylish and easy ideas
- For summer vacation homework! Simple and amazing crafts for elementary school students that you’ll want to make after seeing them
- [For Girls] Make It with Everyday Items! Easy but Super Cute Craft Ideas
- [For Kids] Today’s Handmade Craft Ideas
- Fun for elementary school kids! A collection of craft ideas using plastic bottle caps!
- Simple yet amazing crafts: craft ideas that elementary school students will want to make
- Kids get hooked on crafts with toilet paper rolls! Idea collection for elementary school students
- Adults will be hooked! A collection of craft ideas using toilet paper rolls
- Handmade games: DIY craft ideas you can make and play
- Stylish plastic bottle crafts. Packed with surprising ideas!
- DIY science projects that elementary school boys will love: ideas you can make with everyday materials
- Recommended for lower elementary school students! A collection of plastic bottle craft ideas made with everyday materials.
- [For Upper Elementary Students] Simple but Awesome! A Collection of Summer Vacation Craft Ideas
[For Elementary School Students] Craft Ideas Using Tissue Boxes (11–20)
Small storage box with a lid

It’s handy to have a small container for little items like snacks or stamps, isn’t it? The ones sold at variety stores are nice, but you can make one with things you have at home.
Prepare an empty tissue box.
Take the box apart and cut it so you get a rectangle.
Fold it to create eight equal sections, and you’ll end up with an octagonal piece.
Cut the lid into an octagon as well, add some padding, and cover it with fabric.
Using double-sided fabric tape makes it easy.
Attach fabric to the sides of the box body, and you’re done.
Try changing the fabric pattern to make the box cute or give it a chic look—have fun customizing it!
Guitar

Here’s an idea for making a guitar that lets you get into character as a guitarist and have fun.
The concept is to recreate a guitar by combining an empty tissue box with rubber bands.
However, instead of just stretching rubber bands over the box as-is, add some creative touches to make it look more like a real guitar.
For example, you can make the body as a separate piece and layer it on, or stick on hairpins to resemble controls.
There are no strict rules—feel free to approach it however you like.
pendulum clock

How about making a pendulum clock out of a tissue box? All you need is one tissue box, construction paper, cardboard, a bamboo skewer, and two buttons.
First, remove the plastic film from the box.
Decorate the surface by gluing on construction paper.
Then make a slit on the side large enough for the cardboard to pass through.
Put double-sided tape on the end of the cardboard and attach a button.
Thread the cardboard through the hole in the box, then make a hole on the opposite side and insert the bamboo skewer.
Now the pendulum part is complete.
Cut a circle out of construction paper, write the numbers on it, and make the clock face.
Glue the face onto the box, and finish by attaching a paper bird above the pendulum.
The gently swinging pendulum will look just like the real thing.
basket
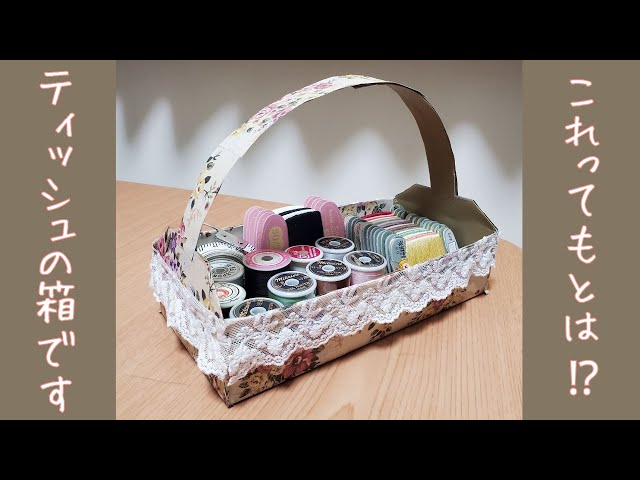
Putting sandwiches in a hand-woven basket and heading out—it’s the kind of scene you might find in Anne of Green Gables, isn’t it? Baskets still feel a bit unfamiliar to many in Japan, but why not try making one out of tissue boxes? A single box is too small, so let’s combine four tissue boxes.
Put the four together to make one large box, and use the leftover paper to add a handle—that’s the basic idea.
Then decorate it however you like with lace or fabric scraps.
It could be great for a summer vacation project, too!
gift box

With just a little extra effort, an empty tissue box can be transformed into an adorable gift box.
All you need are a tissue box, your favorite beads, and two kinds of construction paper.
Draw guide lines on the tissue box, cut along them with scissors, and make creases.
Then simply fold along the guide lines to create a box that opens and closes.
Attach your chosen construction paper and decorate with beads, and it’s ready in no time.
Since it can be made easily with everyday materials, it’s great for use in elderly care facilities as a fine motor skills activity.
organizer box

Glasses, remote controls, pens, notepads—leave them where you used them and your table turns into a mess… sound familiar? If tidying up is a hassle and you think, “I’ll need it again soon anyway,” here’s an organizer box for you.
All you need is a single tissue box.
It’s easy to make: draw a line at the halfway point of the box, cut along the line on every side except the back, then fold it and secure it with double-sided tape.
That’s it—you’ve got a simple organizer that will tidy up your tabletop.
If you decorate it with origami paper or stickers to your taste, you might grow even more attached to it.
[For Elementary School Students] Craft Ideas Using Tissue Boxes (21–30)
A round box with a lid

A small storage box can also serve as interior decor when placed in your room.
Let’s try making a round lidded trinket box using a tissue box.
Cut the tissue box into long rectangles or circles and assemble the pieces.
Once finished, the tissue box’s pattern will become a lovely design on the box.
For this project, tissue boxes with decorative designs are recommended.
It also looks great if you attach fabric to the sides of the box.
Thinking about what to put inside and where to place it will be an enjoyable part of the process, too.