For upper-grade boys! Simple yet awesome craft project [Don’t call it lazy]


I want to make something for my summer break craft project that makes people say “Wow!” but I’d like to avoid anything too difficult.
Great news for upper-elementary school boys! In this article, we introduce intriguing craft projects with clever mechanisms you can build using everyday materials.
Even creations that look complex—like a fountain where water seems to flow upward or a spinning top that floats in midair—are actually surprisingly easy to make.
Once you finish, you can submit your project with an explanation of how it works and use it as a science project, too.
Go ahead and try these fun crafts that apply principles of physics!
- For summer vacation homework! Simple and amazing crafts for elementary school students that you’ll want to make after seeing them
- [For Upper Elementary Students] Simple but Awesome! A Collection of Summer Vacation Craft Ideas
- Craft ideas using plastic bottle caps [for boys]
- Simple yet amazing crafts: craft ideas that elementary school students will want to make
- DIY science projects that elementary school boys will love: ideas you can make with everyday materials
- [For Adults] Simple yet Impressive Crafts: A Stylish, Eye-Catching Collection
- Elementary School Students: Simple One-Day Science Project and Craft Ideas
- Recommended for upper elementary grades! Exciting indoor recreation and games
- Elementary school kids will be hooked! A collection of fun craft ideas using disposable chopsticks
- Adults will be hooked! A collection of craft ideas using toilet paper rolls
- [Middle School Students] Easy One-Day Science Projects and Crafts Ideas
- Recommended for high school students! A collection of easy one-day science project ideas
- [For Upper Grades] Simple Magic Tricks for Elementary School Students: Astonishing and Impressive Magic
Crafts to learn how things work (51–60)
How to Make an Easy Guitar

A simple guitar you can make with paper cups lets you easily live out the dream of strumming a ringing guitar.
First, glue the bottoms of two paper cups together.
Then stack another paper cup on each side with slits cut into them, and attach rubber bands into those slits—done.
The key here is the length of the rubber bands.
By choosing which slit to anchor them in and lining up rubber bands of different lengths, you can create differences in sound just like a real guitar.
Think about what kind of sound will make it feel cool, and fine-tune it into your ideal guitar.
For demon-slaying only! Bean-throwing rubber band gun
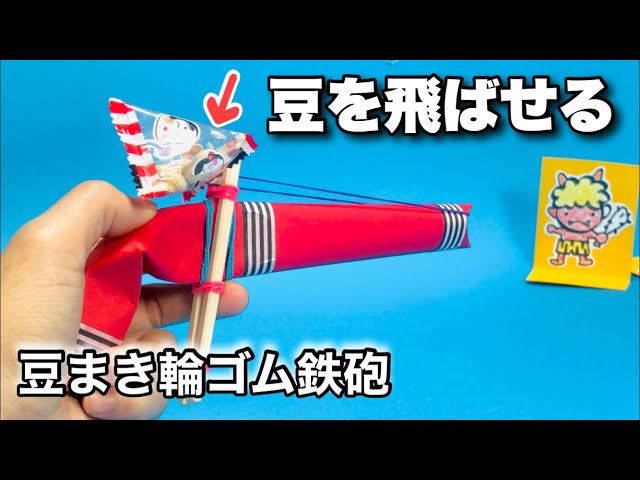
Oni-busting only! Here’s how to make a bean-throwing rubber band popper.
Prepare chopsticks, roasted soybeans (fukumame), construction paper, tape, scissors, and rubber bands.
Roll the construction paper into a tube, then secure the tube with rubber bands by clamping it between a pair of chopsticks folded in half.
The key is to wrap the rubber bands tightly so they don’t loosen.
Be careful not to cut your hand on the ends of the chopsticks.
When launching, dent the tip of the paper tube, hook on a rubber band, set it, and play.
When playing, don’t aim at people and make sure to play safely.
A beanbag-toss game using ping-pong balls

Here’s a fun and engaging game using ping-pong balls: a ball-toss challenge.
Gather chopsticks, clothespins, tape, and paper cups to make it.
When building the launcher, be mindful of the angle as you fix the chopsticks in place with tape.
Secure them firmly with tape and test to make sure it works properly as you build.
Attach a pair of plastic bottle caps to the back end of the chopsticks, and it’s complete.
You can decorate it however you like.
Stick paper cups on the wall to create goals, then try shooting from the launcher and have fun playing!
Let’s explore the secrets of sound
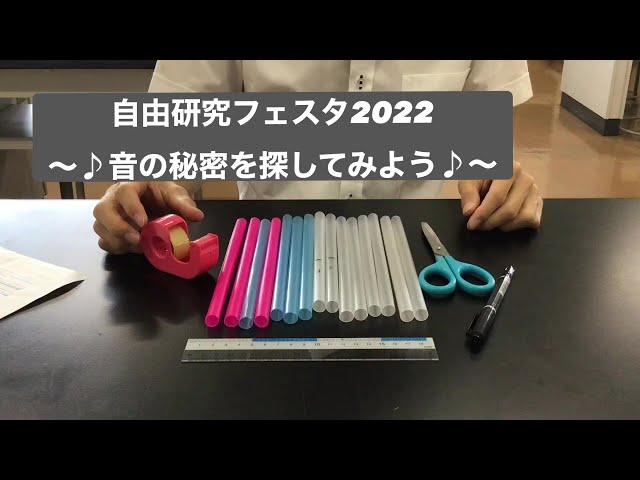
Here’s an idea for a flute you can make just by connecting straws.
Prepare straws that are all the same thickness and length.
You’ll need 8 straws for the mouthpiece, and since you’ll place spacer straws between them, prepare an additional 7, for a total of 15.
Cut the spacer straws to 5 cm.
The straws that become the flute pipes will vary in length depending on the pitch, so be sure to measure their lengths carefully with a ruler.
After cutting, seal one end of each straw with tape to make it a closed pipe.
Once everything is connected and glued together, it’s done.
Try experimenting with different lengths to see what sounds they make.
Crafts to learn how things work (61–70)
Lots of soap bubbles with DIY
@sachimama_asobi How about going all out with bubble play this summer? 🫧 Regular bubbles are fun, but since it’s summer, if you’re thinking, “I want to play with a huge amount of bubbles!” give this a try—it's super easy to make! You’ll need: 8–9 straws, a 500 ml plastic bottle, double-sided tape, chopsticks, and bubble solution. You’ll also use a utility knife, scissors, and glue, so if small children are helping, please work together with an adult. How to make it: 1) Cut the straws into pieces about 1.5 cm wide. 2) Line up the cut straw pieces on double-sided tape to make a strip about 50 cm long. (I used 8–9 straws to reach 50 cm.) 3) Stick another layer of double-sided tape on top of the lined-up straws. 4) Roll the straws into a circle. 5) Slice the plastic bottle into a ring. (Personally, I recommend the “I LOHAS” bottle—it’s soft and easy to cut.) 6) Insert the rolled straws into the bottle ring. (If there are gaps, add more straw pieces to adjust. If the double-sided tape around the straws holds them in place, that’s fine; if it’s loose, secure with glue.) 7) Use a utility knife or awl to make a hole in the edge of the bottle ring, insert a chopstick there, and secure it with glue. 8) Pour bubble solution into a shallow dish, dip, and blow! You’ll get way more bubbles than usual, and it’s super fun! 🥰 It’s really easy, so save this and give it a try! +———————————————+ I’m Sachi, a mom of three rambunctious boys (ages 7, 5, and 1). I share play ideas and simple crafts with kids using 100-yen items, natural materials, and recyclables. Feel free to like, follow, or DM! +———————————————+#AtHomePlay #AtHomePlaywork #Summer Craft Summer activitiesPlay with children#I love crafts Handmade Childcare sea Summer Straw Straw craftOrigamiSummer Flowers #Summer Seaplaying outside origami #origamiSoap bubbles Soap bubble#bubble#SoapbubbleSoap bubble play Summer activitiesPlastic bottle Plastic bottle crafts
♬ Utopia – imase
Let’s have fun making soap bubbles using short-cut straws! First, cut a long strip of double-sided tape and line up the straws, sticking them onto it.
Apply double-sided tape to the other side as well, then roll the straws up tightly from the edge into a spiral and secure it.
Glue on a ring cut from a plastic bottle to serve as a frame, and attach a stick as a handle to finish.
Dip it in bubble solution and blow.
Bubbles will come out from each straw, creating a beautiful effect, and lots come out at once, so even small children can enjoy it.
Spinning piggy bank
https://www.tiktok.com/@silk_haru3mama/video/7514644804823682311Why not make a fun piggy bank where the coins spin as they go in? It’s a perfect idea for a summer vacation craft.
First, slice a milk carton into rings, press the corners to flatten the center space, and make four “blades” to form a propeller.
Decorate the edges with vinyl tape, and make two large propellers and four small ones in the same way.
Skewer a large propeller on a bamboo stick, then add two small propellers on each side to create a spinning mechanism.
Insert this into a clear tube, make a coin slot in the lid, put the lid on, and you’re done.
Easy Spinning Top Made from a Milk Carton
@silk_haru3mama Simple spinning top made from a milk cartonSummer Vacation CraftSummer Vacation Craft#HandmadeToys#HandmadeEducationalToy#Milk Carton Crafts#Milk carton#AtHomePlayworkSimple craftEducational toy#Summer Vacation
Fuzzy Navel – Conton Candy
Here’s an idea for making a spinning top you blow on using a milk carton.
First, cut the carton about 1.5 cm up from the bottom, then make slits at the four corners and open it up.
Next, rotating the carton in a consistent direction from each corner, cut along the edges of the bottom.
Leave about 1 cm uncut at the ends.
Bend the sections you just cut inward so they gather toward the center, and decorate with masking tape or stickers to finish.
If you blow straight down from above, it will spin around and around.