[For Upper Elementary Students] Simple but Awesome! A Collection of Summer Vacation Craft Ideas


Summer vacation crafts—especially for older elementary students—can feel like a dilemma: “Simple projects aren’t satisfying,” but “overly difficult ones are a problem,” too, right? The truth is, by getting creative with materials and tools, you can make projects that look and function like the real deal.
Here, we’re sharing craft ideas—like coin banks, motor-based projects, and food replicas—that will make your friends say, “Wow!” They’re simple to build, yet fun to use even after they’re finished.
Use these as inspiration and add your own twists to create an original masterpiece!
- For upper-grade boys! Simple yet awesome craft project [Don’t call it lazy]
- Simple but awesome! Craft ideas for upper-grade girls
- Simple yet amazing crafts: craft ideas that elementary school students will want to make
- For summer vacation homework! Simple and amazing crafts for elementary school students that you’ll want to make after seeing them
- Craft ideas using plastic bottle caps [for boys]
- Recommended for elementary school students! Science fair topics & craft ideas
- [Middle School Students] Easy One-Day Science Projects and Crafts Ideas
- DIY science projects that elementary school boys will love: ideas you can make with everyday materials
- Elementary School Students: Simple One-Day Science Project and Craft Ideas
- Toys you can make from cardboard crafts! Authentic ideas you can build and play with
- Simple and cute summer project crafts! A collection of ideas for girls that will make you want to create
- [For Kids] Today’s Handmade Craft Ideas
- [For Middle Grades] Simple Magic Tricks for Elementary School Students: Fun Magic Everyone Will Love!
[For upper elementary grades] Simple but amazing! A collection of summer vacation craft ideas (151–160)
Milk Carton Rolling Tower
@silk_haru3mama [Summer Vacation Craft/Independent Study] I made a rolling ball tower out of a milk carton 🌻#Summer VacationSummer Vacation Independent ResearchSummer Vacation Crafttranslation#HandmadeToysworkIndependent ResearchScrap Material CraftingSimple craft#AtHomePlay#craft
♬ Electro Swing Jazz – Retro, strange, mysterious(1137053) – Ponetto
Let’s reuse empty milk cartons to make a fun rolling tower where a ping-pong ball tumbles down! Cut the milk cartons and connect two of them to create a long cylindrical base.
Make holes and slits in paper plates, attach them in a stepped arrangement, and adjust the angles so the ball rolls smoothly through.
Add slits to the side of the cylinder so the ball won’t stop midway and will drop all the way to the bottom.
If you wrap the whole thing with a tube-shaped cover made from a clear file, the ball won’t fly out and it’s safer to play with.
A bonus is that kids can learn about gravity and incline through the speed of the rolling ball and the fun sounds it makes.
It’s an eco-friendly idea that uses recycled materials to create a moving, interactive project.
A piggy bank that helps you save while having fun

Let’s use Daiso’s 3-tier drawer case to make a fun, game-like piggy bank over summer break.
First, flip the second and third drawers upside down and reassemble them so the flat sides face the front.
Next, cut corrugated plastic (plastic cardboard) into any shapes you like and attach it to the outside of the drawers to create a design that looks great.
Inside, apply double-sided tape so coins pause partway and drop slowly as they travel down.
With a piggy bank you made yourself, saving money becomes fun and easier to turn into a habit.
It’s a unique, practical idea that can change your everyday life through creativity and ingenuity.
Key rack made from 100-yen shop materials

This is a key rack packed with ideas, made using photo frames.
Prepare three identical photo frames: two will form the body and one will be the lid.
Start by making the body.
First, cut a cork sheet to fit the inside dimensions of a photo frame, apply a decorative remake sheet, and attach it to the first frame.
Next, glue the second frame on top of the first.
That completes the body.
Then, use hinges to connect the third frame to the body as a lid.
Finish by attaching an arch latch.
By inserting aluminum pins into the cork sheet, you can hang your keys on them.
It’s a creative project that turns photo frames into a key rack.
Try painting it or adding your own touches to make it uniquely yours.
cool pen holder

Let me introduce a very handy and stylish pen holder.
Prepare a wooden box, wooden boards, an interior mesh frame, paint, a brush, glue, and sandpaper, and let’s get started.
Cut the wooden boards, paint them, and glue them together.
Glue on the interior mesh frame as well.
Once it’s dry, it’s complete.
This pen holder makes the contents easy to see and offers great ventilation—give it a try! Adding illustrations or decorations to give it a personal touch will make it even more wonderful.
Candy Magnet

Let’s make a magnet that looks like a candy with twisted ends.
The materials and steps are very simple, so it’s highly recommended.
First, prepare strong magnets from a 100-yen shop, a plastic bottle cap, and a fabric scrap with a pattern you like.
Start by gluing the magnet to the back of the bottle cap.
Next, cut the fabric scrap to 14 cm by 10 cm, then fold back and glue three sides, leaving just one of the short sides unfolded.
Once the glue is dry, wrap the bottle cap with the fabric and secure it with glue.
Finally, to create the candy shape, gather and stitch the fabric at both ends with thread.
You’re done! Try making lots in different colors and patterns.
Original T-shirts made with stencil printing

How about making your own T-shirt over summer vacation? We’ll use a technique called stenciling to create an original T-shirt.
You place a cutout of letters or illustrations on the fabric and paint over it with ink or other pigments.
Since you’ll wear the T-shirt, you’ll likely wash it too.
When stenciling on T-shirts or fabric, be sure to use fabric ink that won’t wash out.
While this can be a summer vacation homework project, it can also become a fun summer memory.
You might even make matching T-shirts for the whole family.
There are stencil T-shirt kits available online, so why not give them a try?
[Upper Elementary Students] Simple but Awesome! Summer Vacation Craft Ideas (161–170)
Let’s make a cardboard pochette
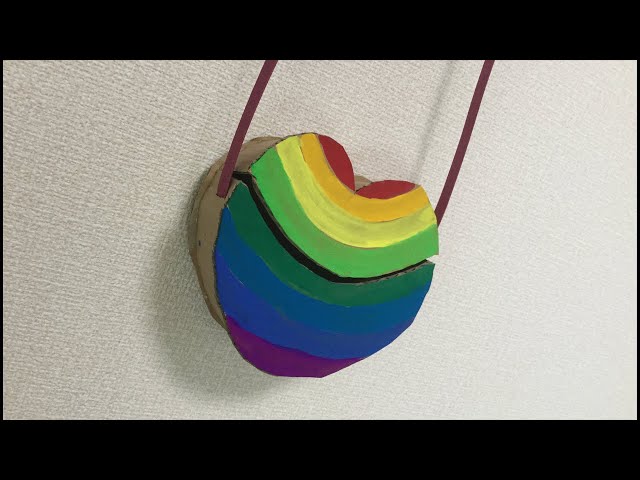
Here’s an introduction to making a pochette using cardboard.
Do you have cardboard boxes at home from parcel deliveries or from purchases at the supermarket? If you have some on hand, you can make a pochette simply by cutting it into shape, folding it, and assembling it.
Cardboard has lines where the inside is hollow.
The key is to keep those lines in mind when you cut.
If you want to create curves in your cardboard parts, cut across those lines.
Doing so will expand your creative possibilities.
Designing the pochette itself is sure to be an enjoyable time, too.