Origami Penguins for Ages 3 and Up: A Parent-Child Folding Guide


Here are some simple penguin origami projects you’ll want to try together with your three-year-old.
They’re all designed with easy steps so kids can enjoy making them.
Among them, the especially cute penguins with little flippers sticking out to the sides, and the round, chubby penguins will warm your heart just by looking at them.
You can paste the penguins you make onto construction paper with drawings of ice and the ocean, or display them as a parent-and-child set alongside smaller penguins.
There are lots of ways to enjoy them depending on your ideas.
Please use this as a reference and have fun!
- [Childcare] Cute Penguin Craft Ideas | Introduced by Age Group
- [Childcare] Recommended for 3-year-olds! Origami ideas with a winter theme
- [For 3-year-olds] Easy snowman origami (how to make)
- [For 3-year-olds] Easy-to-make origami rabbit ideas collection
- Simple origami for kids: cute, playable origami ideas
- For Age 3: Have Fun Making with Your Child! A Collection of Easy Dinosaur Origami Ideas
- [For Preschoolers] Let’s Make It Together with the Kids! Origami Ideas for February
- Perfect for first-timers! A collection of origami that’s super popular with kids as young as three!
- [For 3-year-olds] Let’s make strawberries with origami! A collection of easy strawberry folding ideas
- [For 3-year-olds] Let's make it with origami! A collection of easy mushroom folds
- [For Preschoolers] Fold with Fun! January Origami Ideas for Little Ones
- [For 4-5-year-olds] Folding is fun! A collection of January origami ideas to enjoy with preschoolers
- For older kindergarteners: Let’s make it! A collection of recommended origami ideas for February
Origami Penguins for Ages 3 and Up! A Parent-Child Folding Guide (11–20)
Penguin parent and child
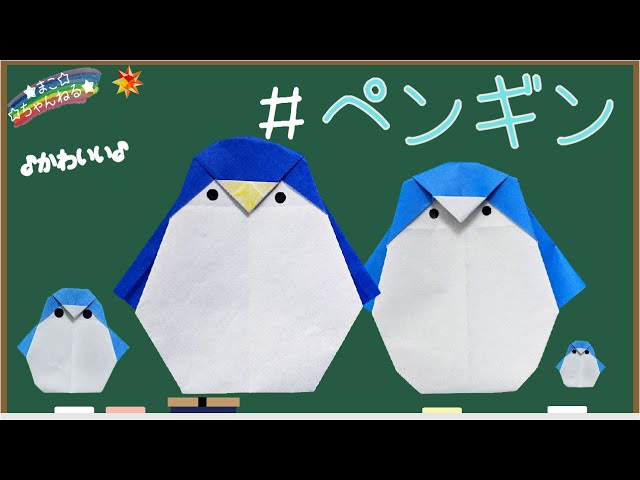
Here’s how to fold cute parent-and-child penguins.
First, turn the origami paper to the back and fold it into a triangle twice to make creases.
Fold one corner to align with the center line, open it, then fold along the creases two more times to set the folds.
Fold the corner up twice.
Next, fold both corners at the folded section toward the center line.
Fold the tip up to the front crease, then flip it over.
After flipping, fold the outer corners diagonally upward toward the center line.
Then, fold both corners outward so they stick out, like in the image of hands.
Finally, adjust the corners to shape them into penguins, and you’re done! If you make them with small origami paper as well, you’ll have a parent and child penguin set.
Decorate the eyes with round stickers or a pen.
Penguin face

With a simple process, you can make an adorable penguin face! Fold the origami into a triangle, then fold the top layer’s tip down to meet the center of the base.
Fold the tip back up so it sticks out about 1 cm beyond the crease you just made.
Next, fold the bottom triangular part to the back, leaving about 2 cm of the white side showing.
Flip it over and adjust it into the shape of a penguin’s face.
Turn it to the front, color the white beak area in the center, and draw the eyes and cheeks to finish.
The vibe changes just by varying the beak size or the width of the face, so it might be fun to line up and display the different creations the children make.
Penguin made from a single sheet of origami paper

With just one sheet of origami paper, you can make an adorable penguin with little hands that pop out! Start with the colored side facing up, crease along the diagonals, and fold in order.
Then fold the head downward, flip it over, and complete the body.
Round off the head’s corners by folding them to the back, and fold the hands so they stick out to the sides and are visible from the front.
Finally, color the white beak yellow or another color, draw in the eyes, and you’re done.
You can also add a tie or buttons, or draw any patterns you like for extra fun.
Simple penguin

Here’s an easy penguin origami that kids can try with simple steps! Place the paper with the colored side down, crease along the diagonal, and fold one corner to the center.
Flip it over, then fold the opposite corner to the midpoint of the facing edge.
Fold the left and right sides inward and flip it back again.
Fold the “hands” so they pop out to the sides, turn it to the front, and shape the beak and head—your penguin is complete.
Add eyes and rosy cheeks with a pen to finish it cutely!
Front-facing penguin

Here’s how to fold a chubby penguin with a slightly larger head! Place the paper with the colored side facing up and crease along both diagonals.
Position it so the corners point up, down, left, and right.
Fold the bottom corner upward, shifting the tip a few centimeters below the top point, then fold a small section back toward you and flip the paper over.
Fold the left and right sides inward, then fold them slightly back outward so they peek out from the front.
Flip to the front again, and tuck the head area on the back to make it rounded.
You’re done! If you make a smaller one with a small sheet of origami paper and place them together, you’ll have an adorable parent-and-child penguin pair.
Try gluing them onto construction paper with ice or winter motifs to create a single finished piece!
An upright-standing penguin

Here’s how to fold a three-dimensional penguin! Place the paper with the front side facing up and fold it in half into a triangle.
Fold back about halfway so that the colored sides are visible on both the front and back, then open it once.
Fold the face section inward and the tail section outward.
Fold it in half again, pull out the face section and shape it, and you’ll have a three-dimensional penguin that can stand on its own.
It’s simple, so try adding cuteness by drawing eyes or making a smaller baby penguin to display next to it.
[For Ages 3 and Up] Penguin Origami! Parent-Child Fun Folding Instructions (21–30)
Penguin you can make with two sheets of origami paper
I will show you how to make a cute penguin that feels cool for summer.
Prepare two sheets of origami paper, round stickers, and glue, and let’s get started.
We’ll begin with the penguin’s face.
Take one sheet of origami and fold one corner by about one third.
Flip it over, then fold the left, right, and bottom edges to form the shape of the penguin’s face.
For the body, fold the left and right sides of the origami diagonally, flip it over, then fold up the tip of the bottom section to finish.
Attach the face and body together, then add the beak, eyes, and facial expression to create your cute penguin.