Simple Origami Ideas to Enjoy in Autumn (For 4-Year-Olds)

When summer ends and autumn arrives, we see a big increase in delicious seasonal foods, and there are major events like Halloween, too.
Here are some origami ideas with an autumn theme, designed for 4-year-olds.
We’re focusing on simple folds that are easy to make.
Through origami, children may broaden their interest and curiosity about seasonal foods that peak in autumn and the lives of autumn creatures.
If there are parts they don’t understand, it would be great if they could fold along with their teachers or discuss and proceed with friends—giving them chances to think and to learn the importance of helping one another.
- [Childcare] [Origami for 4-year-olds] Introducing origami for 4-year-old children!
- [Autumn] Easy Origami Ideas for November
- Preschool: Autumn-Themed Craft Ideas Recommended for November
- [Childcare] Simple fall origami ideas
- [Childcare] Things to make in October! Easy origami ideas
- Craft ideas for 4-year-olds to try in autumn! Enjoy creative activities with seasonal motifs and events.
- For 5-Year-Olds: Enjoy Autumn! Easy Origami Ideas
- [For 4-Year-Olds] Fun to Make! A Collection of Halloween Craft Ideas
- A collection of fall origami ideas recommended for 2-year-olds! Make them easily and enjoy autumn!
- [For preschoolers] A collection of origami ideas to enjoy February, including Setsubun and Valentine’s Day
- [Origami] Simple Origami Folding Ideas to Savor Spring with 5-Year-Olds
- [Preschool] Recommended for 3-year-olds! Easy-to-make fall origami craft ideas
- Irresistibly fun to make! Simple mushroom origami ideas you can enjoy with kids
Simple Origami Ideas for Fall to Enjoy with 4-Year-Olds (1–10)
Full Moon and Clouds

Perfect for the autumn moon-viewing season! Here’s an easy way to fold a moon and clouds recommended for 4-year-olds.
You’ll need one sheet of yellow origami paper, two sheets of white origami paper, and glue.
First, fold the yellow paper to make diagonal creases.
Fold each of the four corners in by 3 cm.
Flip it over and you’ll have a moon.
Next, fold a white sheet into a triangle to make a crease.
Fold the top and bottom on the right side toward the center crease, then fold the left side to line up with the right edge.
Unfold everything, then fold along the creases to shape it like a cloud.
Make two clouds, then glue them above the moon to finish.
Give it a try as an autumn craft!
matsutake (pine mushroom)

Here’s a super easy matsutake mushroom origami perfect for 4-year-olds! All you need is one sheet of brown origami paper.
First, cut the paper into three equal strips with scissors.
Take one strip, flip it over, and fold about the top third down.
Make a small slit from the side up to the fold line just above the bottom section.
Fold the cut left and right sections inward.
Finally, fold the top corners to shape and tidy it up—and your matsutake is done! You can make three mushrooms from one sheet of paper.
It’s perfect for autumn wall decorations, so try making them with the kids.
Japanese pampas grass

Here’s an easy and cute way to fold pampas grass that’s perfect for autumn moon-viewing! Even four-year-olds can make it.
All you need is one sheet of yellow origami paper cut in half.
First, fold it vertically into a thin strip by folding three times.
Then fold it in half vertically to make a center crease.
We’ll make the pampas plumes at the top.
Use scissors to make thin vertical cuts halfway down, then offset and layer the strips so that the white side shows alternately—and you’re done! It’s great for an autumn wall display, so try making it with the kids.
[For 4-Year-Olds] Simple Origami Ideas to Enjoy in Autumn (11–20)
jack-o’-lantern

How about making a cute pumpkin ghost—the main character of Halloween—out of origami? First, fold the paper in half into a square, then fold it in half again.
Open it up and fold it into a triangle.
Next, fold both side edges toward the center, flip it over, and fold up the parts that stick out.
Then keep folding up the bottom section, fold the top as well, and adjust the shape to look like a pumpkin.
If you glue on black paper cutouts for the eyes, nose, and mouth, it will give it a sharp, finished look.
You can make it easily with a single sheet of origami paper, so give it a try!
mushroom

Mushrooms with cute shapes are a perfect motif to make together with children! If you’re looking for a September craft, try making this autumn-themed project with origami.
The basic method is very simple, so even young children can work on it with a teacher.
You can also add patterns to the mushroom caps with pens, stamps, or stickers to suit the children’s ages.
Once they get the hang of it, you can make lots of them and enjoy pretend play, too!
maple leaves
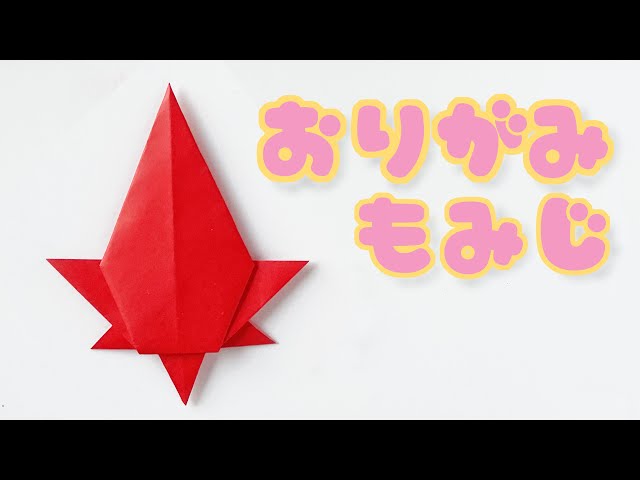
Let’s make bright red autumn maple leaves with origami.
However, folding a maple leaf from a single sheet is quite challenging.
That’s why I recommend a method that uses two sheets of origami paper.
Fold them into a vertical piece and a horizontal piece, then glue the two together at the end to complete it.
The vertical piece involves many broad, simple folds, while the horizontal piece includes some slightly more complex, tucked-in folds, so take care with that.
That said, if an adult helps with the tricky parts, it should be an enjoyable activity.
pear

Here’s an easy pear origami project recommended for four-year-olds.
Materials: one 15 cm sheet of origami paper, one green and one brown sheet of origami paper (each 3.5 cm × 3.5 cm), glue, and a pen.
First, make the pear with the large sheet.
Fold it into quarters, then fold it into thirds.
Unfold, bring two sides toward the center along the creases, and press together.
Fold the edges to shape it like a pear.
Fold a leaf from the green paper and a stem from the brown paper.
Finally, glue the three parts together and draw a face on the pear with the pen to finish!