
When summer ends and autumn arrives, we see a big increase in delicious seasonal foods, and there are major events like Halloween, too.
Here are some origami ideas with an autumn theme, designed for 4-year-olds.
We’re focusing on simple folds that are easy to make.
Through origami, children may broaden their interest and curiosity about seasonal foods that peak in autumn and the lives of autumn creatures.
If there are parts they don’t understand, it would be great if they could fold along with their teachers or discuss and proceed with friends—giving them chances to think and to learn the importance of helping one another.
- [Childcare] [Origami for 4-year-olds] Introducing origami for 4-year-old children!
- [Autumn] Easy Origami Ideas for November
- Preschool: Autumn-Themed Craft Ideas Recommended for November
- [Childcare] Simple fall origami ideas
- [Childcare] Things to make in October! Easy origami ideas
- Craft ideas for 4-year-olds to try in autumn! Enjoy creative activities with seasonal motifs and events.
- For 5-Year-Olds: Enjoy Autumn! Easy Origami Ideas
- [For 4-Year-Olds] Fun to Make! A Collection of Halloween Craft Ideas
- A collection of fall origami ideas recommended for 2-year-olds! Make them easily and enjoy autumn!
- [For preschoolers] A collection of origami ideas to enjoy February, including Setsubun and Valentine’s Day
- [Origami] Simple Origami Folding Ideas to Savor Spring with 5-Year-Olds
- [Preschool] Recommended for 3-year-olds! Easy-to-make fall origami craft ideas
- Irresistibly fun to make! Simple mushroom origami ideas you can enjoy with kids
Simple Origami Ideas for Fall to Enjoy with 4-Year-Olds (1–10)
owl

I’m going to show you how to make a cute owl that even 4-year-olds can easily create! You’ll need origami paper, round stickers, a pen, and glue.
First, fold the origami paper into four squares to make crease lines.
Next, fold the top and bottom corners toward the center crease to form the owl’s head and body.
Then, fold the left and right edges diagonally to make the wings.
After that, stick on round stickers and draw the eyes with a pen.
Glue on a small triangle of origami paper for the beak, and you’re done! It also looks adorable if you draw the eyes and body with a pen or crayons instead—highly recommended.
pine cone

Some kids love collecting pinecones in the fall, don’t they? Here’s an easy folding project perfect for pinecone-loving four-year-olds! You’ll need four pieces of brown origami paper cut into quarters, and some glue.
First, fold a piece of origami paper into a triangle twice.
Unfold it once to return to a single triangle, then fold the left and right corners up so they land slightly outside the center crease.
Open those folded sections, tuck each corner inward twice, and refold along the crease you just made.
Fold up the bottom tip just a tiny bit, then fold it up about another centimeter.
Flip it over and fold in the left and right corners—that completes one part! Fold the remaining three pieces the same way, then glue all four parts together to finish.
Have an adult help with the small, tricky steps.
It’s super cute, so give it a try!
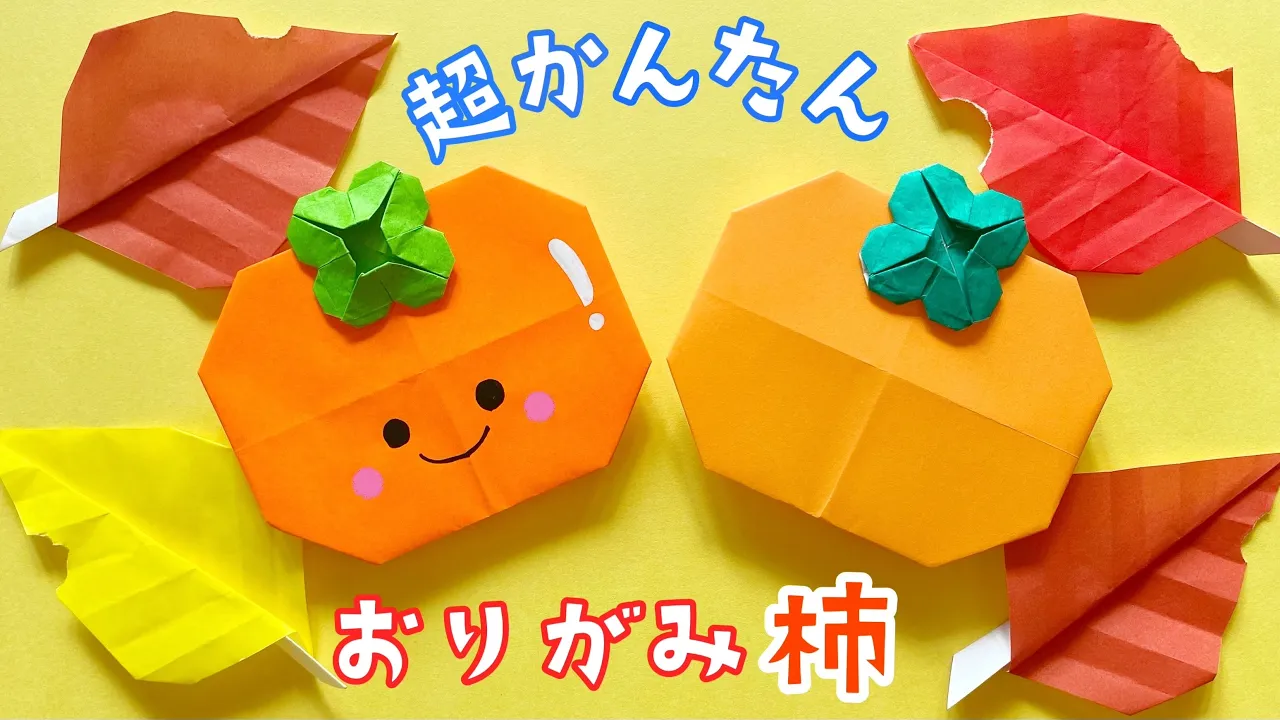
persimmon

When it comes to autumn fruits, some kids love persimmons! Here’s an easy persimmon origami recommended for fall.
Four-year-olds can enjoy making it.
Materials: one sheet of orange origami, one quarter-size sheet of green or light green origami, glue, and a pen.
First, fold the orange origami in half to make a crease.
Fold both edges toward the center.
Then fold it into four equal sections, and fold the corners in.
That completes the persimmon.
Next, use the green origami to make the calyx (stem and leaf), and finally glue it onto the persimmon to finish! Drawing a face with a pen makes it super cute—highly recommended.
Halloween bat

Perfect for the Halloween season! Here’s an easy bat origami that a 4-year-old can make.
All you need is one sheet of origami paper and a pen.
First, fold the paper into a square to make a crease.
Fold it in half to add another crease, then fold it into a triangle to create diagonal creases.
Follow the crease lines and fold in order.
Toward the end the folds get smaller, so please help your child with any tricky parts.
Once the bat is finished, draw a face with a pen.
If you used black origami paper, use a white pen to draw.
It’s also cute to make them in different colors or use Halloween-patterned origami paper.
ginkgo

Here’s a super easy ginkgo origami that’s perfect for 4-year-olds! All you need are two sheets of origami paper cut in half.
First, let’s make the ginkgo leaf with one piece.
Fold the paper in half, open it, then fold the top and both sides.
After that, fold up the corners to shape it like a ginkgo leaf.
For the bottom part (the stem), use the other piece of paper—just fold it in half vertically, and it’s done.
Finally, glue the two parts together and you’re finished! If you use colors like yellow or brown, you can make a whole row of ginkgo trees.
Give it a try with the kids!
cricket

Here’s an easy cricket origami that’s perfect for a 4-year-old using just one sheet of paper! First, fold the paper into a triangle, then fold it into a triangle again.
Stand it up, open it, and squash it into a square.
Flip it over and squash it the same way.
Fold both sides in toward the center line.
Fold along the bottom edge of the triangle, then unfold.
Open it up and fold into a diamond shape.
At the marked lines, make outside reverse folds, then fold both sides in along the creases.
Fold down about 3 centimeters from the top.
Keep folding along the creases, and your cricket is complete! Draw cute eyes with a pen to finish it off.
grasshopper

Perfect for kids who love insects! Here’s an easy way to fold a grasshopper suitable for 4-year-olds.
You’ll need one sheet of origami paper in green or light green and a pen.
First, fold the paper into a triangle twice.
Then open it into a pocket and squash it into a square.
On just one side, fold the left, right, and bottom edges toward the center to make crease lines.
Open it up and, using those lines as guides, squash-fold along them.
Next, form the legs on the left and right, and fold one end to make the face—done! Draw any face you like with the pen.
It’s three-dimensional, so kids will love it.
Give it a try in your classroom or childcare setting.