Simple Origami Ideas to Enjoy in Autumn (For 4-Year-Olds)

When summer ends and autumn arrives, we see a big increase in delicious seasonal foods, and there are major events like Halloween, too.
Here are some origami ideas with an autumn theme, designed for 4-year-olds.
We’re focusing on simple folds that are easy to make.
Through origami, children may broaden their interest and curiosity about seasonal foods that peak in autumn and the lives of autumn creatures.
If there are parts they don’t understand, it would be great if they could fold along with their teachers or discuss and proceed with friends—giving them chances to think and to learn the importance of helping one another.
- [Childcare] [Origami for 4-year-olds] Introducing origami for 4-year-old children!
- [Autumn] Easy Origami Ideas for November
- Preschool: Autumn-Themed Craft Ideas Recommended for November
- [Childcare] Simple fall origami ideas
- [Childcare] Things to make in October! Easy origami ideas
- Craft ideas for 4-year-olds to try in autumn! Enjoy creative activities with seasonal motifs and events.
- For 5-Year-Olds: Enjoy Autumn! Easy Origami Ideas
- [For 4-Year-Olds] Fun to Make! A Collection of Halloween Craft Ideas
- A collection of fall origami ideas recommended for 2-year-olds! Make them easily and enjoy autumn!
- [For preschoolers] A collection of origami ideas to enjoy February, including Setsubun and Valentine’s Day
- [Origami] Simple Origami Folding Ideas to Savor Spring with 5-Year-Olds
- [Preschool] Recommended for 3-year-olds! Easy-to-make fall origami craft ideas
- Irresistibly fun to make! Simple mushroom origami ideas you can enjoy with kids
[For 4-Year-Olds] Simple Origami Ideas to Enjoy in Autumn (11–20)
shiitake mushroom

Here’s how to fold a shiitake mushroom that even 4-year-olds can easily make.
You’ll need one sheet of origami paper and a pen.
First, fold the paper into quarters, then unfold it and fold each corner toward the center.
Next, fold each corner to meet the outer line.
Open it up, fold along the outer line, and then once more fold each corner to meet the outer line.
Finally, flip it over and fold it up to the middle.
Your shiitake mushroom is complete! After that, draw any face you like with a pen.
It also looks cute if you make a basket out of construction paper and stick it on.
It’s very easy, so give it a try!
Cat message card

How about folding a cute black cat out of origami that will stand out at Halloween events? If you stick a piece of white origami under the cat’s yellow, glowing eyes on the black base, it can double as a message card.
First, fold the origami paper into a triangle.
Fold one side toward the center and cut off the other side.
Next, fold so that it sticks out slightly past the center, then fold up the bottom section to adjust it into a cat shape.
Cut the separated piece of origami into a circle, and with the white side facing forward, paste it on to complete your message card.
Make sure the ears are stylishly sharp and upright!
autumn foliage

Here’s a super cute autumn origami tree that’s perfect for 4-year-olds.
You’ll need two sheets of origami paper and some glue.
First, fold diagonally both ways to make creases.
Fold the top and bottom corners toward the center.
Fold the right side diagonally toward the center.
Fold the opposite corner just a little, and the tree is done! Use the other sheet to fold the trunk, then glue them together to finish.
Make them in different colors and line them up for a beautiful fall foliage display.
They’re perfect for wall decorations, so give it a try!
red dragonfly

This is an origami dragonfly you can spot during walks or in the playground in autumn.
Use one sheet of red origami paper for the body and half a sheet of white paper for the wings.
First, fold the red paper into a triangle, unfold it, and fold the bottom section up to meet the center line.
After tucking in the bottom slightly, fold it up to the center line two more times.
Then tuck a white section into a triangle to form the head.
For the wings, fold the white paper in half, make small cuts, and create four wings.
Combine the body and wings, draw the eyes, and it’s complete.
Through origami, we also hope to deepen children’s interest in living creatures in nature.
It moves! A flapping bat
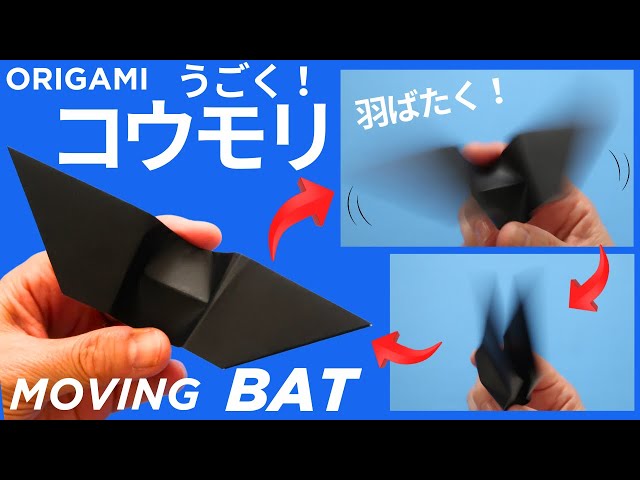
This is perfect for Halloween decorations or toys, with wings that flap amusingly.
First, cut the origami paper into a long rectangle and fold it in half vertically to make a crease.
Then fold both ends into triangles toward the center.
Keeping that shape, fold it in half vertically again, and fold further in the same direction to add a light crease at the center.
Next, flip it over and insert a finger at the center to make two creases.
Reinforce the creases you made earlier, and it’s done! By lightly holding the top and bottom of the center and moving them, the wings on both sides will flap.
three-dimensional grapes

Here’s how to fold 3D grapes! It’s recommended for 4-year-olds.
You’ll need eight sheets of purple origami paper, one sheet of green origami paper, and glue.
First, let’s make the grapes with the purple paper.
Crease the purple paper, then use the creases to fold it into a triangle.
Finally, puff it up like a little balloon to make one grape.
Make eight of these.
Adults can help with the tricky parts.
Next, fold the stem with the green paper.
This part is easy—just scrunch and fold it by hand.
Then glue the grapes and the stem together, and you’re done!
[For 4-year-olds] Simple origami ideas to enjoy in autumn (21–30)
Pacific saury

Let’s try folding a Pacific saury (sanma) together with a four-year-old.
Using a rectangular sheet of origami paper, we’ll create the shape with a simple folding method.
Since the folds are mostly straight lines, it’s easy for young children to try.
Adding eyes and scale patterns to the finished fish will make it look more realistic.
While folding, it’s nice to talk about how sanma is an autumn fish and where it lives.
Through origami, children may become more interested in seasonal changes and living creatures.
Why not enjoy this activity with a caregiver and feel the arrival of autumn together?