[For 5-year-olds] Let’s make origami! A collection of fun folding ideas


Here are some origami ideas for five-year-olds.
By the time children are five, you’ll often see them helping each other with parts they don’t understand or folding while looking at an origami instruction book.
While respecting each child’s pace, teachers should also enjoy working on these together with the children.
We’re introducing lots of ideas—ones you can fold and play with, as well as cute ones to decorate with or wear—so once the origami is finished, be sure to have fun playing with the children!
- [Origami] Simple Origami Folding Ideas to Savor Spring with 5-Year-Olds
- For 5-Year-Olds: Enjoy Autumn! Easy Origami Ideas
- [Childcare] A roundup of easy summer origami ideas to enjoy with 5-year-olds
- [Childcare] [Origami for 4-year-olds] Introducing origami for 4-year-old children!
- Fun January Crafts! A Collection of Ideas You Can Make and Play With for 5-Year-Olds
- Simple origami for kids: cute, playable origami ideas
- For older kindergarteners: Let’s make it! A collection of recommended origami ideas for February
- Easy Winter-Themed Origami Ideas for 5-Year-Olds
- [For 4–5 year olds] A collection of recommended origami ideas for March—featuring seasonal events and natural motifs
- [For 4-5-year-olds] Folding is fun! A collection of January origami ideas to enjoy with preschoolers
- [For preschoolers] A collection of origami ideas to enjoy February, including Setsubun and Valentine’s Day
- [For 4-year-olds] Let's fold! A collection of simple rabbit origami ideas
- [For Preschoolers] Let’s Make It Together with the Kids! Origami Ideas for February
[For 5-Year-Olds] Let’s Make Origami! A Collection of Fun Folding Ideas (21–30)
Ring Paper Airplane
@nagoya_kodomo I tried making a ring paper airplane ✈︎✨Origami playHow to fold a paper airplane#DailyLifeOfChildcareStudentsAspiring childcare worker
Classic Medley 2019 – Pianica Magician
A round-shaped paper airplane is something new! Here’s an idea for a ring paper airplane.
For children, paper airplanes are simple yet offer endless fun.
With just a few clever twists to origami, you can add the joy of flying and a sense of friendly competition—that’s part of the charm.
This time, let’s make a ring paper airplane using origami.
The key is to curl the paper into a loop, which gives it a uniquely gentle, floating flight! It would be fun to compete with friends or family to see whose flies the farthest.
Balloon Rabbit

Those perky little ears are so cute! Let me introduce an idea for making a balloon bunny out of origami.
All you need is origami paper in your favorite colors or patterns and a pen.
It looks absolutely adorable and is a fun origami project for kids! The balloon part refers to the classic origami water balloon.
The folding requires a bit of ingenuity, but once finished, you’ll have a three-dimensional bunny with a sense of movement.
Balloon bunnies are cute as decorations and fun to play with, so give it a try!
[For 5-year-olds] Let's make with origami! A collection of fun folding ideas (31–40)
Make the whole body! Cute horse origami

This is an idea where you make the head and body separately, glue them together, and finish it as a horse.
First, we’ll make the head: fold the origami paper into a triangle, then fold the left and right corners up to meet the top corner.
Next, as you would when making a samurai helmet, open the folded-up corners to the left and right and crease them, then fold them back along the creases.
These parts will be the horse’s ears.
Turn the paper over, fold one layer of the bottom corner up diagonally to make a triangle, crease it, and unfold.
Then fold the bottom corner up again into a small triangle, and fold the base of that small triangle up along the crease.
Fold the top corner down into a triangle, flip the paper over, fold the bottom corner up, then fold the left and right corners inward—this completes the head.
For the body, first fold the origami paper so it becomes a rectangle and make a crease.
Fold the top and bottom edges to that center crease, then fold the left and right edges to meet in the middle to make the paper a square again.
Open the pocketed sections and squash-fold them to make two boat shapes.
Fold the top left and right corners vertically inward to form the legs.
Tuck the lower left corner inside, then make a step fold on the right corner to create the tail.
Fold this in half, attach the head you made earlier, and it’s done.
How to fold a unicorn
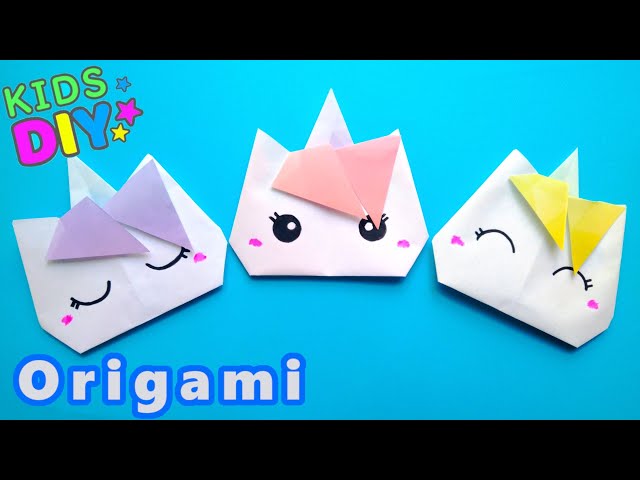
This is an origami unicorn with an adorable colorful mane.
Prepare origami paper, scissors, and colored pens.
First, fold the paper into a triangle and unfold it.
Next, fold the left and right sides toward the center along the crease, and align the top and bottom with a slight offset.
Fold the offset edges toward the center line, and fold the left and right sides at a slight angle.
Flip it over, make three small cuts at the top with scissors, and fold them back—this completes the base.
Finally, draw the eyes and cheeks with colored pens to create unicorns with a variety of expressions!
Three-dimensional cute pony origami

It looks like it’s made from a single sheet, but it’s actually made from two sheets of origami, separated into the head, body and tail, and legs.
First, fold the origami into a triangle to make a crease.
You’ll be using this crease as you fold, so be sure to align the corners carefully.
For the head, body, and tail, flatten the pocketed sections and use inside reverse folds to shape them.
For the legs, start with a zabuton fold and then make fine creases, folding the corners into triangles to form the four legs.
Once the parts are complete, overlap the legs onto the body, glue them in place, and finish it as a horse.
Cute horse origami with a single sheet
https://www.tiktok.com/@origamihanaschannel/video/7535102312579140871Let me introduce a cute horse idea with bowl-shaped rounded legs and body.
Start with the colored side of the origami paper facing up, fold it into a triangle twice, and from the point where the open pockets are flattened into a square, we’ll transform it into a horse.
On both sides of the square, fold the flippable corners up to meet the opposite corners, then use those creases to make inside reverse folds on the corners.
Fold the top corner down into a triangle on both sides to create creases, open the paper, and while performing a sink fold on the central, square-creased section, return the paper to the square base.
Place the paper back down with the sunk portion at the bottom, and sink-fold the left and right corners into triangles as well.
Make the top-right corner a right angle by folding it into a triangle, then use an inside reverse fold to form the head.
On the opposite side, narrow it by folding the edges inward, then make the tail with another inside reverse fold.
How to fold a cute horse
https://www.tiktok.com/@summercraft56/video/7285598399150279954Let’s make a horse in profile with origami.
Fold the paper into a triangle twice to make creases, then open it and fold the bottom corner up to the center to form a triangle.
Next, fold that corner up to meet the base edge, then unfold the first fold you made.
Fold the lower side edges inward so they become straight, then fold the top corner down.
Fold the top corner back up slightly to form an ear, then fold the left and right corners inward to refine the shape.
Finally, fold the model in half along the vertical center line to finish.
Draw the eyes and nose to complete your horse.