[For 5-year-olds] Let’s make origami! A collection of fun folding ideas


Here are some origami ideas for five-year-olds.
By the time children are five, you’ll often see them helping each other with parts they don’t understand or folding while looking at an origami instruction book.
While respecting each child’s pace, teachers should also enjoy working on these together with the children.
We’re introducing lots of ideas—ones you can fold and play with, as well as cute ones to decorate with or wear—so once the origami is finished, be sure to have fun playing with the children!
- [Origami] Simple Origami Folding Ideas to Savor Spring with 5-Year-Olds
- For 5-Year-Olds: Enjoy Autumn! Easy Origami Ideas
- [Childcare] A roundup of easy summer origami ideas to enjoy with 5-year-olds
- [Childcare] [Origami for 4-year-olds] Introducing origami for 4-year-old children!
- Fun January Crafts! A Collection of Ideas You Can Make and Play With for 5-Year-Olds
- Simple origami for kids: cute, playable origami ideas
- For older kindergarteners: Let’s make it! A collection of recommended origami ideas for February
- Easy Winter-Themed Origami Ideas for 5-Year-Olds
- [For 4–5 year olds] A collection of recommended origami ideas for March—featuring seasonal events and natural motifs
- [For 4-5-year-olds] Folding is fun! A collection of January origami ideas to enjoy with preschoolers
- [For preschoolers] A collection of origami ideas to enjoy February, including Setsubun and Valentine’s Day
- [For 4-year-olds] Let's fold! A collection of simple rabbit origami ideas
- [For Preschoolers] Let’s Make It Together with the Kids! Origami Ideas for February
[For 5-Year-Olds] Let’s Make It with Origami! A Collection of Fun Folding Ideas (41–50)
Easy way to make mushrooms

Open the paper after folding it twice to make a square.
Fold the top two corners in so they meet at the center of the paper.
Turn the paper over, then fold the bottom edge up to meet the horizontal crease.
Turn the paper over again, and fold the left and right sides in to meet the vertical crease in the center.
Fold the bottom edge up to meet the top corner, then fold it back down at the point where the color changes, making a valley fold.
On the rectangular section, tuck the top left and right corners inward to make creases, open them, then squash-fold those sections into triangles while aligning both side edges with the center.
Finally, tuck the remaining corner inward and round the overall shape slightly—your mushroom is complete.
[For 5-year-olds] Let’s Make Origami! A Collection of Fun Folding Ideas (51–60)
A cute penguin you can make with a single sheet of origami paper

Here’s a cute penguin you can make with just one sheet of origami paper—perfect for three-year-olds.
Prepare one sheet of origami paper and fold it into a triangle to make a crease.
Fold the corners along the center line; you’ll be flipping the paper over to fold on both the front and back.
Next, fold the left and right sides toward the central vertical line to form the base of the penguin’s wings.
To give the wings movement and a three-dimensional look, make sure to crease firmly.
After checking that both sides are balanced, fold the tip to round out the overall shape of the penguin, and you’re done.
It might also be fun to make them in different colors and give each penguin a name.
A twirling butterfly toy you can toss and play with

It’s so fun to make and play! Here’s an idea for a spinning butterfly you can throw and play with.
For children, it’s exciting to play with something they made themselves using origami! By folding paper, kids can experience the joy of shapes changing and feel a sense of accomplishment with the finished piece.
It’s a great idea for creative playtime, so highly recommended.
All you need is one sheet of origami paper.
The steps are simple and easy to follow, so try making it together with teachers or friends while having fun.
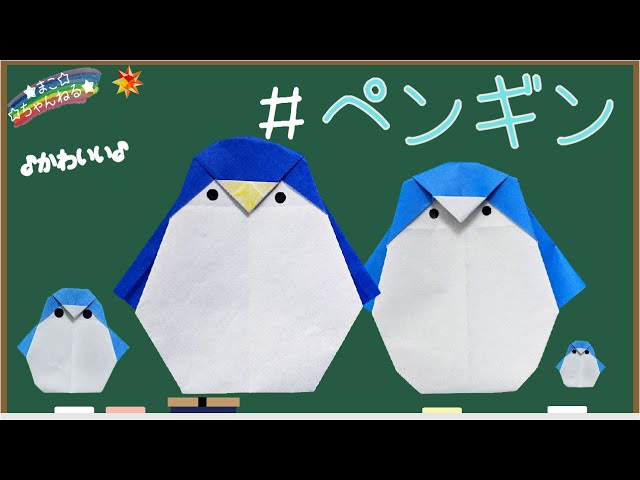
Cozy Penguin

Here’s how to fold an origami penguin that can also wear a hat and scarf.
First, fold it into a triangle twice, then open it once.
With a corner pointing down, fold up the top layer so about 2 centimeters stick out, then fold it down along the edge.
Fold the edge you just made in half to make a crease, then fold the bottom corner up to that crease to set a guideline.
Next, fold the other corner up toward the front crease.
Fold the tip of the corner down just a little.
Fold up along the crease you made earlier, align the edges, and fold the whole piece in half.
Finally, adjust the shape to look like a penguin and draw the eyes with a pen to finish.
Try making a hat and scarf for it, too!
Peekaboo Penguin

Here’s a super cute way to fold a penguin that’s perfect to attach to letters or cards! First, place the origami paper with the back side facing up and fold it into a triangle twice to make crease lines.
Lift one corner up to just slightly before the center line, then fold both edges of the lifted section upward at a slight diagonal.
Fold both corners of that folded section inward.
Turn it over so the white side is facing you, and fold along the center line twice to shape the face.
Next, use a 2.5 cm piece of origami paper to make the hands.
Start with a basic “zabuton” fold, then fold both corners diagonally to shape the hands.
Make two of these.
Finally, glue the hands on, and add eyes and a mouth with round stickers or similar—done!
a round and laid-back penguin
This is an easy and cute origami penguin.
First, turn the paper over and make two creases by folding it in half both ways into a square.
Fold one edge down to align with the center crease.
Flip it over, then fold the left and right edges to the center line.
Open the colored corner and squash-fold it.
Fold the bottom edge up to the center to make a crease, open it once, then fold the bottom tip inward along that crease.
Fold the corners to form the feet.
Fold the protruding colored corner to suggest the hands.
Finally, round off the colored tip to finish! Decorate it cutely with round stickers or a pen.
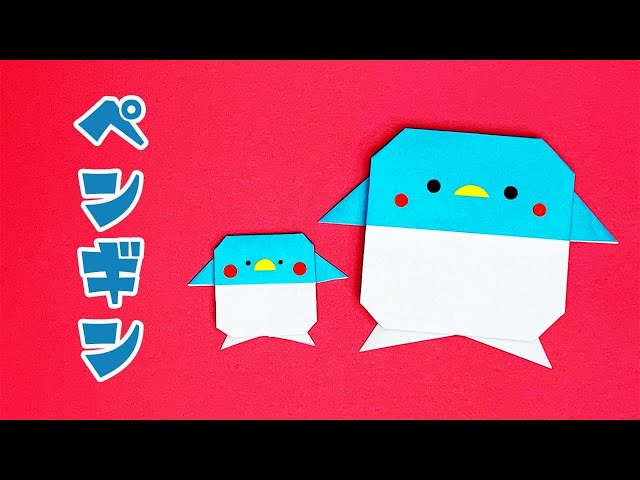
Penguin parent and child
Here’s how to fold cute parent-and-child penguins.
First, turn the origami paper to the back and fold it into a triangle twice to make creases.
Fold one corner to align with the center line, open it, then fold along the creases two more times to set the folds.
Fold the corner up twice.
Next, fold both corners at the folded section toward the center line.
Fold the tip up to the front crease, then flip it over.
After flipping, fold the outer corners diagonally upward toward the center line.
Then, fold both corners outward so they stick out, like in the image of hands.
Finally, adjust the corners to shape them into penguins, and you’re done! If you make them with small origami paper as well, you’ll have a parent and child penguin set.
Decorate the eyes with round stickers or a pen.