[For Seniors] Recommended for day services! Simple and cute small craft ideas


Craft time at the day service is an important activity that enriches both mind and body.
Each piece—like adorable pipe-cleaner bouquets and handy little organizers—shines with its own personality.
They’re lovely to use yourself, and they’d surely delight someone special as a gift!
None of the projects are very complicated, so you can take your time and work at your own pace.
Making them while chatting with other participants also helps expand your circle of communication.
Why not choose your favorite materials and colors to create a one-of-a-kind handmade piece in the whole world?
- For Seniors: Simple and Lovely Crafts – A Collection of Take-Home Project Ideas for Day Service
- [For Seniors] Introducing Fun Crafts Made with Plastic Bottle Caps
- [For Seniors] Small craft ideas: for yourself and as gifts!
- [For Seniors] Simple Handicrafts Recommended for Finger Exercise
- Take-Home Craft Ideas for Winter: Perfect for Day Services for Seniors
- [For Seniors] Practical Crafts to Make in Day-Service Recreation: Idea Roundup
- [For Seniors] DIY Strap Craft Ideas. Great as Gifts, Too!
- Handmade Gifts: Ideas That Will Delight Older Adults
- For seniors: Recommended for day services. Hands-on activities that help prevent dementia.
- [For Seniors] Amazing Scrap Fabric Hacks! Easy Handmade Small Item Ideas
- [For Seniors] Easy and Fun! Tsumami Zaiku Craft Ideas
- [For Seniors] Get Started Easily: Simple Handicraft Kit Ideas
- [For Day Service Centers] February Craft Ideas: Decorations for Setsubun, Valentine’s Day, and the Feeling of Spring
[For Seniors] Recommended for Day Service! Simple and Cute Small Craft Ideas (231–240)
Rose Gemstone Soap

Like jewels! These rose gemstone soaps are easy to make by melting and setting.
Put glycerin soap and colored soap for tinting into paper cups and heat them in the microwave to melt.
Add a few drops of aroma oil to each to give them fragrance and color, then drip the mixtures onto parchment paper to create petal pieces.
When they’re beginning to set, roll them up to form a rose shape, and apply a suitable amount of glitter along the edges of the petals.
Finally, coat the rose with melted glycerin soap, and you’re done! Please be very careful to avoid burns.
Patchwork

Patchwork is the art of creating works by piecing together various fabrics.
The range of projects is broad, from small accessories to large items like bed covers.
Among older adults, some may feel, “I can make lovely pieces, but I’m not good at sewing.” For them, we’d like to introduce a kit that lets you create patchwork-style works without sewing.
Simply place fabrics onto a board that has a printed guide and an adhesive surface.
The fabrics are pre-cut to match the outlines of the guide.
Add some padding in the appropriate areas to create a three-dimensional effect.
With a finish that looks like real patchwork, it’s sure to satisfy older adults as well.
Patchwork-style sacoche
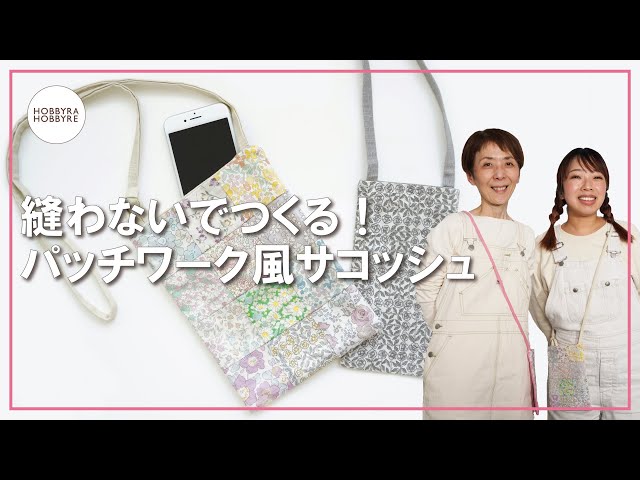
A crossbody sacoche without gussets, so the bag has no thickness.
Shoulder bags free up both hands and are sized to hold valuables like a wallet and keys.
It seems handy for older adults to have one for outings or walks.
These days there’s double-sided tape that can be ironed on with heat, so you can make it without sewing the fabric.
You can use the same patterned fabric, but combining various patterns like patchwork would also be lovely.
Some older adults who enjoy crafts may be refraining because small details are hard to see.
Try using helpful tools and enjoy your crafting.
Carnations made of felt

Mother’s Day is in May.
Some of you may have given carnations on Mother’s Day, or perhaps there are seniors who have received them.
Here is a carnation craft that’s perfect for a May project.
Use a circular template and cut matching pieces from felt.
Make small slits around the edge of the felt circles.
Poke a hole in the center of the felt and thread a wire through it.
Use a hot glue gun to attach the felt to the wire.
Layer several felt circles to form the petals.
Create leaves and tape them to the wire, which will serve as the stem, to finish.
You can make several carnations and arrange them into a bouquet.
Gerbera made of felt

Gerberas bloom in vibrant colors like orange, red, and yellow.
Just seeing their fully spread petals can lift your spirits.
Let’s try making gerberas out of felt.
For the brown or black center of the flower, wrap thinly cut strips of felt around a wire to form the pistil.
Then cut felt into petal shapes, wrap them, and attach them as well.
The finished gerberas are nice because older adults can display them at home.
Making several and arranging them into a bouquet to give to a senior celebrating a birthday would likely be very well received.
Carnations made of felt

Carnations are a flower famously given for Mother’s Day.
Why not try making one by hand to express your gratitude? You’ll need red and green felt and some wire.
First, make the flower.
Prepare a strip of red felt cut lengthwise, and snip it so it’s divided into eight sections.
Trim the cut sections into wavy edges to shape them.
Thread a string through the uncut edge and pull it tight.
As it gathers, pinch it with wire and sew it together with the flower.
Make three of these and bundle them, then wrap them with a larger flower piece.
Use green felt to create the calyx and leaves, gather the wires, and secure them with tape.
You now have a heartfelt carnation that will never wilt.
Give it a try!
Coasters made from felt scraps

Coasters made from felt scraps are recommended as a craft activity for seniors.
Simply cut four colors of felt you like and stick them onto a template—it’s easy to do.
The colors you choose will create a coaster that suits your taste, making it a one-of-a-kind, special item.
It’s great for personal use and also makes a lovely gift for someone important.
Because it involves fine handwork, it’s ideal for rehabilitation for seniors.
In addition, discussing how to make them during the process encourages interaction among seniors, making this a highly recommended group craft activity.