[For Seniors] Recommended for day services! Simple and cute small craft ideas


Craft time at the day service is an important activity that enriches both mind and body.
Each piece—like adorable pipe-cleaner bouquets and handy little organizers—shines with its own personality.
They’re lovely to use yourself, and they’d surely delight someone special as a gift!
None of the projects are very complicated, so you can take your time and work at your own pace.
Making them while chatting with other participants also helps expand your circle of communication.
Why not choose your favorite materials and colors to create a one-of-a-kind handmade piece in the whole world?
- For Seniors: Simple and Lovely Crafts – A Collection of Take-Home Project Ideas for Day Service
- [For Seniors] Introducing Fun Crafts Made with Plastic Bottle Caps
- [For Seniors] Small craft ideas: for yourself and as gifts!
- [For Seniors] Simple Handicrafts Recommended for Finger Exercise
- Take-Home Craft Ideas for Winter: Perfect for Day Services for Seniors
- [For Seniors] Practical Crafts to Make in Day-Service Recreation: Idea Roundup
- [For Seniors] DIY Strap Craft Ideas. Great as Gifts, Too!
- Handmade Gifts: Ideas That Will Delight Older Adults
- For seniors: Recommended for day services. Hands-on activities that help prevent dementia.
- [For Seniors] Amazing Scrap Fabric Hacks! Easy Handmade Small Item Ideas
- [For Seniors] Easy and Fun! Tsumami Zaiku Craft Ideas
- [For Seniors] Get Started Easily: Simple Handicraft Kit Ideas
- [For Day Service Centers] February Craft Ideas: Decorations for Setsubun, Valentine’s Day, and the Feeling of Spring
For Seniors: Recommended for Day Service! Easy and Cute Small Craft Ideas (41–50)
Small gift envelopes made from fabric scraps
@handmade_apricot HandmadeHandmade Fabric Accessories#Utilizing Fabric ScrapsHow-to videoPochi-bukuro (small decorative envelope for gifting money)
♬ Relaxing, cute everyday BGM – Avi
Here’s a simple way to make small gift envelopes (pochibukuro) using fabric scraps.
If you use different fabrics for the front and back, the look changes dramatically when opened, which is fun; rounding the corners gives a soft, cute feel.
All you do is layer the fabrics and sew along the edges, so even beginners can finish one quickly.
The finished envelopes are perfect for New Year’s money gifts or small thank-yous.
They offer a warmth and handmade charm that paper envelopes don’t have, sure to bring a smile to the recipient.
It’s an idea that balances practicality with the joy of crafting.
Mini fabric basket
@tama_sewing How to Make a Mini Fabric Basket from Scraps!#fabricbasket#100-yen shop DIYTokTok ClassroomSewing machineHandmade
♬ Fashionable, cute songs with a laid-back atmosphere(1425149) – sanusagi
A small basket for snacks or trinkets is cute too.
Since there aren’t many parts to sew, even people who aren’t good at sewing can give it a try! If you’re not putting anything too heavy in it, double-sided tape or fabric glue will work fine.
There are also hobbyists’ websites and videos that share basket patterns, so please refer to those for detailed measurements.
If you insert thick paperboard, it becomes sturdier, so you can even make a big basket that’s fine for things like fruit.
It’s perfect for a kotatsu as well, so if you have one at home, definitely give it a try!
Small accessory case made from fabric scraps

Here’s an easy-to-make accessory tray that uses fabric scraps you have at home.
Prepare twenty pieces of fabric measuring 5 cm by 50 cm.
Fold each piece in half with right sides together, press the seam allowance open, and use an iron to shape it.
Once you’ve turned the fabric right side out, lay the strips alternately and fold them together.
You’ll end up with a sturdy, three-dimensional accessory holder.
Simply changing the colors and arrangement of the fabric gives a different look, even with the same method.
It’s exciting and enjoyable to watch forgotten fabric scraps transform into a cute item, and you’ll feel a real sense of accomplishment when it’s done.
Hagire Necklace

Here’s how to make a necklace using leftover fabric scraps.
First, cut the fabric into long, thin strips, fold each strip in half, then press it with an iron to shape it into a tube.
Next, prepare pearls or beads you can get at a 100-yen shop, and thread them alternately inside and outside, like making prayer beads, to create an original necklace.
By changing the fabric’s color or pattern and the type of beads, you can achieve a completely different look with the same method.
The finished necklace is lightweight and easy to wear, making it perfect for adding a stylish accent to everyday outfits.
Fabric scrap hanger

We’d like to introduce how to make a scrap-fabric hanger using a wire hanger.
First, reshape the wire hanger by hand.
If you make it slimmer, the finished piece will look cuter.
Wrap the entire hanger with a piece of scrap fabric cut larger than the hanger, and stuff as much of the excess fabric as you can into the inside.
By changing the patterns and colors, you can achieve completely different looks with the same method and enjoy a personalized touch.
The finished scrap-fabric hanger is colorful and will give you a little lift every time you hang your clothes.
It’s a great way to use up fabric scraps, the process is simple, and for older adults it can also serve as effective finger exercise.
Give it a try!
Brick-style coaster
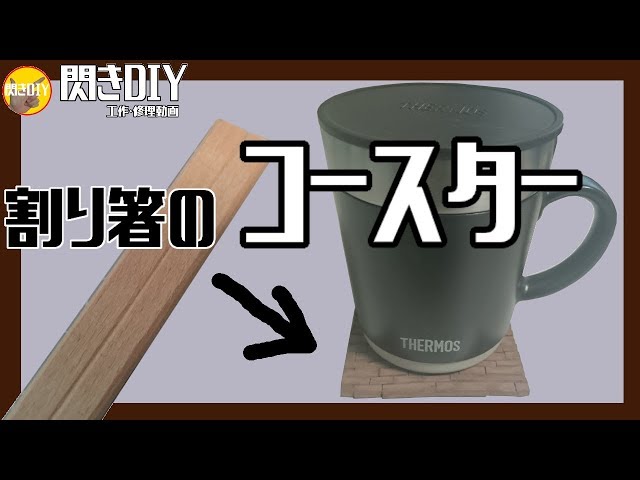
Here’s an introduction to brick-style coasters made with disposable chopsticks.
Cut the chopsticks into 1-centimeter pieces.
Since cutting them can be a bit tricky, it might be better to prepare the pieces in advance.
Stick the cut pieces onto a cork sheet with adhesive on one side, arranging them to look like bricks.
Once you’ve laid them out in a brick pattern, color them and let them dry—that’s it.
You can go for a brick-like color scheme, or use your favorite colors for a charming finish.
It’s great to have a handmade coaster to set your drinks on.
Horse made from a paper cup
@stephitupwithstephanie Melbourne Cup Horse Puppet #puppet#melbournecup#fyp#abcxyz#kidscrafts#diypuppet
♬ Alibi (with Pabllo Vittar & Yseult) – Sevdaliza & Pabllo Vittar & Yseult
This is a cute, moving horse craft made with paper cups.
For the head cup, attach a yarn mane and use pens or stickers to make the eyes and nose.
Add ears made from construction paper to complete a face full of expression.
For the body cup, attach accordion-folded construction paper legs to create a light, lively movement.
Finally, hang it from above with a bamboo skewer so it sways and looks as if it’s running—that’s the charm.
By changing the colors of the yarn and stickers, you can enjoy making unique horses like white or black ones.
Craft time will become a pleasantly refreshing break.