[For Seniors] Recommended for day services! Simple and cute small craft ideas


Craft time at the day service is an important activity that enriches both mind and body.
Each piece—like adorable pipe-cleaner bouquets and handy little organizers—shines with its own personality.
They’re lovely to use yourself, and they’d surely delight someone special as a gift!
None of the projects are very complicated, so you can take your time and work at your own pace.
Making them while chatting with other participants also helps expand your circle of communication.
Why not choose your favorite materials and colors to create a one-of-a-kind handmade piece in the whole world?
- For Seniors: Simple and Lovely Crafts – A Collection of Take-Home Project Ideas for Day Service
- [For Seniors] Introducing Fun Crafts Made with Plastic Bottle Caps
- [For Seniors] Small craft ideas: for yourself and as gifts!
- [For Seniors] Simple Handicrafts Recommended for Finger Exercise
- Take-Home Craft Ideas for Winter: Perfect for Day Services for Seniors
- [For Seniors] Practical Crafts to Make in Day-Service Recreation: Idea Roundup
- [For Seniors] DIY Strap Craft Ideas. Great as Gifts, Too!
- Handmade Gifts: Ideas That Will Delight Older Adults
- For seniors: Recommended for day services. Hands-on activities that help prevent dementia.
- [For Seniors] Amazing Scrap Fabric Hacks! Easy Handmade Small Item Ideas
- [For Seniors] Easy and Fun! Tsumami Zaiku Craft Ideas
- [For Seniors] Get Started Easily: Simple Handicraft Kit Ideas
- [For Day Service Centers] February Craft Ideas: Decorations for Setsubun, Valentine’s Day, and the Feeling of Spring
For Seniors: Recommended for Day Service! Simple and Cute Small Craft Ideas (71–80)
Cute felt accessory case

Here’s a super easy way to make a small felt-covered container.
Cut the bottom portion of a milk carton to your desired height, then attach felt to the sides.
Since you’ll be lining the inside as well, cut the felt to twice the height of the outside plus extra for the seam allowance.
After attaching the felt to the outside, line the inside, fold over the seam allowance, and make small slits at the corners to adhere it neatly and securely.
You can also use leftover felt to make a handle, and it’s recommended to decorate the edges with ribbon tape or other trims.
Flower memo stand made with origami

Let’s gather the materials at a 100-yen shop and give it a try! Here’s an idea for making an origami flower memo stand.
A memo stand is an item that holds papers or cards with notes written on them, right? It’s practical because you can display messages or things you tend to forget.
What you’ll need: origami paper, wood glue, a needle bottle, tweezers, scissors, a wooden clip, and wire.
If you make the flowers with your favorite colors of origami paper, or colors that match the recipient’s image, your feelings are sure to come across.
Medicine, coin purse

A small pouch that can hold medicine or coins is highly practical and makes a useful gift.
Fuse interfacing to the fabric and create the handle and body pieces.
Securely sew the handle to a ring placed in the center with a sewing machine, then fold the corners to add dimension.
Finish by attaching a button.
Although you’ll use a sewing machine, it’s mostly straight stitching, so it’s approachable even for beginners.
Choosing fabric patterns to match the season or personal taste adds an extra touch of originality.
For older adults, it’s not only convenient for keeping essentials close at hand; the thoughtfulness of making something just for them is an added delight.
It’s a gift that combines practicality and warmth, reminding the recipient of the giver each time it’s used.
For seniors: Recommended for day services! Easy and cute small craft ideas (81–90)
Super Easy Aroma Sachet

Let’s give the gift of a handmade sachet.
Here are some simple aroma sachet ideas.
An aroma sachet is a scented pouch that you can place in closets, drawers, or around your room to enjoy a soft, subtle fragrance.
How about making an original aroma sachet with materials you can buy at a 100-yen shop and giving it as a present? All you need are a paper envelope or drawstring pouch in a design you like, cotton, and essential oil.
The steps are simple and easy to follow, so give it a try!
Hedgehog made from a pine cone
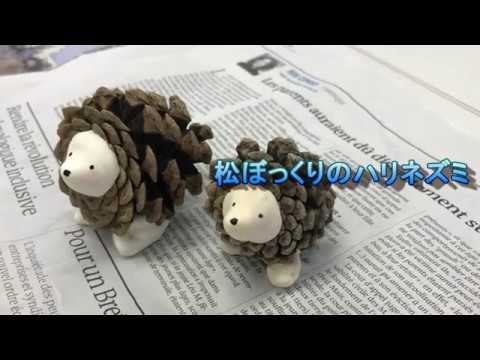
This eco-friendly, unique hedgehog uses pinecones you can find in parks and other places.
There’s no fiddly work at all, so it’s great even if you’re not good at crafts! All you need is a pinecone, air-dry clay, glue, and drawing tools.
Make the face and feet with the clay and fit them onto the pinecone.
While they’re in place, draw the eyes, mouth, and other features.
To keep it from sticking to the base, lay down a sheet of clear plastic.
After waiting a day for the clay to dry, glue everything together.
This piece really shows the warmth of the materials and is super cute.
You can expand the idea to other animals or even fruits like persimmons—try brainstorming together and making your own original creations!
Ribbon bookmarker

When we think of bookmarks, paper ones are the most common, but this time let’s make an elegant and cute bookmark using a ribbon! Prepare a ribbon about 37 cm long, jump rings, ribbon clamps, and a charm.
You can buy them at specialty parts stores, craft stores, 100-yen shops, or online.
Fold the ends of the ribbon over twice and attach the ribbon clamp hardware.
Doubling the ends helps prevent fraying.
When using pliers, place a piece of cloth between the tool and the hardware to avoid scratching it.
Once you attach the charm to the ribbon clamp with a jump ring, your bookmark is complete.
The dangling charm adds a stylish touch!
Foam polystyrene bookmark

Here’s a bookmark made with slightly unusual materials.
This one is made using polystyrene foam.
Prepare a steel sheet or a food tray that you can also find at 100-yen shops.
Place a sheet of parchment paper under the polystyrene foam, and arrange construction paper cut into your favorite shapes.
In the video, the motif is a cat and a full moon, but feel free to choose anything you like.
Layer another piece of polystyrene foam on top, cover with parchment paper, and apply heat with an iron.
When the polystyrene shrinks and the design emerges, place a heavy object like a book on it while it’s still hot.
Once it cools, tie a ribbon, and you’re done.