[For Seniors] Recommended for day services! Simple and cute small craft ideas


Craft time at the day service is an important activity that enriches both mind and body.
Each piece—like adorable pipe-cleaner bouquets and handy little organizers—shines with its own personality.
They’re lovely to use yourself, and they’d surely delight someone special as a gift!
None of the projects are very complicated, so you can take your time and work at your own pace.
Making them while chatting with other participants also helps expand your circle of communication.
Why not choose your favorite materials and colors to create a one-of-a-kind handmade piece in the whole world?
- For Seniors: Simple and Lovely Crafts – A Collection of Take-Home Project Ideas for Day Service
- [For Seniors] Introducing Fun Crafts Made with Plastic Bottle Caps
- [For Seniors] Small craft ideas: for yourself and as gifts!
- [For Seniors] Simple Handicrafts Recommended for Finger Exercise
- Take-Home Craft Ideas for Winter: Perfect for Day Services for Seniors
- [For Seniors] Practical Crafts to Make in Day-Service Recreation: Idea Roundup
- [For Seniors] DIY Strap Craft Ideas. Great as Gifts, Too!
- Handmade Gifts: Ideas That Will Delight Older Adults
- For seniors: Recommended for day services. Hands-on activities that help prevent dementia.
- [For Seniors] Amazing Scrap Fabric Hacks! Easy Handmade Small Item Ideas
- [For Seniors] Easy and Fun! Tsumami Zaiku Craft Ideas
- [For Seniors] Get Started Easily: Simple Handicraft Kit Ideas
- [For Day Service Centers] February Craft Ideas: Decorations for Setsubun, Valentine’s Day, and the Feeling of Spring
For Seniors: Recommended for Daycare! Simple and Cute Small Craft Ideas (251–260)
Tulips at the mall

Here’s how to make an easy and cute tulip using chenille stems (pipe cleaners).
Prepare two chenille stems in your favorite color for the petals and two green ones for the leaves.
Fold each stem in half, stack the folded points together, twist them, then align the ends with the knot at the top.
Twist the aligned part to secure it—this completes the leaf.
For the flower, twist once at the center while the stems are still aligned, then fold up again and twist to secure.
Round the shapes, and curl the extended ends to form the petals.
Make three identical petal pieces and glue them together to complete the flower.
Attach the flower and leaves to a plastic stick to finish your chenille-stem tulip.
Wrapping it or bundling several together into a bouquet makes it even more decorative.
A small rack that can also hold the remote control.

Let’s try making a small rack that’s handy for keeping a remote control or glasses.
We’ll use two milk cartons.
The inner divider will also serve as a handle, so cut one side to about 15 cm and the other three sides to 8 cm.
Make a hole for the handle, tape the long sides together with double-sided tape, and then apply fabric to the sides, bottom, and inside.
Leave about a 1.5 cm seam allowance for the fabric, and trim the corners so they adhere neatly.
If handling fabric is difficult, you can decorate it with origami or chiyogami paper instead.
A pouch that can manage medication for four doses a day

Some older adults need to take medication as many as four times a day—morning, noon, evening, and before bed.
Here’s a handy item for them.
Attach a laundry bag or a soft plastic sheet to a fabric in your favorite pattern or color, and create divided pockets for about four doses × one month.
Adding decorations like lace or appliqués not only makes it cute, but also helps distinguish it from others—highly recommended.
Add a button and make it like a notebook for easy carrying.
If you use a lovely pattern, you’ll want to pick it up and open it, which helps prevent forgetting to take your medicine.
Triangle Garland

Also recommended for event decor! Here are some ideas for triangle garlands.
A garland is a decoration made by stringing together flags, flowers, and the like.
It’s a perfect idea for anyone who wants to decorate walls or windows and enjoy sprucing up their room! You’ll need fabric scraps, scissors, string, and so on.
If you use different fabric scraps on the front and back, you can make it reversible—that’s a nice bonus.
Try making a warm, cozy garland using scraps you can’t throw away or leftover pieces of fabric.
Gogatsu Ningyo (Boys’ Day dolls)
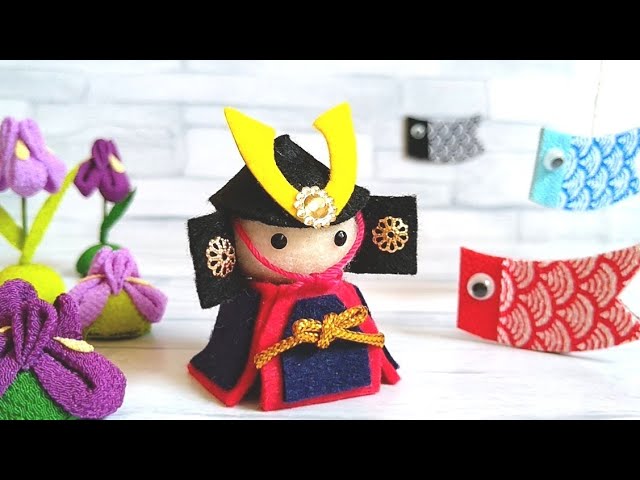
Let’s make a cute Boys’ Day doll out of felt without any sewing.
Use decorative balls—so-called pom-poms—from the 100-yen shop and stick on the armor and other parts.
Use a pom-pom for the face as well, and place a helmet on it.
If cutting small parts seems difficult, you can prepare just the parts in advance and simply have them assembled.
It’s fun because the finished dolls have a variety of expressions depending on the maker.
Please give it a try!
photo frame

This is a photo stand you can make from a flyer—perfect for when you want to display photos easily.
The appeal is that anyone can make it with just an A4-sized flyer! There are no complicated folds at all.
To finish, simply set the photo inside and fold the edges around it—done! It stands on its own, so it’s great as an accent for your room.
It’s also an ideal craft for day service activities, so imagine which photos you’ll put in and have fun making it together with everyone!
Embroidery kit

These days, 100-yen shops sell all kinds of items.
They even have craft sections, so you can easily try things without going to a specialty store.
This time, I’d like to introduce embroidery kits from 100-yen shops.
They come with fabric printed with embroidery patterns and a set of instructions that explain the stitches and steps.
The designs include flowers, letters, and more, so pick your favorite and give it a try.
You can also find matching threads and embroidery hoops in the craft section at the 100-yen shop.
Older adults can enjoy quietly stitching their projects while having lively conversations with those around them.