[For Seniors] Recommended for day services! Simple and cute small craft ideas


Craft time at the day service is an important activity that enriches both mind and body.
Each piece—like adorable pipe-cleaner bouquets and handy little organizers—shines with its own personality.
They’re lovely to use yourself, and they’d surely delight someone special as a gift!
None of the projects are very complicated, so you can take your time and work at your own pace.
Making them while chatting with other participants also helps expand your circle of communication.
Why not choose your favorite materials and colors to create a one-of-a-kind handmade piece in the whole world?
- For Seniors: Simple and Lovely Crafts – A Collection of Take-Home Project Ideas for Day Service
- [For Seniors] Introducing Fun Crafts Made with Plastic Bottle Caps
- [For Seniors] Small craft ideas: for yourself and as gifts!
- [For Seniors] Simple Handicrafts Recommended for Finger Exercise
- Take-Home Craft Ideas for Winter: Perfect for Day Services for Seniors
- [For Seniors] Practical Crafts to Make in Day-Service Recreation: Idea Roundup
- [For Seniors] DIY Strap Craft Ideas. Great as Gifts, Too!
- Handmade Gifts: Ideas That Will Delight Older Adults
- For seniors: Recommended for day services. Hands-on activities that help prevent dementia.
- [For Seniors] Amazing Scrap Fabric Hacks! Easy Handmade Small Item Ideas
- [For Seniors] Easy and Fun! Tsumami Zaiku Craft Ideas
- [For Seniors] Get Started Easily: Simple Handicraft Kit Ideas
- [For Day Service Centers] February Craft Ideas: Decorations for Setsubun, Valentine’s Day, and the Feeling of Spring
[For Seniors] Recommended for Day Service! Simple and Cute Small Craft Ideas (271–280)
Origami name tag
Let me show you how to make a name tag out of origami that looks like a woven ribbon.
We’ll fold it using a rectangular piece made by cutting a square of origami paper in half.
It’s very easy to fold, so you can make two tags from one sheet, and you can even use the leftover paper for decoration.
You can place it like a place card and use it as a nameplate, or attach this ribbon tag to crafts made during an activity to write the creator’s name—it’ll look cute either way.
For the ribbon’s tail, you can either cut the notch with scissors or create it by folding, so choose whichever method you prefer.
Laminated pressed-flower card
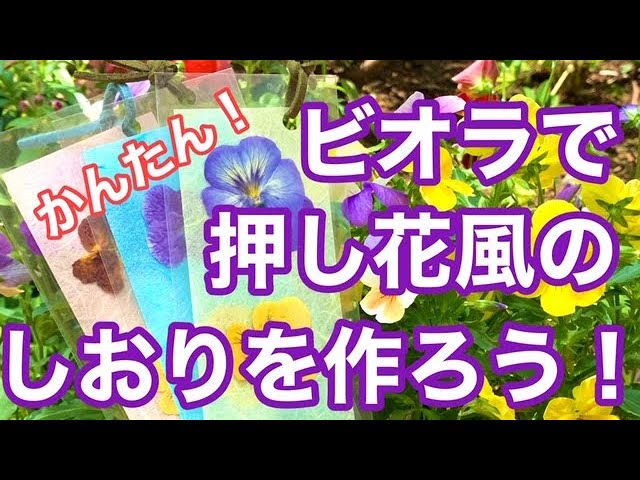
Why not make a vibrant, long-lasting nameplate using pressed flowers and a laminating card? Pressed flowers might sound time-consuming, but if you use a microwave, they dry in no time—you can make pressed flowers in about a minute.
Carefully place the finished pressed flowers with tweezers onto a piece of paper with the name written on it so they don’t tear, then seal it in a laminating film to finish.
These days you can find easy-to-use laminating films at 100-yen shops, so take advantage of those.
Punch a hole and you can hang it from a bag, too.
A basket-style design with a cute handle

A cute-handled basket you can make from a single milk carton by using three sides for the body and the remaining side as the handle.
Cut it to size, paste your favorite wrapping paper or similar on the inside and outside, then staple it together.
Add decorations to hide the handle base and staples, and you’re done.
The key point is making small cuts to create angles and stapling them in place—this gives it that basket-like look.
It’s a handy size for holding fruit or for tucking away items you don’t want to stand out, so it seems useful for all kinds of purposes.
Finger-knitted acrylic scrubber

Finger-knitted acrylic scrubbies are an easy craft idea that uses readily available acrylic yarn.
Their soft feel and colorful look make them appealing, and they’re also highly practical—they clean well and dry quickly.
Since the process involves hooking the yarn with your fingers as you knit, it’s perfect for finger exercises, and the fine motor movements can even provide brain-training benefits.
By experimenting with colors and shapes, you can create your own unique designs, and sharing the finished pieces with one another can turn the activity into a great opportunity for communication.
Three-dimensional hanging scroll of morning glories

We’d like to introduce a morning glory hanging scroll that’s perfect for the season when the rainy season ends and the heat sets in.
Make the morning glories by folding and cutting origami, then attach paper straws to them.
Cut a base into a long rectangular shape like a hanging scroll and punch holes for the straws.
Insert the morning glories with the attached straws into the holes in the base.
If you thread a string through the straws, you can hang it up as a decoration.
Curving the base will give the morning glories a three-dimensional look.
Many older adults associate morning glories with summer, so creating this piece can also help them feel the season.
Pinecone doll

Pinecone dolls are a perfect craft for autumn.
They’re made using pinecones, acorns, twigs, and dried leaves.
Because they use natural materials, you can appreciate the unique character of each component.
All you need to do is attach the materials with a hot glue gun, so it’s an easy craft for older adults to try.
Touching natural materials allows you to experience the season, which can also help stimulate the minds and bodies of seniors.
By imagining a leaf as a violin, you can complete a doll that looks like it’s playing the violin.
Momotaro

The story of “Momotaro” has long been loved as a tale in which Momotaro sets out to defeat demons with millet dumplings made by his grandmother hanging at his waist, accompanied by a dog, a monkey, and a pheasant.
This time, let’s make the main character, Momotaro.
Cutting out small parts with scissors involves fine hand movements and thinking about “How should I cut this?”, which provides good stimulation for the brain and is expected to help prevent dementia.
If you’re doing this in a senior care facility, it’s safer to pre-cut the parts and have participants do the pasting.