[For Seniors] Practical Crafts to Make in Day-Service Recreation: Idea Roundup


At day service craft activities, there are times when participants make items to take home.
I imagine many people display them at home, too.
This time, we’re sharing craft ideas for older adults that you can make and actually use!
We’ve gathered practical crafts you can keep using after you make them, as well as stylish pieces that look great on display.
Simply changing the origami patterns or the types of beads and ribbons can create a completely different feel, so have fun using these ideas as inspiration.
- For Seniors: Simple and Lovely Crafts – A Collection of Take-Home Project Ideas for Day Service
- [For Seniors] Small craft ideas: for yourself and as gifts!
- [For Seniors] Recommended for day services! Simple and cute small craft ideas
- [For Seniors] A Collection of Craft Ideas Using Paper Cups
- Take-Home Craft Ideas for Winter: Perfect for Day Services for Seniors
- For Seniors: Come, Spring! Recommended March Craft Ideas for Daycare Services
- [For Seniors] Simple Handicrafts Recommended for Finger Exercise
- [For Seniors] Recycle Everyday Materials: A Collection of Flyer Craft Ideas
- [For Seniors] Have Fun Making Things Based on Today’s Mood! Today’s Recommended Craft
- [Day Service] Craft Ideas for Seniors to Make in October
- [For Seniors] Easy Construction Paper Crafts Activity
- [For Seniors] Easy and Fun! Tsumami Zaiku Craft Ideas
- [For Seniors] Color Your Care Facility’s Spring: Wall Decoration Ideas
[For Seniors] Practical crafts to make in day-service recreational activities. Idea roundup (281–290)
Simple bookmark
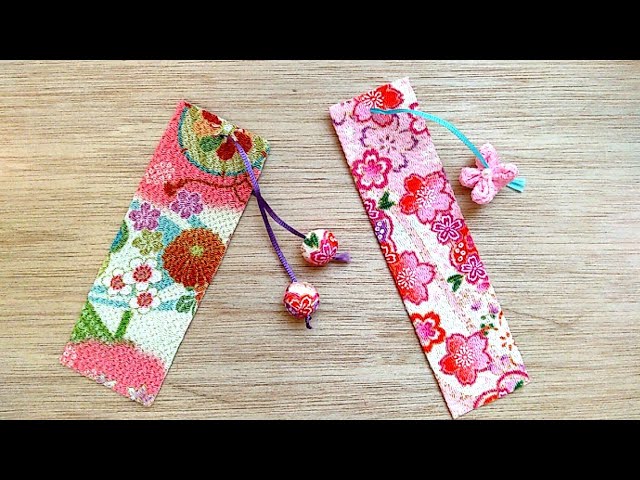
This is a bookmark craft we’d like older adults who enjoy reading to make.
Prepare chirimen fabric, apply double-sided tape to the back, and fold it in half.
Thread a string through with a needle.
It looks lovely to add decorations to the string, such as a small Styrofoam ball covered with chirimen, or other chirimen craft pieces.
Because this bookmark is easy to make, it should be approachable for older adults as well.
Having a handmade bookmark makes reading even more enjoyable.
Chirimen fabric is also available at 100-yen shops, so gathering materials is easy.
Easy fluffy mittens

Let’s make simple gloves using yarn.
Many yarn crafts involve knitting needles or crochet hooks, right? Some older adults may feel, “I’m not good at knitting.” Knitting often includes complicated methods.
However, here’s a way to make knitted gloves using just cardboard and wooden sticks like ice cream sticks.
Place your hand on the cardboard and draw an outline about one size larger.
After cutting out the outline, make slits at 1-centimeter intervals along the cut edge.
Wrap yarn around all the slits in the cardboard, then attach yarn to a wooden stick and start weaving.
The key is to pack the woven sections tightly together.
Once you’ve finished weaving, tie off the end of the yarn, remove it from the cardboard, and you’re done.
This easy method for making hand-knit gloves seems like something older adults can enjoy as well.
paper cup basket

The great thing about paper cups is that they’re light and easy to use.
Here’s a lovely basket you can make using a paper cup.
For those living in senior facilities, it’s just the right size for sharing snacks or candies with everyone.
All you need are paper cups and a cutting tool like a craft knife.
First, cut around the rim of the paper cup in a circle; the piece you cut off will be fashioned into the handle.
Next, make vertical slit strips in the cup body about 1–2 cm wide, then weave the cut strips to form the basket.
Attach the crafted handle to the cup, and you’re done.
If you color the cup or draw designs on it, you’ll have a charming one-of-a-kind basket.
Recommended for those who are good with their hands!
hydrangea

Here is a no-sew hydrangea made from felt.
Cut two petals of the same shape from felt in different colors.
Thread them onto a wire; use hot glue on one of the pieces to secure it in a three-dimensional form.
Once that’s done, thread the second piece from the back and layer it.
Attach a bead or similar item in the center to complete one flower.
Make about eight of these and combine them into one bloom.
Then make about two leaves per bloom.
They look cute displayed in a vase or made into a corsage.
[For Seniors] Practical crafts to make in day-service recreation. Idea roundup (291–300)
No-sew clasp pouch

Introducing a clasp pouch you can make without sewing.
Projects stitched with a sewing machine or needle can be fun for those who are skilled at or enjoy handicrafts.
For those who aren’t confident in sewing, we also recommend projects that use fabric glue for bonding.
Cut the fabric according to the pattern and adhere the pieces with glue.
Use an iron’s heat to set the adhesive.
Attach the metal clasp with craft glue.
It’s simple to make yet looks intricately crafted, and it’s likely to be appreciated by older adults as well.
No-sew cherry blossom corsage

Introducing a cherry blossom corsage that’s perfect for ceremonies like entrance ceremonies.
Although it looks glamorous, you can make it without using a needle and thread.
What you’ll need: pink and light green felt, flower stamens, wire, brown floral tape, a corsage pin, and ribbon.
For the flower, cut the felt into a circle and make five slits to divide it into equal parts.
Round the corners and cut the tips into a jagged shape.
Wrap the stamens onto the wire, thread the felt on, and secure it with glue.
Use the light green felt to make the calyx, then wrap and secure everything with tape along the wire.
Make several of the same flower and bundle them together with tape.
Attach a corsage pin to the stem, secure it again with tape, and finish by wrapping a ribbon.
There are no complicated steps, so you can proceed with confidence.
Give it a try as a bit of finger exercise, too.
plant dyeing

Let’s try plant dyeing, using colors from plants to dye fabric! There are many recommended materials for plant dyeing—such as black soybeans, mugwort, and onion skins—so pick whatever you like.
For the fabric, choose natural fibers like linen, cotton, or wool.
Before dyeing, soak the fabric in milk or similar to infuse it with protein.
Make the dye by simmering your chosen materials in a pot.
Next, prepare a mordant using alum and apply the dye to the fabric.
After dyeing, rinse with water and let it dry to finish.
Because the process takes time and care, you’ll feel a special attachment to the piece you create.