[For Seniors] Practical Crafts to Make in Day-Service Recreation: Idea Roundup


At day service craft activities, there are times when participants make items to take home.
I imagine many people display them at home, too.
This time, we’re sharing craft ideas for older adults that you can make and actually use!
We’ve gathered practical crafts you can keep using after you make them, as well as stylish pieces that look great on display.
Simply changing the origami patterns or the types of beads and ribbons can create a completely different feel, so have fun using these ideas as inspiration.
- For Seniors: Simple and Lovely Crafts – A Collection of Take-Home Project Ideas for Day Service
- [For Seniors] Small craft ideas: for yourself and as gifts!
- [For Seniors] Recommended for day services! Simple and cute small craft ideas
- [For Seniors] A Collection of Craft Ideas Using Paper Cups
- Take-Home Craft Ideas for Winter: Perfect for Day Services for Seniors
- For Seniors: Come, Spring! Recommended March Craft Ideas for Daycare Services
- [For Seniors] Simple Handicrafts Recommended for Finger Exercise
- [For Seniors] Recycle Everyday Materials: A Collection of Flyer Craft Ideas
- [For Seniors] Have Fun Making Things Based on Today’s Mood! Today’s Recommended Craft
- [Day Service] Craft Ideas for Seniors to Make in October
- [For Seniors] Easy Construction Paper Crafts Activity
- [For Seniors] Easy and Fun! Tsumami Zaiku Craft Ideas
- [For Seniors] Color Your Care Facility’s Spring: Wall Decoration Ideas
[For Seniors] Practical crafts to make in day-service recreation. Idea roundup (291–300)
A charm with a cute sheer look

How about a handmade charm to encourage exam takers and others? For this charm, you’ll use a laminated sheet made by placing an aurora-design sheet and a transparent film—both cut into small squares—together with something like a clear sticker inside a laminating pouch.
This laminated piece becomes the body of the charm, and the outer part is made from felt.
Cut a window in the felt outer layer, apply double-sided fabric tape, and insert the laminated sheet.
With its sparkle and transparency, it feels like a charm that promises a bright future.
baseball cap

It’s a baseball cap you can actually wear, made from flyers! It might be a bit on the challenging side, but the sense of accomplishment matches the effort you put in.
First, crumple up a large flyer into a ball and then spread it out, shaping the whole thing into a cylinder.
Tip: check as you go to make sure your head fits inside! Next, fold the edge in slightly and secure it, then turn about half of it inside out in one go.
Finally, push the remaining part over to one side to create a hole, shape the brim, and you’re done! No glue or scissors needed.
It’s great to make with your grandkids, and also recommended as an activity for day-service recreation!
Koinobori garland

When it comes to Children’s Day decorations, koinobori carp streamers are a classic—their colorful look really highlights the fun.
This piece is about making a koinobori-inspired garland using felt.
First, cut the base felt into the shape of a carp streamer, then combine it with colored felt and decorative parts.
After that, just connect the koinobori pieces and you’re done, but it’s also recommended to pair them with decorations like pinwheels to express the feel of wind.
Focusing on aligning and sticking the felt pieces neatly together is a good way to boost fingertip concentration.
Christmas wreath
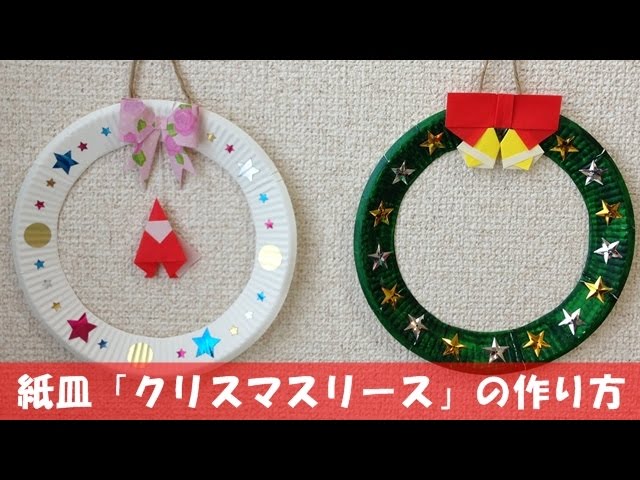
Let’s try making a wreath using a paper plate.
Cut out a circle from the center, and use the outer ring as the wreath.
Then, attach decorations you like—such as stars or a Santa Claus folded from origami—and you’ll have a Christmas wreath.
It’s also nice to make wreaths for other seasons by adding seasonal items, not just for Christmas.
Popup card
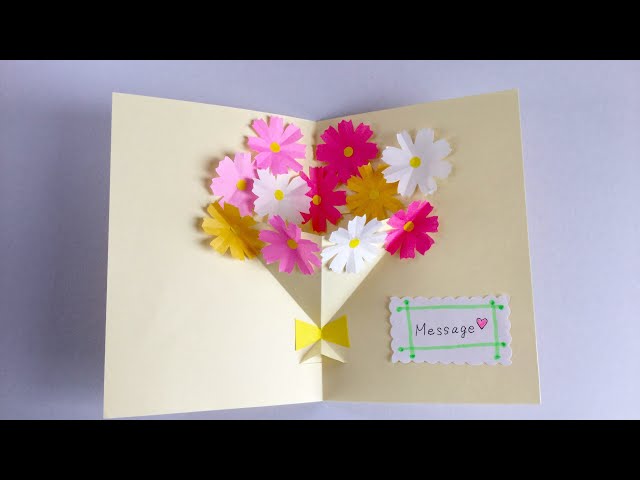
A message card to send for birthdays and other occasions.
Those pop-up cards that become three-dimensional when you open them are so cute, aren’t they? Let’s try making one by hand.
This guide shows how to create a card where a bouquet pops out by making lots of small flowers from origami.
It involves a bit of detailed work, but it’s great for using your fingertips, so I recommend it.
3D Origami Flower Bouquet

We’ll use origami and colored paper to make three-dimensional flowers and turn them into a bouquet.
Make the flower parts with origami, and use colored paper for the stems and leaves.
Folding the flower parts takes many steps, so it’s a bit challenging, but it’s great for stimulating your brain since it uses fine motor skills.
Let’s make lots of flowers in various colors and create a gorgeous bouquet!
Knitting with milk cartons

Knitting with a milk carton? It sounds surprising, but you can actually knit without using needles! Make several small protrusions on the milk carton to catch the yarn, wrap the first row around and around, then from the second row on, thread the yarn through to knit.
Once you’ve knitted to your desired length, pull the end of the yarn and add a pom-pom, and your scarf is complete!