[For Seniors] Let’s Start a Fun Craft Activity

In elderly care facilities and day service centers, craft-based recreation is essential.
Because it involves fine motor movements, it helps with rehabilitation and stimulates the brain.
In this article, we’ve gathered easy and enjoyable craft ideas that older adults can make with minimal effort.
Even those who have never done crafts and lack confidence will find it easy to get started.
Most materials are things you already have at home or can quickly pick up at a dollar store.
If you’re interested in crafts, give them a try!
- [For Seniors] Introducing Fun Crafts Made with Plastic Bottle Caps
- For Seniors: Simple and Lovely Crafts – A Collection of Take-Home Project Ideas for Day Service
- [For Seniors] Easy and Fun! Tsumami Zaiku Craft Ideas
- [For Seniors] DIY Hand Rehabilitation Tools to Strengthen Fingertips: A Collection of Handmade Ideas
- [For Seniors] Recommended for day services! Simple and cute small craft ideas
- For Seniors: Auspicious Handmade Zodiac Ornament Craft Ideas
- [For Seniors] Enjoy at Day Service: A Roundup of May Craft Ideas
- [For Seniors] Practical Crafts to Make in Day-Service Recreation: Idea Roundup
- [For Seniors] DIY Rehabilitation Aids: A Collection of Easy-to-Make Ideas
- [For Seniors] Enjoy Your Alone Time: Perfect Ideas for Passing the Time
- [For Seniors] Have Fun Making Things Based on Today’s Mood! Today’s Recommended Craft
- [For Seniors] Easy Craft Activity Using Straws
- [For Seniors] Enjoy the Hot Summer to the Fullest! A Collection of Easy Craft Ideas
[For Seniors] Let's Start Fun Craft Activities (91–100)
Horse Play Craft

This is a unique craft idea that uses yarn to create a mane.
You’ll need construction paper, yarn, cardboard, and cooking chopsticks.
Draw a horse’s face, ears, and mane on the construction paper and cut along the lines.
Prepare two pieces each for the face and ears.
After gluing the parts together, attach the yarn to the mane.
Using a craft punch to make evenly spaced holes will make this easier.
Fold the yarn in half, pass the loop through a hole, then pull the loose ends through the loop to secure it.
Thread two strands of yarn through each hole.
After attaching the eyes and nose, place a piece of cardboard between the layers to make it sturdy and secure the cooking chopsticks.
Decorate with cute embellishments to finish.
It’s a project that would likely be a delightful gift for your grandchild.
Stained glass grapes
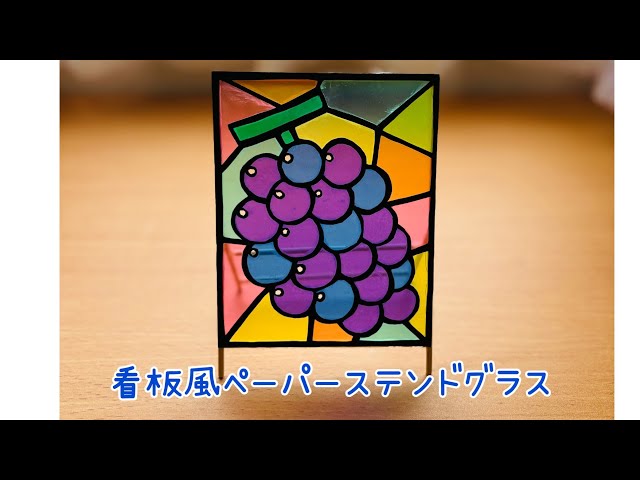
Stained glass displayed in museums and churches creates a lovely atmosphere, doesn’t it? Let’s make a grape-themed piece with a stained-glass look.
Place a drawing of grapes on a backing sheet and cut along the lines with a craft knife.
Next, place blue and purple film over the grape drawing on the backing sheet and draw your cutting lines.
Cut along those lines and stick the pieces onto the backing sheet.
That’s all it takes to complete a stained-glass-style artwork.
Since it doesn’t use real glass and is easy to make, it should be a project that’s approachable for older adults as well.
Christmas gift-shaped charm

Christmas just isn’t complete without presents! So, here’s how to make a Christmas gift-shaped charm.
First, prepare some craft paper and design your favorite motif.
You can draw it with a pen, or use origami paper, colored paper, yarn, and other materials to give it a three-dimensional finish.
Next, put cotton and beads into a small transparent bag to create a snowy effect, then place your designed craft paper inside, seal the bag, and fold the top two corners to the back, securing them with tape.
Glue the bag onto a piece of felt that will serve as the base of the charm, and shape the felt into a gift shape.
Finally, tie a ribbon, and your charm is complete.
Santa made of felt

Here’s a handmade idea for a cone-shaped Santa Claus.
First, cut a piece of cardstock into a semicircle and roll it into a cone.
Cover it with felt in your favorite color, then glue a long, thin strip of white felt slightly above the center to represent the hat.
Cut out the face base and clothing pieces from felt and attach them as well.
For the beard, use yarn and a pen, creating it with a method similar to casting on stitches in knitting.
Once you’ve glued the beard around the face base, add eyes using rhinestones painted black and attach a larger bead for the nose.
Finally, add a star-shaped accent to the chest, and you’re done.
Just cut and paste. Shaka-shaka ornament.
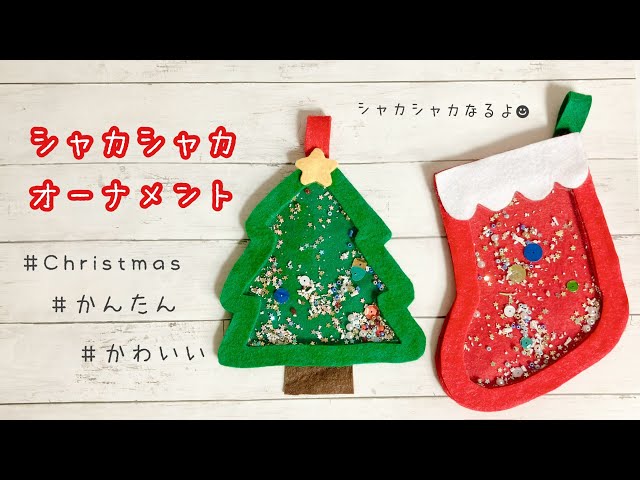
Let’s handcraft warm, felt Christmas ornaments.
First, create your favorite shapes—like a stocking or a tree—using thick paper.
Next, use this template to cut 0.3 mm plastic sheet and the felt that will serve as the ornament base.
Cut out the inside of the thick-paper template to make a frame-only template, then use that to cut three felt frames.
Glue two of the felt frames onto the felt base to add height, and place your favorite beads or sequins inside.
Glue the plastic sheet and the remaining felt piece on top, attach a hanging component, and you’re done!
Easy wreath made from a single sheet of origami paper

There are various ways to make wreaths out of origami.
You can create a cute wreath with just a single sheet.
From a 15-centimeter square sheet of origami paper, cut it into nine pieces measuring 5 centimeters each.
Set one piece aside, and fold the remaining pieces into the parts for the wreath.
The trick is to make four pieces with the colored side facing outward and the other four with the white side facing outward.
Once the parts are finished, assemble them into the wreath.
Fold and cut the remaining piece to make a ribbon and decorate the wreath with it.
You can also enjoy customizing it by adding round or star-shaped stickers.
It’s a project that older adults can enjoy making while chatting with those around them.
Santa stuck in a chimney

How about making a Santa Claus decoration trying to climb down a chimney to deliver presents? It’s a humorous piece that will surely make you chuckle and feel delighted every time you see it.
All you need are a toilet paper roll, colored construction paper, a pen, scissors, and glue.
First, draw a chimney pattern on brown construction paper with a white pen and paste it onto a slightly flattened toilet paper roll.
Next, use red, white, and black construction paper to create Santa’s lower half.
Once Santa is ready, glue him upside down on top of the chimney.
Finish by adding snow pieces and a white sack to the chimney.