[For Seniors] Let’s Start a Fun Craft Activity

In elderly care facilities and day service centers, craft-based recreation is essential.
Because it involves fine motor movements, it helps with rehabilitation and stimulates the brain.
In this article, we’ve gathered easy and enjoyable craft ideas that older adults can make with minimal effort.
Even those who have never done crafts and lack confidence will find it easy to get started.
Most materials are things you already have at home or can quickly pick up at a dollar store.
If you’re interested in crafts, give them a try!
- [For Seniors] Introducing Fun Crafts Made with Plastic Bottle Caps
- For Seniors: Simple and Lovely Crafts – A Collection of Take-Home Project Ideas for Day Service
- [For Seniors] Easy and Fun! Tsumami Zaiku Craft Ideas
- [For Seniors] DIY Hand Rehabilitation Tools to Strengthen Fingertips: A Collection of Handmade Ideas
- [For Seniors] Recommended for day services! Simple and cute small craft ideas
- For Seniors: Auspicious Handmade Zodiac Ornament Craft Ideas
- [For Seniors] Enjoy at Day Service: A Roundup of May Craft Ideas
- [For Seniors] Practical Crafts to Make in Day-Service Recreation: Idea Roundup
- [For Seniors] DIY Rehabilitation Aids: A Collection of Easy-to-Make Ideas
- [For Seniors] Enjoy Your Alone Time: Perfect Ideas for Passing the Time
- [For Seniors] Have Fun Making Things Based on Today’s Mood! Today’s Recommended Craft
- [For Seniors] Easy Craft Activity Using Straws
- [For Seniors] Enjoy the Hot Summer to the Fullest! A Collection of Easy Craft Ideas
[For Seniors] Let's Start Fun Craft Activities (21–30)
Two-color felt koi-nobori

Let’s make a carp streamer with felt that gives a warm, cozy feel.
Once you’ve prepared felt in different colors for the body, cut both pieces into a “V” shape with a 5 cm width.
After cutting, apply glue to both ends and stick them together, then make two slits along the crease so they’re the same width.
Stack the two pieces so that the slitted sections form a lattice pattern, and use the initially glued area to create the face and tail fin.
For the eyes, use eye stickers, and wrap a thinly cut strip of white felt around the mouth.
Chirimen craft: Koinobori (carp streamers)

Because of its distinctive texture, chirimen fabric strongly evokes a traditional Japanese atmosphere.
This piece uses that Japanese-feeling fabric to make a koi nobori (carp streamer), clearly emphasizing that it’s a Japanese event.
The key point is the scale pattern; using it well gives the koi nobori a luxurious look.
Layering various fabrics to add volume further enhances the splendor when they’re displayed together.
It also seems fun to think about what shapes would best bring out the qualities of chirimen.
[For Seniors] Let's Start Fun Craft Activities (31–40)
A hanging decoration of carp streamers made with yarn
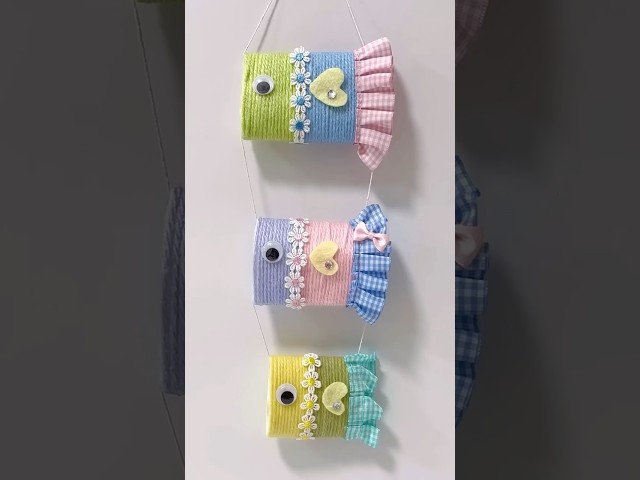
A soft-looking carp streamer made with yarn—this craft creates a cheerful vibe through playful color combinations.
For the base, use a kitchen paper tube: cut it, apply double-sided tape, and attach the yarn.
The key is to stick the yarn on without gaps; once the tube is wrapped so it doesn’t show, add decorations to finish.
It’s also recommended to line up versions with different colors, sizes, and decorations to make the display even more fun.
Climbing koi-nobori

Shall we make a carp streamer you can also enjoy flying? We’ll use a paper cup, a straw, round stickers, and kite string.
First, cut out the bottom of the paper cup.
Then gently flatten the rim and cut a triangle with scissors to make the tail fin.
Inside the cup, stick two short, vertical pieces of straw facing each other.
Use round stickers to add the eyes and scales.
For the scales, cut the stickers in half.
Thread the kite string through the straws and you’re done! Hook the looped part of the string onto a high spot and set the carp streamer lower down.
By moving the string alternately left and right, friction will make the carp streamer rise!
bear
There are many kinds of dolls made with Yakult containers, but using them upside down might be unusual.
Here, let’s use an empty container upside down to make a bear.
First, stick double-sided tape all around the container, then wrap yarn around and around it.
The bottom of the container will be the head, so attach a circular piece of colored paper there and add the ears.
Draw the nose and mouth on a round sticker and stick it on, add the eyes, and you’re done.
They look very cute if you make lots of them in various colors.
butterfly
@pakpaijo135t bikin kerajinan kupu-kupu dari botol yakult #yakult minuman kerajinan #kraft#craft kreatif anak #anaktk#anakhebatku#fyp#fypシ fypppppppppppppp
♬ suara asli – pakpaijo
You can make a cute butterfly using a Yakult container.
For the wings, layer a circle cut from colored paper with a slightly smaller circle of colored paper on top.
Fold the stack in half, then fold it in half again parallel to the first fold, and continue folding like that; when you open it up, it will be an accordion.
After making the accordion, fold it in half and spread out the outer sides.
Make two of these so they face each other.
Wrap strips of colored paper around the bottom and the body of the container, matching their widths to those parts of the container.
Attach curled paper for the antennae, add the wings you made, draw the face, and you’re done.
lamp
@listatsurayya Lampu tidur seupil #diy#craft#tutorial#daurulang#baranbekas#idekreatif#lamputidur#samasamabelajar#botolyakult#aesthetic
♬ suara asli – Lista Tsurayya – Lista Tsurayya ✨
Here’s an idea for making a lamp that uses Yakult containers as a support column.
First, prepare two containers and glue them together at the drinking openings.
Next, cut out two 10 cm diameter cardboard circles, glue them together, and attach the previously joined containers at the center.
This will form the base and the column of the lamp.
Then, prepare a paper bowl, cut out the bottom, and decorate it with a decorative sheet.
After that, cut some disposable chopsticks and glue them in a cross shape across the rim of the paper bowl.
Place this on top of the column and glue it in place to finish.
If you put an LED inside, it can be used as a stylish lamp.
Since there are many steps involving cutting and gluing various materials, it’s a great idea for when you want to take your time and enjoy a craft project.