[For Seniors] Ideal for Finger Rehabilitation: A Collection of Simple Ideas Made with Yarn


Craft activities using yarn might seem difficult at first glance.
Did you know there are yarn projects you can make by simply gluing pieces together or finishing them with finger knitting?
In this article, we introduce simple yarn crafts suitable for older adults.
Thinking through the steps and envisioning the finished piece helps stimulate the brain, making these activities recommended for seniors.
They also involve many fine-motor tasks, which can support hand rehabilitation.
Please read this article and use it as a reference for your craft activities.
- [For Seniors] Simple Handicrafts Recommended for Finger Exercise
- [Dementia Prevention] Introducing Easy Knitting!
- Perfect for winter! Easy yarn crafts for seniors
- [For Seniors] DIY Hand Rehabilitation Tools to Strengthen Fingertips: A Collection of Handmade Ideas
- [For Seniors] Small craft ideas: for yourself and as gifts!
- [For Seniors] Amazing Scrap Fabric Hacks! Easy Handmade Small Item Ideas
- [For Seniors] Recommended Handmade Activities! Simple Ideas
- For Seniors: Needle-Free Crafts. A Safe and Easy Collection of No-Sew Project Ideas
- [For Seniors] DIY Rehabilitation Aids: A Collection of Easy-to-Make Ideas
- [For Seniors] Introducing Fun Crafts Made with Plastic Bottle Caps
- For Seniors: Easy, No-Sew! Felt Craft Ideas
- For Seniors: Simple and Lovely Crafts – A Collection of Take-Home Project Ideas for Day Service
- [For Seniors] Finger Rehabilitation Tools: Easy DIY Ideas
[For Seniors] Ideal for finger rehabilitation. A collection of simple ideas made with yarn (21–30)
A placemat woven from cardboard

Add color to your table with a placemat you make yourself.
Create an easy yarn placemat using a cardboard loom.
Tape the edges of the cardboard with duct tape, cut small slits along the edge, then thread yarn into the slits.
The duct tape reinforces the cardboard when you cut it and when you thread the yarn.
After threading the yarn through the slits and wrapping it around, begin weaving.
When weaving, pass the yarn through a dedicated shuttle or a piece of cardboard.
Try changing the yarn color partway through to give it a different look.
When you finish weaving, tie the yarn at both ends to complete your placemat.
A trivet woven from toilet paper rolls
A simple-to-make trivet woven using toilet paper rolls has a warm, original feel.
Prepare the materials: disposable chopsticks, toilet paper rolls, cellophane tape, yarn, and a needle.
First, make the base for weaving the trivet using the toilet paper rolls.
Cut the chopsticks in half and tape them vertically around the toilet paper roll, spacing them evenly.
Once that’s ready, string the yarn in an alternating pattern to form the base.
Next, gently loop the yarn over the chopsticks so it sits on top; the key is to drape the yarn lightly and loosely.
Hook the yarn onto the needle and weave around in circles until it forms the shape of a trivet, and you’re done.
Using colorful yarn will give you a bright, cheerful trivet.
A mat woven with anti-slip sheets

Many people use non-slip mats to prevent shifting at the entrance or in the bathroom.
If you use a non-slip sheet with small holes, you can make a knitted mat by taking advantage of those holes.
Thread yarn through the holes in the sheet and keep knitting.
Layer another non-slip sheet on top and crochet the edging around both sheets together.
Add a frill to complete a cute, furry-looking mat.
Since the steps aren’t too complicated, it seems like something you could make with your child.
The frilled design also gives it a princess-like feel, so children who love princesses are likely to enjoy it.
Weaving a coaster with a paper plate
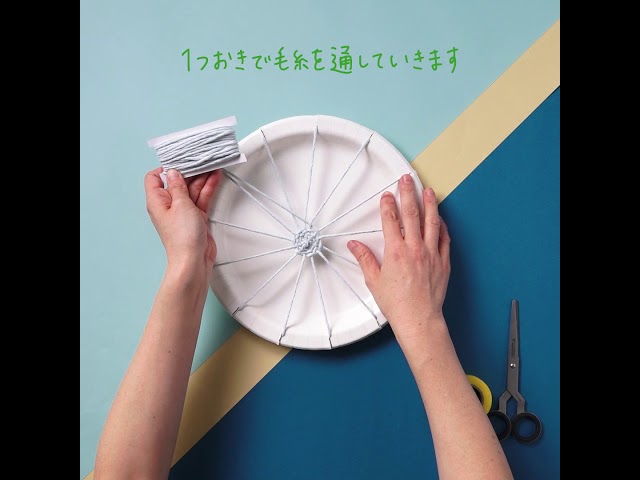
Let’s make round yarn coasters that take advantage of a paper plate’s circular shape.
Cut slits around the rim of the paper plate.
The key is to make sure the number of slits is odd.
Thread yarn from the back of the plate through a slit, then across to the slit on the opposite side.
Continue threading the yarn through all the slits, and then start weaving from the center of the plate.
With this method, you can easily make a circular coaster.
Switching yarn colors partway through will create a cute design.
Both paper plates and yarn are sold at 100-yen shops, so it’s easy to gather the materials.
It also sounds fun to make matching coasters together with your child.
A fluffy, cozy pouch woven from cardboard

A fluffy, fuzzy pouch you can use for cosmetics or quick outings.
You’d never guess it was woven with cardboard.
Cut slits into both ends of a piece of cardboard and glue chopsticks to it.
Thread yarn through the slits and wrap it around the cardboard.
Using yarn attached to the chopsticks, weave over-under, over-under along the threaded yarn—similar to how you’d use a loom.
Once you’ve woven a sufficient length, cut it free from the cardboard.
Make two woven panels and tie the yarn at the ends to join them.
Turn it inside out, insert an inner pouch, add decorations, and you’re done.
Try making one with fluffy yarn!
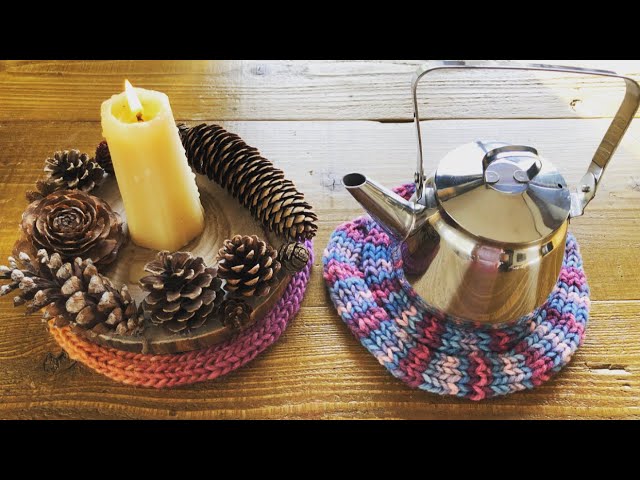
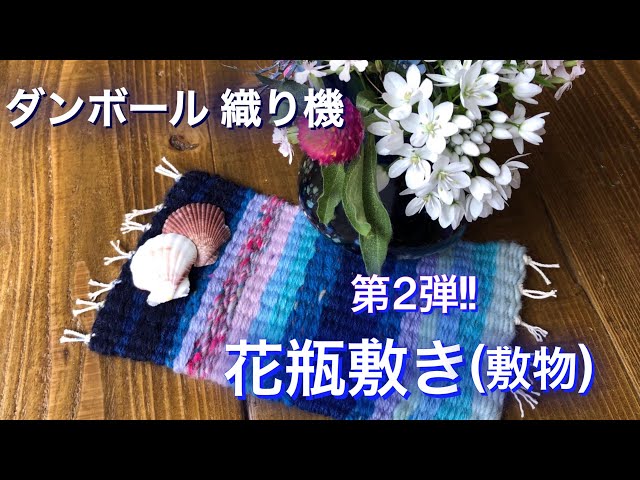
Woven mats and vase doilies made from cardboard
It’s fun to make knitted items with a handmade loom, isn’t it? Your child will probably enjoy creating projects with excitement, too.
You can make a cardboard loom by cutting slits in two edges of a piece of cardboard and attaching chopsticks.
Thread twine through the slits, and use two colored markers to dye the yarn alternately.
Attach the yarn to a toothpick and start weaving, passing it over and under the twine of the same color—that’s the trick.
It also looks lovely to change the yarn colors for a gradient effect.
Try making it with your favorite colors of yarn.
Tie off the twine at the edges and you’ll have a finished mat or a vase coaster.
A scarf woven from milk cartons

With an empty milk carton and some disposable chopsticks, you can make a knitted scarf.
Cut several chopsticks in half and attach them to the milk carton.
Now you’ve got a simple loom.
You can also use thin black bobby pins instead of chopsticks, but the chopsticks are easier to knit with.
By threading the yarn through the chopsticks in sequence, you can knit, so even young children can make a project.
As the knitting progresses and the scarf grows longer and longer, kids will probably get excited watching it.
When you’re finished, add yarn pom-poms to complete a cute scarf.