[For Girls] Make It with Everyday Items! Easy but Super Cute Craft Ideas


I want to make cute, satisfying crafts! But they seem hard…
In response to girls who feel that way, here are some adorable and wonderful crafts you can easily make using things you already have at home.
Make a fluffy sunflower with chenille stems, or create an original pouch using candy packaging.
They’re all easy to start, and the finished pieces look just like something you bought at a store! With a little creativity, you can make one-of-a-kind treasures.
Even if you’re not good at crafts, don’t worry.
Use this as a guide and have fun making them!
- Simple but awesome! Craft ideas for upper-grade girls
- [Summer Vacation Crafts] Stylish Ideas for Girls
- [For Adults] Simple yet Impressive Crafts: A Stylish, Eye-Catching Collection
- Fun for elementary school kids! A collection of craft ideas using plastic bottle caps!
- [Easy & Fun] Craft Ideas Using Pipe Cleaners
- Plastic bottles transformed! A collection of simple yet amazing craft ideas
- Handmade snow globe ideas: simple yet cute crafts
- [For Kids] Today’s Handmade Craft Ideas
- [Easy] Practical craft ideas. Great for beginners too!
- Stylish plastic bottle crafts. Packed with surprising ideas!
- For summer vacation homework! Simple and amazing crafts for elementary school students that you’ll want to make after seeing them
- Christmas crafts for adults: stylish project ideas you'll want to display
- Crafts you can make with 100-yen shop items! A collection of fun project ideas that elementary school kids will love
[For Girls] Make it with everyday items! Simple yet super cute craft ideas (21–30)
gel candle

Gel wax candles are characterized by their clarity and springy texture.
Unlike regular candles, they don’t turn white and hard, which gives you more creative freedom in your designs.
In summer, you can make seasonal candles with seashells and white sand; in autumn, you can use Halloween-themed pumpkin items or orange sand.
Gel candles look beautiful when finished, so they’re also great as eye-catching interior decor.
With a bit of ingenuity, you can easily make them using materials from a 100-yen shop, and searching for supplies on handmade marketplaces can be part of the fun.
Why not relax at home and enjoy making candles at your own pace?
fake acrylic keychain

Acrylic keychains are appealing items thanks to their sturdy material, letting you show off the cute designs without worrying much about them breaking when you hang them on a bag.
With that acrylic keychain image in mind, how about making a durable keychain using simple materials? The main component is a sticker of the character you want to feature on the keychain; you cut it out and wrap it with tape to give it an acrylic-like look.
To make it more colorful and more durable, it’s also important to consider which tapes you use and how much you layer them.
[For Girls] Make It with Everyday Items! Easy but Super Cute Craft Ideas (31–40)
Puru-Koro Soap
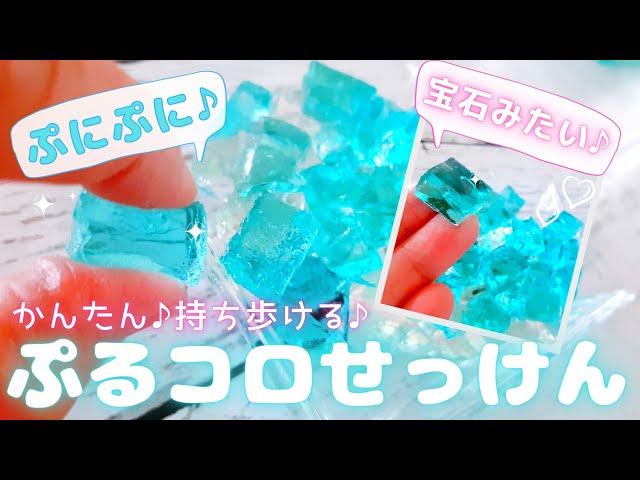
It’s like a jewel! Let me show you how to make cute, jiggly soap.
You’ll need liquid hand soap, gelatin, hot water, and food coloring.
Dissolve the gelatin in hot water, then mix in the liquid hand soap.
The trick is to stir slowly so it doesn’t foam.
Add food coloring, pour into a flat container, and chill in the refrigerator for 1–2 hours.
Then just cut it into your favorite shapes and you’re done! It looks adorable and might make handwashing more fun.
Just be careful to prevent small children from accidentally swallowing it.
Sumikko Gurashi piggy bank

I’ll introduce how to make a Sumikko Gurashi piggy bank out of origami.
Prepare two sheets of origami paper and one small sheet, then let’s get started.
Use the small origami paper to make the 5-yen coin part.
Fold the corners toward the center, then fold the surrounding corners as well.
It will form the shape of a 5-yen coin, so draw the details with a felt-tip pen.
For the base piggy bank, fold the origami toward the center to create creases.
Following the creases, tuck the paper inward to form a square box.
Make two identical boxes; on one of them, attach the 5-yen coin and draw the face.
The key point is to change the color of the origami depending on the character.
tile coaster

Wouldn’t it be lovely to have cute tile coasters on your table? Some people might think handmade ones seem difficult, but they’re actually easy to make.
Try creating tile coasters using tiles and cement in your favorite colors and shapes.
Once you decide on the tile layout, attach the tiles to the coaster base with wood glue.
Choose a base with grooves to set the tiles into, and be sure to apply wood glue over the entire surface where the tiles will stick.
Mix the cement with water and pour it in; once it dries, make any adjustments and polish the surface of the tiles.
When the cement has fully dried, it’s complete.
It’s a lovely piece you can enjoy actually using.
Sea memo stand

Some families may go swimming at the beach during summer vacation, right? When we think of the hot summer, many children surely picture the sea.
So why not make a memo stand using resin with an ocean theme? Prepare parts to embed in the resin, such as seashells, sea creatures, and clear or blue stones.
Of course, it’s also nice to include shells you picked up at the beach.
Place your favorite parts and the memo stand into a container, then pour in the resin.
After that, leave it undisturbed for the specified time.
At this stage, the key is to prevent dust and debris from getting in—for example, by placing the piece in a box.
If you include seashells you collected at the beach, you can create a lovely piece that captures your summer memories.
You can make it without sewing! A small teddy bear

Let’s make a fluffy teddy bear with yarn! Since this method doesn’t require any sewing, kids can give it a try too.
Start by making the parts the same way you would make pom-poms.
Wrap yarn around your hand several times, and when it reaches the desired size, tie the center with another piece of yarn.
Cut through the looped sections, then trim with scissors to make them round.
For rounded areas like the face and ears, adjust by combining two pom-poms if needed.
Once the parts are ready, attach them with a hot glue gun.
Finally, neaten the overall shape and add the facial features to finish!