Cute Origami Ideas for Girls

We’ve gathered origami ideas for girls.
From items you can use for doll play and pretend shops to animals and characters girls love, cute letters, and fun toys you can play with—we’ll introduce lots of ideas that girls will enjoy!
If you’re looking for easy origami kids can make or ideas you can make for your child, please use this as a reference.
Origami is said to be great for early childhood development, so keep trying new things.
If you make something cute, it would be fun to trade with friends, too!
- [Origami] She’ll love it if you fold these! Simple ideas for girls
- Popular characters that are easy to make with origami. A collection of creations you can enjoy with children.
- Cute origami ideas
- Kids will love it! Easy origami ideas—great as gifts too!
- Kids’ Origami: Cute and Easy Ideas to Make for a Birthday
- [For Kids] Let's Fold! Today's Origami Idea Collection
- Children’s Origami: Easy Single-Sheet Flower Ideas
- Simple origami for kids: cute, playable origami ideas
- Origami ideas boys will want to make!
- Made of paper! A fun collection of DIY toy ideas you can play with
- Easy flower craft ideas you can make with a single sheet of origami paper
- [Origami] Have fun with kids! A collection of easy snowman origami ideas
- [Kids] Let’s Make Origami! A Collection of Easy Goldfish Folding Methods
[For Girls] Cute Origami Ideas (71–80)
One sheet of origami! How to fold a cute cosmos flower

Let’s prepare scissors and origami paper to make cosmos flowers in your favorite colors.
First, crease the origami by folding it into a triangle and then a square.
Gently puff it up and squash fold it to create the base for the petals; make four bases so they form a square shape.
After folding the paper into petal shapes, use scissors to make small cuts.
Tuck in the tips so they form petal points, shape the whole piece into a cosmos, and finish by making a small outward tuck in the center.
It might also be fun to use patterned origami paper.
Cosmos made with four sheets of origami

Let’s make a cosmos flower that uses four sheets of origami, where the volume really highlights its elegance.
Fold the origami into a square, puff it up, and gently squash it into a triangle.
After folding the tip of the triangle down to align with the center line at the bottom, slowly open the pocket of the origami to form the cosmos flower.
Fold the remaining sheets in the same way, then glue the four pieces together at the center to complete one cosmos.
The steps are simple and easy, so give it a try!
A Fluffy Ribbon Made with Just Half a Sheet of Origami Paper

This fluffy, cute ribbon is perfect for wall decorations and gift wrapping.
Since you only use half of a square sheet of origami paper, you can make two ribbons from one sheet! First, fold it lengthwise in half to make a crease, then fold both edges toward that crease.
Fold it in half so that the short edges meet, make triangular creases on the end that doesn’t open, and unfold.
Using the X-shaped crease in the center as your axis, continue folding, then open it out into a ribbon shape.
Open the corner formed in the center, spread the ribbon ends, tuck in the corners, and gently puff and shape the whole piece with a wavy finish to complete it.
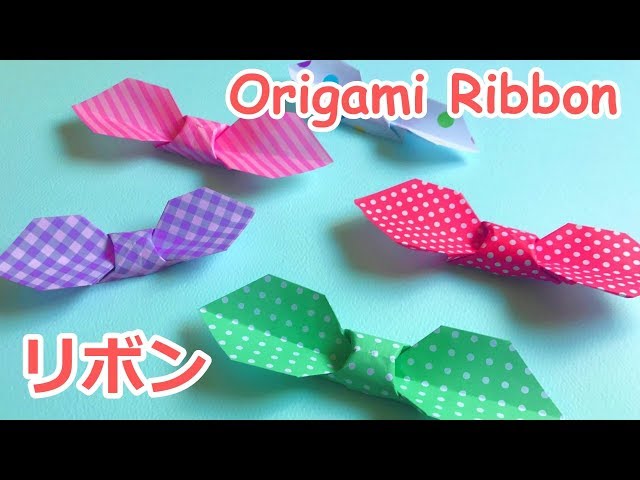
A relatively easy ribbon origami

Here’s how to fold a ribbon you can use in many situations.
Fold the square into three equal parts.
Fold the bottom layer up to align with the top edge.
Now fold the top edge down to align with the bottom edge.
Fold the top and bottom to meet at the center, then fold the upper-right center layer up to align with the top edge.
Now fold the top edge down to align with the bottom edge.
Fold the top and bottom to meet at the center, then fold up to the upper-right center.
Squash-fold the center into a square shape.
After turning it over, open the left and right sides into a ribbon shape and adjust to finish!
It can be three-dimensional or flat! How to fold a ribbon
Depending on where you display it, you can change the final look.
First, make diagonal X-shaped creases, then fold in from both sides toward the center crease twice each.
Fold it in half at the center, make a triangular crease in the middle, then open both sides into triangles.
On both sides, fold one sheet of the paper horizontally, and fold the top and bottom upward respectively.
On the back of the ribbon’s center, make a small triangular fold, then spread the parts you folded up outward.
If you finish by puffing up the center of the ribbon, it becomes three-dimensional; if you flatten it, it becomes a flat ribbon.
Try making lots of ribbons in different colors and patterns and decorate with them!
Also great as a display decoration! How to fold a unicorn

The unicorn origami, with its fairy-tale-like atmosphere, is charming for its soft colors and simple shape.
First, fold the paper to form the shape of a unicorn.
Once the overall silhouette is set, trim any excess with scissors.
Use the cut-off paper as the horn.
Draw the horn, mane, and facial features with a pen to complete your very own unicorn.
Choosing pale colors for the paper enhances its cuteness, and displaying several together creates a cohesive decorative set.
Once finished, place them on a desk or shelf to create a sweet, charming space.
Give it a try!
The petals are 3D! How to fold a cute cosmos flower

Here’s how to fold a cosmos with eight petals using four sheets of origami paper.
Use your preferred colors for the flower sections and yellow origami for the center.
For the petal parts, make crease lines on 5 cm square origami paper, then fold along those creases.
Each sheet makes two petals.
Cut the tips of the petals into a jagged shape to represent the cosmos.
After making four petal parts, combine and adjust them.
For the center, take a long, narrow strip of yellow origami paper and make lots of small cuts in it.
Assemble it with the flower to finish.
You’ll create a cosmos with beautifully three-dimensional petals.