Cute Origami Ideas for Girls

We’ve gathered origami ideas for girls.
From items you can use for doll play and pretend shops to animals and characters girls love, cute letters, and fun toys you can play with—we’ll introduce lots of ideas that girls will enjoy!
If you’re looking for easy origami kids can make or ideas you can make for your child, please use this as a reference.
Origami is said to be great for early childhood development, so keep trying new things.
If you make something cute, it would be fun to trade with friends, too!
- [Origami] She’ll love it if you fold these! Simple ideas for girls
- Popular characters that are easy to make with origami. A collection of creations you can enjoy with children.
- Cute origami ideas
- Kids will love it! Easy origami ideas—great as gifts too!
- Kids’ Origami: Cute and Easy Ideas to Make for a Birthday
- [For Kids] Let's Fold! Today's Origami Idea Collection
- Children’s Origami: Easy Single-Sheet Flower Ideas
- Simple origami for kids: cute, playable origami ideas
- Origami ideas boys will want to make!
- Made of paper! A fun collection of DIY toy ideas you can play with
- Easy flower craft ideas you can make with a single sheet of origami paper
- [Origami] Have fun with kids! A collection of easy snowman origami ideas
- [Kids] Let’s Make Origami! A Collection of Easy Goldfish Folding Methods
[For Girls] Cute Origami Ideas (51–60)
Ribbon box with a lid
This is a lidded ribbon box that makes you want to get creative with the color and pattern of the origami you use.
For the lid, first make X-shaped creases both vertically and diagonally, then collapse it into a square.
Add a small triangular crease to the corner that won’t open, unfold the whole piece, and use the small square formed in the center to create the ribbon and then the entire lid.
For the box, after making creases such as the diagonal X and vertical lines, shape it into a box by folding along the creases.
Try different combinations of colors for the lid and the box as you make it!
How to fold a simple unicorn

We present a unicorn you can make using a single sheet of origami paper.
The horn, mane, and body are expressed through clever folding techniques, and you can enjoy watching the unicorn take shape step by step.
The model can stand on four legs, making it suitable for display or play, expanding its uses.
The impression changes depending on the paper you use, allowing you to adjust the finish from gentle to glamorous—another appealing point.
Differences in creases and shaping will appear from person to person, so you can also enjoy lining up the finished pieces and comparing them.
While savoring origami-specific processes, you can focus on forming the shape; it’s an idea that’s easy to incorporate into home crafting or recreational activities.
No scissors needed! How to fold Mimikyu

Mimikyu is known for its distinctive look of wearing a tattered cloth like Pikachu.
Let’s fold it using slightly duller yellow origami than Pikachu! First, fold in half vertically and open to make a crease.
Fold both edges toward the crease, then fold in half from the opposite direction as well.
Using the new crease, fold one edge toward the center to create another crease.
Open it up along the creases to form a boat-like shape.
Fold one end upward and slightly lower the other end to create the ears.
On the side opposite the ears, fold upward to make a step in the center, then create a pinch between the face and the body, and spread the bottom out like the hem of a skirt.
Finally, draw Mimikyu’s face and you’re done! Since it can be made without scissors, it’s recommended even for small children.
Origami heart with a ribbon

A ribbon pops out of a heart! Here’s a very cute origami to try.
First, fold into a triangle twice to make creases, then squash along the creases.
Squash-fold the inner sections so they become triangles.
Fold all four corners up along the edges, then fold down both corners on one side.
Flip it over and shape it into a heart.
Turn it to the front and fold the two bottom corners diagonally outward so they stick out.
Open the top part into a pocket and adjust it into a ribbon shape, and you’re done! Writing a message and adding it as a gift will make it even more delightful.
[For Girls] Cute Origami Ideas (61–70)
An easy way to fold a pudding

A Jigglypuff who sings a mysterious song that makes everyone fall asleep! Prepare pink origami paper, and first fold it in half both ways to make a cross-shaped crease.
Fold both sides toward the center, then from the opposite direction also fold both ends toward the center.
Fold all four corners into triangles toward the center, then open up the triangles you just folded and the sections folded before that.
Using the many creases you’ve made, shape it into something like two boats.
Hold it so the pointed ends are at the top and bottom; open the top to make the ears, and tuck the bottom in small to make the feet.
Turn it over, and fold down the area between the ears.
Finally, draw the face, and your cute, round-looking Jigglypuff is complete.
How to fold Piplup

Piplup, the Water-type starter from the fourth-generation Diamond and Pearl series.
You can make it easily with a single sheet of blue origami! With the colored side facing in, fold into a triangle twice, then open it once.
Fold both ends up toward the crease you made.
Flip it over, fold the top layer of the origami down in half, open it, and make a crease.
Fold it down again so it goes just a little past that crease, then fold it up slightly to align with the first crease line you made.
Fold the corners at the top, bottom, left, and right of the face, and draw Piplup’s face with a pen to finish!
Unicorn bookmark
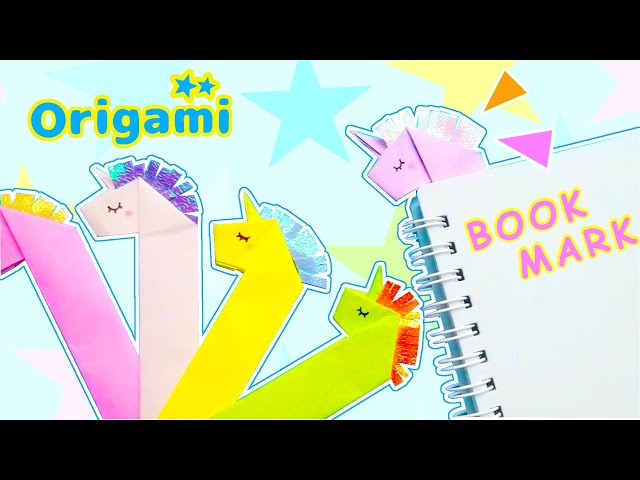
Here’s an origami idea that combines practicality with cuteness.
It’s meant to be used tucked into a book, and when you insert it into a closed book, the design looks as if it’s peeking out from inside—very eye-catching.
The folding process is relatively simple: you shape it so the neck becomes long as you go.
Adding eyes and a mouth to the face gives it expression, and the overall vibe can change dramatically depending on how you draw them.
Color choice also affects the impression—soft hues create a calm look, while bright colors make it pop.
Because you can enjoy it in everyday use, it’s not just something you fold and forget; it’s an idea that comes alive in daily life.