Cute Origami Ideas for Girls

We’ve gathered origami ideas for girls.
From items you can use for doll play and pretend shops to animals and characters girls love, cute letters, and fun toys you can play with—we’ll introduce lots of ideas that girls will enjoy!
If you’re looking for easy origami kids can make or ideas you can make for your child, please use this as a reference.
Origami is said to be great for early childhood development, so keep trying new things.
If you make something cute, it would be fun to trade with friends, too!
- [Origami] She’ll love it if you fold these! Simple ideas for girls
- Popular characters that are easy to make with origami. A collection of creations you can enjoy with children.
- Cute origami ideas
- Kids will love it! Easy origami ideas—great as gifts too!
- Kids’ Origami: Cute and Easy Ideas to Make for a Birthday
- [For Kids] Let's Fold! Today's Origami Idea Collection
- Children’s Origami: Easy Single-Sheet Flower Ideas
- Simple origami for kids: cute, playable origami ideas
- Origami ideas boys will want to make!
- Made of paper! A fun collection of DIY toy ideas you can play with
- Easy flower craft ideas you can make with a single sheet of origami paper
- [Origami] Have fun with kids! A collection of easy snowman origami ideas
- [Kids] Let’s Make Origami! A Collection of Easy Goldfish Folding Methods
[For Girls] Cute Origami Ideas (21–30)
An easy and cute cosmos origami

Let’s make a 3D origami cosmos that looks cute even arranged in a vase! Take a 7.5 cm square sheet of origami and fold it into a square twice and into a triangle once.
Fold the short edge along the long edge to make a crease as a guide.
Draw jagged, petal-like shapes and cut them out with scissors.
Add creases and small cuts so the eight petals become three-dimensional, then finish by making the center from yellow origami paper.
Create a stem with a bamboo skewer and green origami paper, and place your flower in a vase.
The great thing about origami cosmos is that they won’t wither and need no watering, so you can display them forever.
Try making them in your favorite colors to add a touch of floral brightness to your everyday life!
candy
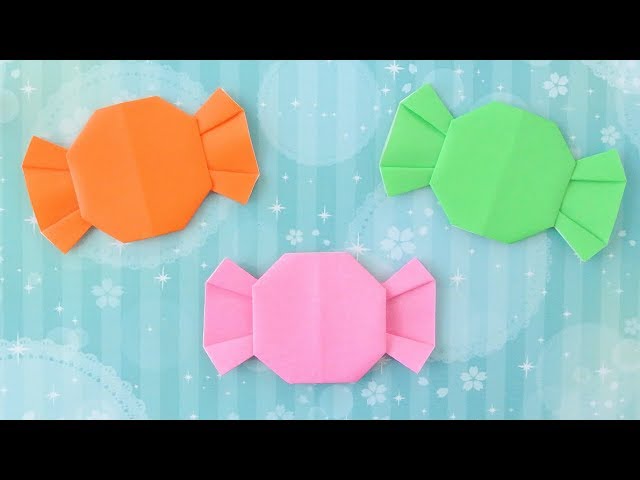
Candy wrapped in colorful paper is a popular motif among girls.
Its rounded shape is cute, and it’s used for all kinds of goods and items.
Prepare origami in your favorite colors and patterns—pink, yellow, polka dots, stripes, and more.
Let’s fold an easy candy motif with origami.
By changing the size of the paper, you can create candy motifs for various purposes.
Stick them on walls or windows to decorate your room, use them to embellish gifts—the possibilities are endless.
Of course, you can also write a message inside and use it as a letter.
A letter of the heart

A heart-themed letter that’s fun to make and use, and a delight to receive—for little kids through students.
It’s simple to craft, yet looks intricate thanks to its 3D form and moving parts, so it’s highly recommended.
Divide a single sheet of origami paper into three equal strips and cut; you’ll use one of the three.
The design features a playful mechanism where a message strip pops out from the center of the heart.
You can use it as a message card on its own or tuck it in with a gift.
A message card with movement is always a joy to receive.
Be sure to master how to make it!
back

Introducing an easy-to-make origami bag that can be used for a variety of events, such as birthday parties, Christmas, and Halloween.
Once you master how to make it, it’ll come in handy for all kinds of occasions.
Since it’s a bag shape, you can fill it with sweets or use it as a stationery holder.
If you attach seasonal motifs made from different paper or add store-bought stickers, you’ll have a colorful and fun bag.
The handle makes it very practical, too.
heart

Why not try making a cute heart and gifting it to someone you love, like a parent or a friend? There are a few fine steps, but once you make it once, you’ll remember it right away.
Not only red and pink—making hearts in various colors and using them for decorations like wall hangings or mobiles is also recommended.
They’re perfect for decorating presents and message cards, too, so try folding lots of them in different sizes of origami paper! If you learn how to fold them and teach the people around you, those gentle feelings will spread far and wide.
princess
A girl’s dream! Let’s make a cute princess in a dress out of origami.
Prepare one 15 cm square sheet, one sheet cut in half from a 15 cm square, and two pieces cut from one quarter of a 15 cm square that are further halved.
Use the 15 cm square for the dress, the half-cut piece for the hair and face, and the quarter-size halves for the dress’s shoulder parts and arms.
If you use patterned origami, it will look even more glamorous.
How about also making a castle and a prince to recreate a storybook world with origami?
Push Pop Ring

Push Pop is a fidget toy where you press protruding bubbles for fun.
Let’s try folding that Push Pop into a ring shape! First, cut a sheet of origami paper in half, then fold each side toward the center.
Fold it in half vertically to make it smaller, and then create two small triangles near the center of the paper.
Next, fold both the front and back sides toward the center again to make a long, narrow strip, then spread out the narrow part so the center bulges outward.
Finally, trim the excess to fit your finger size, glue the ends together, and you’re done! You can enjoy popping it whenever you’ve got some free time.