
Preschoolers who are full of curiosity and love learning through play.
At this stage, they enjoy using their hands, and origami helps nurture their concentration and imagination.
By making origami with friends and showing their creations to one another, their communication skills naturally improve as well.
In July, when we spend more time indoors, why not have everyone enjoy creating lovely, seasonally themed origami pieces? Here, we introduce several July origami ideas recommended for preschoolers.
We hope you find them helpful!
- Fun Origami Ideas for July That Older Kindergarteners Will Love
- Toddlers will love it! Fun-to-make July origami recommendations
- Have fun in August! A collection of summer origami ideas recommended for preschoolers (4–5 years old)
- Fun to make in childcare! A collection of easy origami ideas recommended for July
- Enjoy August with preschoolers using origami! A collection of summer-perfect ideas
- Craft ideas to try in July for 3-year-olds
- Recommended for older preschoolers! A collection of origami craft ideas to enjoy summer in August
- [For 5-year-olds] Crafts to try in July! Ideas that capture the season
- [Age 4] Easy origami ideas perfect for summer! A collection of cool, refreshing motifs
- Perfect Summer Craft Ideas to Try in July for 4-Year-Olds
- [For 4-year-olds] Crafts to make with preschoolers in July and August: Creative activities that let kids feel the summer
- [Childcare] A roundup of easy summer origami ideas to enjoy with 5-year-olds
- [Age 3] Simple summer origami ideas. A roundup of classic summer motifs.
Fun with Kindergartners! Seasonal July Origami Ideas (1–10)
Summer Seashells
@hoiku.labo For summer wall displays! Let’s make seashells with origami 🐚🦀ChildcareNursery teacher / Childcare workerKindergarten TeacherChildcare job openingsChildcare Column#NurseryTeacherThings#IWantToConnectWithChildcareWorkers#Nursery School Craft#DaycarePreparationNursery School PracticumChildcare studentAspiring childcare workerChildcare Job LabNursery teacher skillsJob change activities#JobChange#nursery_teacher_job_changeNursery teacher employmentProduction#CraftworkProductionOrigamiseashell
♪ Original Song – Craft Ideas for Childcare ♪ Hoiku Kyujin Labo – Hoiku Kyujin Labo | Nursery Teacher Job Changes and Helpful Information
Let’s make a seashell out of origami that captures the feeling of summer.
Fold the origami paper into a triangle twice, then unfold it once.
Fold the left and right corners in to meet the center line.
Fold those corners back outward, then fold the creases so they align with the center line.
Next, tuck the left and right corners up toward the center line so they go underneath the small triangle, and fold the tip of the small triangle slightly inward.
Finally, fold the top corner down to shape it like a shell, and you’re done.
Add patterns to make it cute!
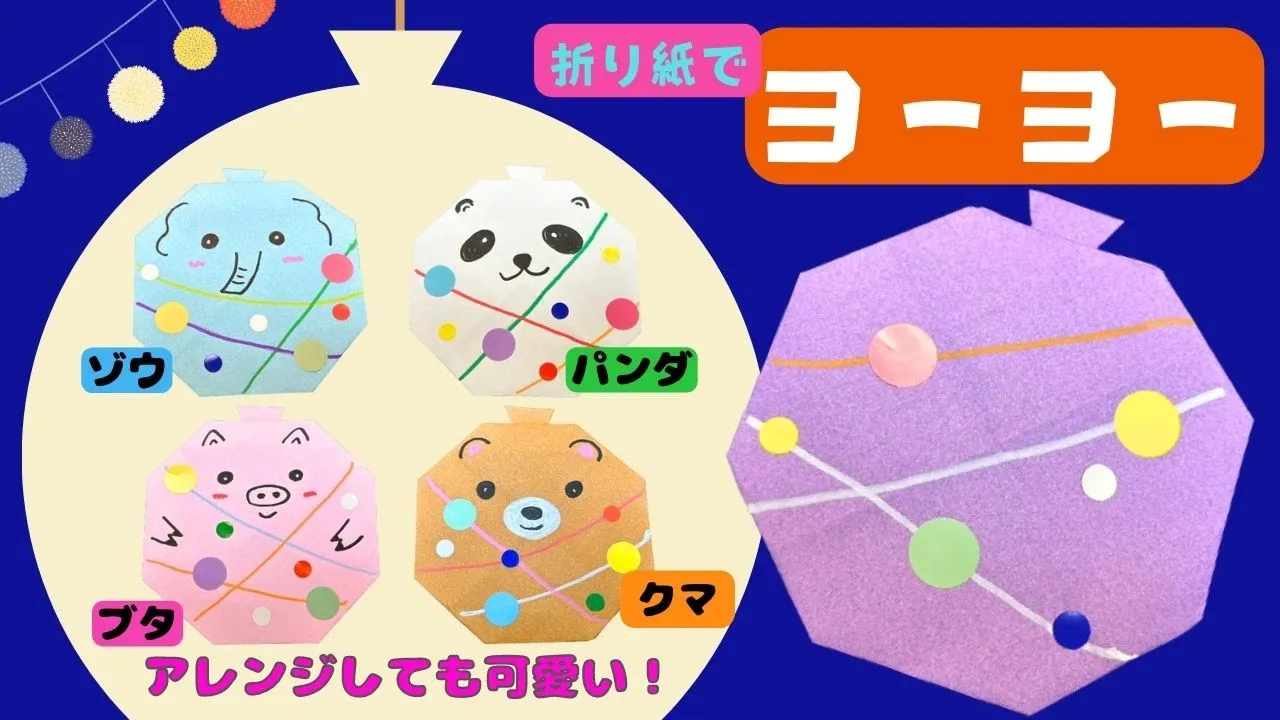
yo-yo

Here’s an idea for making a classic summer festival game toy—a yo-yo balloon—using just one sheet of origami paper.
Fold the paper in half twice to make a smaller square, then unfold it.
Using the crease lines as guides, fold all four corners toward the center.
Next, pick one corner and fold it outward, then fold just the tip of that corner back inward once more.
Fold all four corners slightly inward to round the shape—now it’s starting to look like a yo-yo balloon.
Make small snips with scissors on the left and right sides of the folded-back section, then fold the part above the cuts inward to represent the tied mouth of the balloon.
That’s the end of the folding steps.
Finish by drawing your favorite patterns or adding stickers.
Easy Suica
@sachimama_asobi Easy! Let’s make watermelon you’ll want to eat in summer 🍉^^ Our eldest son in 2nd grade starts summer vacation tomorrow 🌻 We don’t have any long trips planned for now, but we’re thinking of enjoying lots of classic summer activities like catching stag beetles, going to a nearby pool, playing in the river, watermelon splitting, and getting shaved ice^^ I was so happy that so many people checked out yesterday’s post on how to make a stag beetle 🥰 Thanks to your lovely requests, today I posted how to fold a “watermelon 🍉”! Half-cut watermelon, quarter-cut watermelon. Red watermelon, yellow watermelon—please make your favorite versions ❤️ I think they’ll look super cute displayed together with yesterday’s stag beetle! I also tried making a yellow watermelon, and it turned out really cute 🥰 For the yellow watermelon, I used check-pattern origami for the rind. Note: You can find this at DAISO^^ Lately I’ve been getting messages from followers saying, “I tried making it!” and it makes me so happy and motivated! Please feel free to DM or comment, “I made it! 🙌” I’m waiting to hear from you🥰 +———————————————+ I’m Sachi-mama, raising three boys ages 7, 5, and 1—chaotic mom life in full swing ❀´- I share play ideas and easy crafts with kids using 100-yen items, nature finds, and recycled materials. Feel free to like, follow, and DM! +———————————————+How to Grow Watermelons How to make watermelon#AtHomePlay #AtHomePlayworkPlay with children#I love crafts Handmade Childcare #Summer Craft OrigamiSummer extreme heat Insect #BugLoverIndoor play origami #origamiEducational #EducationalPlay#StagBeetle watermelon Watermelon#How to fold a watermelon # How to fold a watermelon#Watermelon Craft Watermelon craft#watermelon
♬ Instrumental pop that makes you want to start running(1091280) – Single Cirquit
Here’s an easy watermelon idea you can make with origami.
Prepare green and red origami paper.
First, let’s make the rind with the green sheet.
Fold the paper in half twice to form a smaller square, then open it up and use the creases to fold all four corners toward the center.
Open the folded parts again, then fold each corner along the crease lines and make a second, tighter fold (a wrap fold).
Repeat for the remaining three corners.
Next, fold the four remaining white corners inward to match the width of the wrap folds.
Now use the red origami paper.
Up to folding all four corners to the center, the steps are the same.
From there, fold each of the four corners inward by about 2 cm.
Layer the two pieces and glue them together, and your watermelon is complete.
Try different shapes like a half-cut or quarter-cut and have fun!
A bamboo leaf that folds in eight steps

Speaking of July, we have Tanabata, don’t we? In childcare facilities and the like, some may create bamboo grass decorations on the walls.
Here’s an origami idea for bamboo leaves that’s useful on such occasions and only takes eight folds.
First, fold the origami paper into a triangle to make a crease, then open it up and fold the two left edges to align with the crease.
At this point, make sure the tip is nice and sharp, and align the edges just slightly outside the crease.
Doing so will help express the leaf’s central vein.
Flip the paper over and fold the triangular section inward.
With the triangle’s base positioned at the bottom, refit the paper and fold the two bottom corners up to meet the center line.
Finally, tuck the left and right corners created in the last step slightly inward, and you’re done!
Cute morning glory

Here’s an origami idea for morning glories, which are often used for summer wall decorations.
Fold the origami paper in half twice to make a square, then place it with the corner that will be the center of the flower pointing down.
Fold both sides of the top corner diagonally inward, crease well, then unfold and open the paper.
With the white side facing up, use the creases you just made as guides and fold both sides of each of the four corners.
Once folded, fold all four corners inward, leaving a small gap from the center.
Then fold the newly formed four corners outward to round the overall shape, and you’re done! The overlapping areas can be a bit stiff, so fold slowly to avoid injuring your hands.
fish

I’ll show you how to fold a simple fish.
Get some origami paper, a felt-tip pen, and round stickers ready, and let’s make it.
Fold the origami paper in half to make a crease.
Fold both the left and right sides into triangles toward the center crease to make creases.
Open up the pockets at the corners, tuck them inside as you puff them out, and turn it over.
Fold the triangular section upward to form the fish’s tail.
Fold the lower-right and upper-right corners—adjusting their sizes—to shape the fish’s face.
Rotate it, flip it over, add a round sticker for the eye, and you’re done.
Give it a try!
ice cream

Let’s make an ice cream that tastes great in summer using origami.
Fold the origami paper into a triangle, then open it and fold the two left edges inward along the crease.
Reposition the paper so the white triangular section is at the top, and fold the bottom corner up to meet the top corner.
Turn the paper over and fold only the top layer downward.
At this point, fold it so that about 2 centimeters of the colored section above the white triangle remains visible.
Turn the paper over again and flip top and bottom, then slightly fold the top and both side corners inward.
Your ice cream is complete!