

Projects to Try in June! A Collection of Craft Ideas Recommended for 5-Year-Olds

Here are some craft ideas perfect for June childcare, tailored for five-year-olds. Along with seasonal motifs like frogs, umbrellas, and hydrangeas unique to the rainy season, we’ve gathered ideas filled with excitement in the very act of making—such as bubble art and an aquarium where fish move with magnets. By the age of five, children are more adept with tools, and you can see them enjoying the chance to add their own creative touches. These are all projects that offer plenty of ways to enjoy them after completion too, like displaying them on the wall or giving them as gifts to friends. Be sure to incorporate them into your daily childcare activities. Note: Since we treat what the children make as “artworks,” we use the term “seisaku (制作)” in the text.
- [May] A collection of craft ideas to try with 5-year-olds
- Projects to Try in June! A Collection of Craft Ideas Recommended for 5-Year-Olds
- [Childcare] Playful craft ideas to enjoy with 5-year-olds
- [For 5-year-olds] Let’s enjoy summer! Summer craft ideas for 5-year-olds
- Recommended in June! A collection of craft ideas to enjoy with 4-year-olds
- Recommended for 5-year-olds! Simple DIY toy ideas
- Ideas for crafts that 1-year-olds will enjoy in June
- [For 3-year-olds] Perfect for June! A collection of craft ideas using various expressive techniques
- Craft Activity Ideas for 5-Year-Olds: November Edition
- Craft ideas recommended for June for 2-year-olds
- For 5-Year-Olds: Let’s Make It! A Collection of Craft Ideas to Feel the Spring
- August Craft Ideas for 5-Year-Olds
- Perfect for June! A collection of craft ideas to enjoy in childcare
June Challenges! Craft Ideas Recommended for 5-Year-Olds (51–60)
Practice brushing teeth with crafts!NEW!

Every year, June 4 is Cavity Prevention Day.
Let’s make a toothbrushing-themed craft with the kids.
If you use a tissue box, you can create a mouth that’s just the right size for children.
Cut the box about halfway across, leaving one side uncut.
When you fold the box in half, it opens and closes like a chomping mouth.
Then use construction paper or origami to make teeth and a tongue and stick them on.
With a toothbrush made from construction paper, you’ll have a finished craft that also lets kids practice brushing teeth.
Even children who dislike brushing may become more interested in it with this activity.

Sensory play is fun too! HydrangeasNEW!

This is a hydrangea craft that lets kids enjoy sensory play with paint.
Prepare a sealable bag, lay it flat, and add a few colors of paint and liquid laundry starch or glue, leaving some space inside.
Once it’s sealed tight, the fun begins! Have the children press the paint from the outside of the bag with their fingers or pat it with their hands to mix the colors.
When the paint is nicely blended, cut open the bag and unfold it, then place construction paper on top to make a print.
After the paint dries, cut it into hydrangea shapes and stick them on a backing sheet along with leaves and a snail to finish.
It’ll be fun to see how the kids react to the squishy, bouncy texture!

Making hydrangeas after playing with newspaperNEW!

Let’s make hydrangeas by using foam beads as petals.
Put foam beads, paint, and glue into a bag, knead to add color, then place a ball of newspaper wrapped in thin paper inside and coat it with the foam beads.
With the flower portion complete, finish by attaching it to a backing sheet along with some leaves.
Using a bag keeps hands clean and also makes the texture fun to explore.
If you use several paint colors, you might even create a gradient.
The idea that a ball made during newspaper play can transform into a hydrangea is sure to make children’s eyes light up.
Colorful Umbrellas Made from Construction PaperNEW!

How about making a three-dimensional, colorful umbrella using construction paper in various colors? First, cut several sheets of colored construction paper into circles of the same size.
After cutting them out, fold each one into quarters.
Then, using a pipe cleaner as the central stem, attach the folded pieces one after another around it, and connect the first and last pieces to form a circle.
In this example, seven pieces are used to complete one circle.
Make a small loop at the end of the pipe cleaner to hang it up—the umbrella will spin around and look very cute.
Give it a try!

Ideas to Try in June! Craft Projects Recommended for 5-Year-Olds (61–70)
A wristwatch made from a paper cup and a toilet paper roll coreNEW!
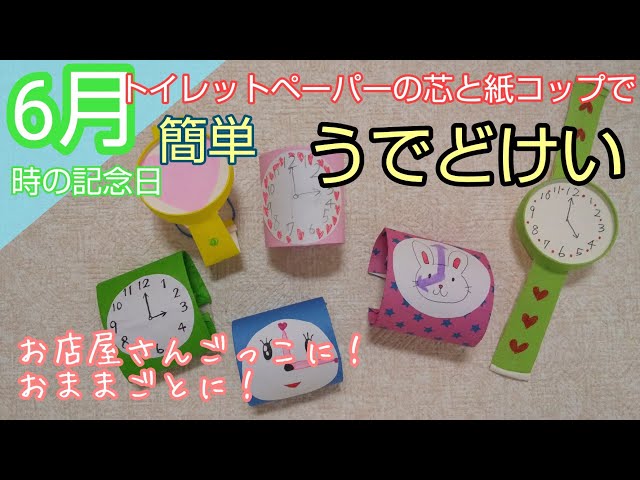
This is an easy, fun wristwatch you can make using a toilet paper roll and a paper cup.
Cut the roll in half, make slits, and wrap it with origami paper using glue to create a cute strap.
Choose your favorite color to make the watch face, then attach it to finish your very own original watch.
Children interested in numbers can write or trace the numbers on the face themselves, which will help deepen their interest in numbers.
Finally, stick the watch face onto the strap and it’s complete.
After making it, it’s also fun to wear it on your wrist for pretend play or enjoy asking, “What time is it now?”

Raindrop-chan MobileNEW!

Here is a mobile featuring cute, smiley raindrops.
The raindrops are made with marble art, so prepare thickly mixed paint, marbles, white drawing paper, and a deep tray.
Place the paper in the tray and roll marbles coated with paint over it.
Once the paint dries, cut the shapes into raindrops, mount them on slightly larger backing paper, and use stickers to make the faces.
Finally, hang them from strings, and you’re done! It’s an idea that will spark children’s curiosity—What kind of patterns will appear?—and help nurture their creativity and emotional richness.
Hydrangea torn-paper collageNEW!

Color a light blue sheet of construction paper with crayons.
Use four crayon colors: red, blue, purple, and white.
It’s fine to mix colors, so let the children enjoy the color changes.
Once colored, cut the paper into strips, then cut those into smaller, randomly shaped pieces.
Next, cut out a base for the flower from purple construction paper, and glue on the pieces you just cut.
For the leaves, cut them from origami paper and fold them in steps to represent the veins.
It’s finished once you attach the hydrangea and the leaves together! It’s a great idea for practicing scissor skills, but tearing by hand also sounds fun!