Croak, hop, and spin! A fun collection of frog craft ideas

Frogs that pop up during the rainy season or when it rains.
The frogs we often see are mostly green or brown, but if you look into it, you’ll find that around the world there are many colorful frogs and frogs with cute patterns.
It’s also fun to deepen children’s interest in frogs through making crafts.
We’re introducing projects that use recycled materials like milk cartons and toilet paper rolls, as well as unique crafts that let you hear frog calls.
Please use these as a reference and give them a try!
Because items made by children are treated as works of art, we use the term “seisaku” (production) in the text.
Croak, Hop, and Spin! A Fun Collection of Frog Craft Ideas (1–10)
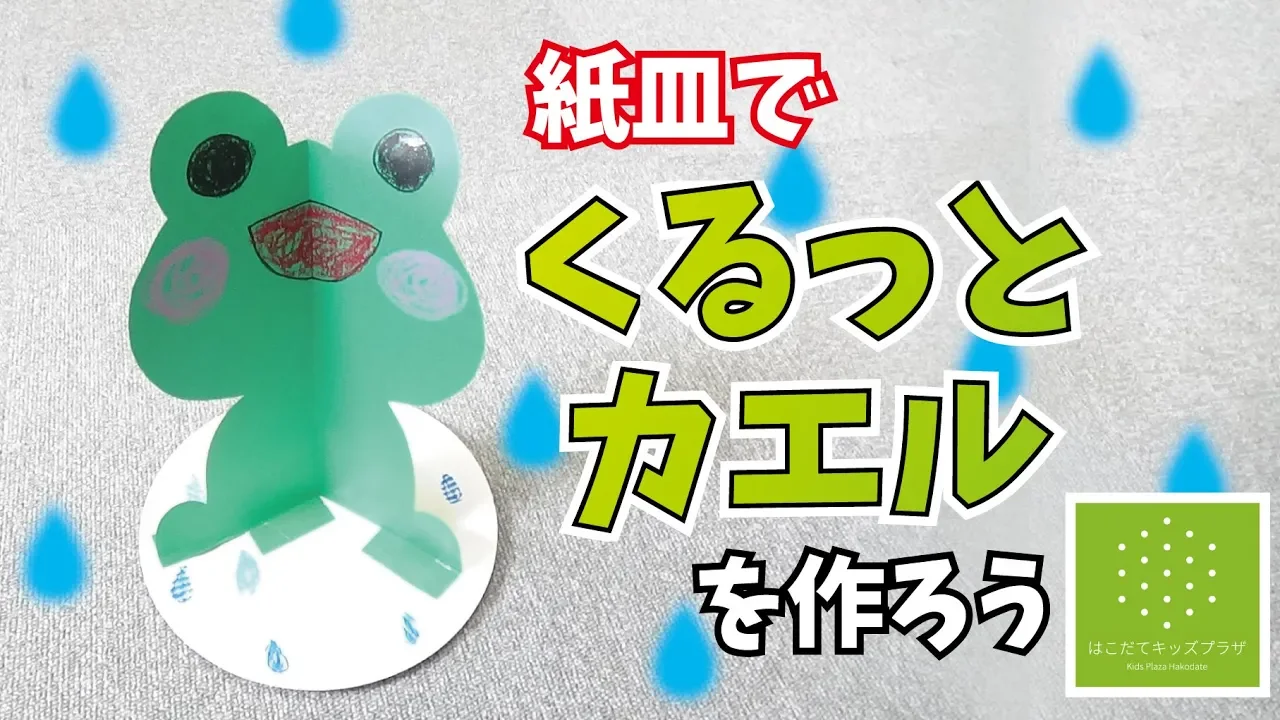
Frog craft made from paper plates that spins around and lands

Let’s make a spinning, landing frog out of a paper plate—its unique movement will captivate kids! First, cut green construction paper into the shape of a frog.
Draw a cute frog face, too.
Make three slits at the bottom, then fold them in alternating mountain and valley folds to create glue tabs.
Next, fold the frog in half vertically.
Finally, tape the frog’s glue tabs to the paper plate, and you’re done.
Hold the paper plate from the top and let the frog drop downward—the frog will spin and land neatly.
It’s so fun you’ll want to play with it over and over.
Be sure to make it together with everyone!
Make it and play right away! Crafting a croaking frog

Here’s a fun frog craft you can make and play with.
First, decorate the outside of a paper cup.
To match the frog theme, it’s nice to draw things like grass or falling rain.
Next, make a hole in the bottom of the cup and insert a straw.
Finally, attach a frog you made separately to the straw, and you’re done.
When you move the straw, the frog appears and disappears from the paper cup.
Another fun point is that when the paper cup and straw rub together, it can make a sound like a frog’s croak.
Making a frog castanet

Let’s make and play with a frog castanet that’s fun to click-clack, using a paper plate.
First, cut red and green construction paper into circles to match the size of the plate.
Next, fold the paper plate in half, then glue the green paper on the outside and the red paper on the inside.
Make the frog’s facial features from construction paper or stickers and attach them.
Finally, on the red inner side, tape two plastic bottle caps so they face each other and click together, securing them firmly.
Your castanet is complete! If everyone plays along with the song “Kaeru no Uta” using their handmade castanets, even rainy days will be lots of fun.
Making a jumping frog with a paper cup and rubber bands

Let’s make a jumping frog using a paper cup and rubber bands.
First, glue green construction paper onto the paper cup.
You can also use a green paper cup from a 100-yen shop, which makes things smoother.
Cutting out the bottom of the paper cup will increase its jumping power, so it’s recommended.
Make four slits along the rim, tie two rubber bands together, and hook them into the slits.
Finally, decorate the paper cup to turn it into a frog, and you’re done.
Stack the frog cup over another paper cup, press it down firmly, and when you let go, it will spring up with a boing! It would be fun to have everyone launch theirs at the same time.
It’s easy to make with simple materials, so give it a try!
Making a cup-and-ball toy (kendama) frog out of paper plates

Here’s how to make a frog-themed cup-and-ball toy that kids will love.
First, cut a hole in the center of a paper plate that’s slightly smaller than a capsule container, and decorate the plate to look like a pond.
Next, decorate the capsule container as a frog and attach a piece of yarn.
Finally, fasten the yarn to the paper plate, and it’s done.
Hold the paper plate and let the capsule container dangle above it, then try to make the frog go “plop” into the pond.
Start by using both hands, and once you get the hang of it, try holding the plate with one hand.
It’s a charming toy that helps develop children’s focus and finger strength while they have fun.
Making a frog chomp-chomp puppet with a paper cup

How about making and playing with a frog puppet out of a paper cup, with an irresistibly cute chomping motion? We recommend using a green paper cup.
First, make two vertical cuts so the cup is split right down the middle, but leave the bottom intact—don’t cut it off.
Next, open the cup so that the bottom part you cut folds together like a hinge.
Cut the top edge into a frog-face shape, then draw the eyes and mouth.
Finally, use another paper cup to make the hands and attach them to the lower part of the cup, and you’re done.
Try chatting, pretending to eat, and enjoying all sorts of games with your chomping frog.
Making a rabbit or a cat is great fun too!
Making a High-Jumping Snap Frog from a Milk Carton

Guaranteed to delight the kids! Here’s how to make a high-jumping snap frog.
First, open up a milk carton and cut off the top and bottom.
Next, cut out two panels from the carton and trim them to one-third size so the fold line sits in the center.
Make four slits about 1 cm in from each end.
Finally, draw a frog with a permanent marker, cross two rubber bands and hook them on—and you’re done.
Set the opened milk carton on a desk and it will spring up high with a boing, so be sure to make it and play with the kids.
If you’re using recycled materials that may contain allergens, take proper safety precautions when making it.