

As graduation season approaches, many teachers may be thinking about giving heartfelt gifts from current students to those who are graduating.
Handmade items have a special warmth that makes both the giver and the recipient feel special.
Here, we introduce ideas for graduation gifts using familiar materials like plastic bottle caps and paper cartons.
Everything—from magnets and trinket boxes to photo frames—can be made together with the children.
Celebrate the graduates’ new beginning with a one-of-a-kind gift!
- From current students to graduates! A collection of handmade graduation gift and keepsake ideas
- [Graduation Ceremony] A collection of handmade corsage ideas you can make with your child
- [Graduation Commemorative Gifts] Handmade Presents That Kids Will Love! A Collection of Easy-to-Make Ideas
- Recommended for graduation ceremonies! A collection of stylish wall decoration ideas
- [Graduation from Kindergarten] Ideas for Handmade Gifts to Give to Someone Special at Farewell Time
- At the End of Preschool Practicum: Simple and Cute Handmade Gifts
- Unforgettable graduation certificates for preschool! A collection of fun, handmade ideas
- [Graduation Keepsakes] Gifts for Teachers and Children: A Collection of Heartfelt, Memorable Present Ideas
- Feelings That Reach the Heart! Handmade Gift Ideas to Give at Graduation
- Recommended for graduation from preschool! A collection of cute handmade farewell card ideas
- [For toddlers] Simple but amazing craft ideas — including toys they can play with
- Handmade ideas to brighten up your preschool graduation album: fun to create, delightful to receive!
- [Graduation from Preschool] Messages with Hand-Drawn Illustrations! A Collection of Ideas to Share with Children
Gifts for preschool graduates! A collection of heartfelt handmade ideas (1–10)
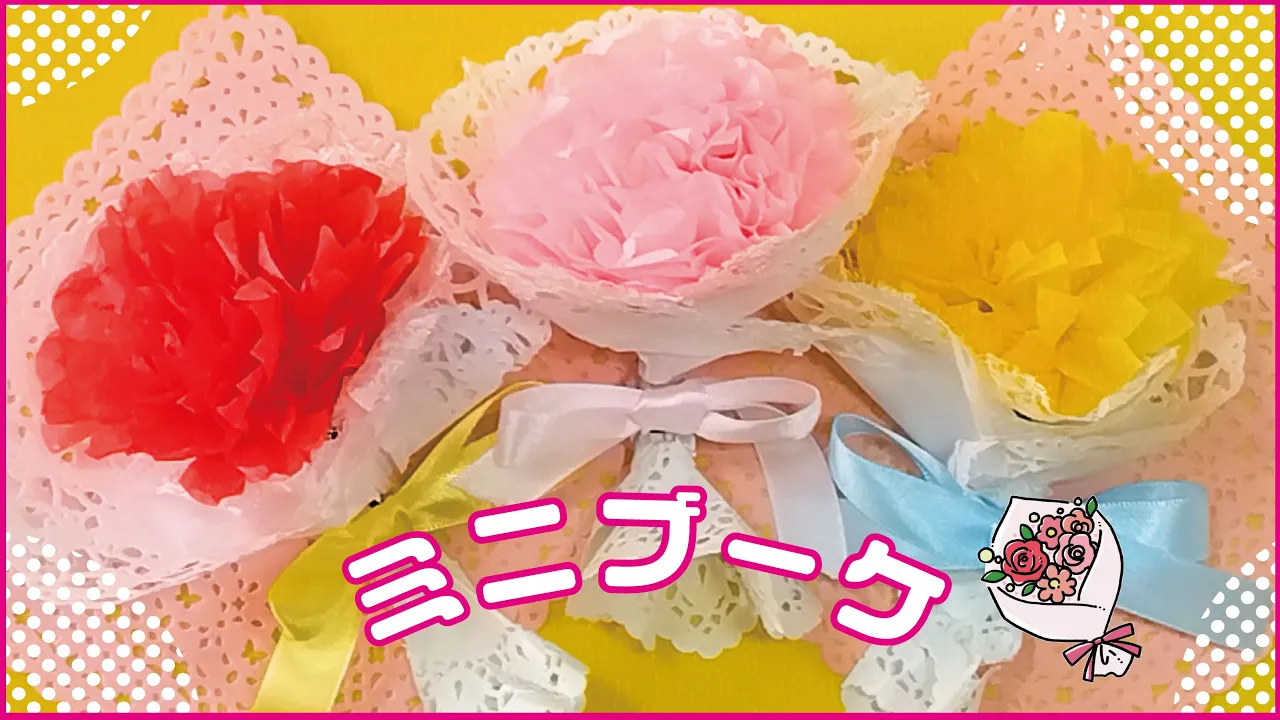
Mini bouquet made with tissue paper

Mini bouquets made with tissue paper are perfect gifts because the flowers never wilt.
Stack several sheets of tissue paper and accordion-fold them, staple the center, then round off both ends with scissors.
Next, fold a green chenille stem (pipe cleaner) in half, hook it over the center of the tissue, and twist to secure, creating the stem.
Gently lift each layer of tissue from the top toward the center to form the flower.
Wrap it with a paper doily and tie a ribbon to finish.
For an even more elegant look, adhere lace under the flower.
Handmade rosettes using side-dish cups

A handmade rosette is perfect as a gift and also makes a memorable keepsake.
Prepare construction paper, food cup liners, glue, scissors, and ribbon, and let’s get started.
First accordion-fold the construction paper, then cut it into strips.
Overlap the strips in a cross shape as you glue them, and fold them toward the center to create and puff up the rosette’s flower portion.
It’s recommended to staple every two or three pieces to keep the shape firmly in place.
Glue construction paper to the bottom of a food cup liner, attach it to the rosette base with double-sided tape, then stick the ribbon on the bottom to finish.
You might also write a message of thanks in the center to prepare it for gifting.
A cute flower with candy inside
@niconico_mama [Graduation Gift] I made something where, if you embed that little something in a cute flower and give it as a present, it’ll make that beloved kid so happy 🥰#Graduation from kindergartenGraduationGraduation Ceremony#asmr
♬ Original song – Niko 🧸 Childcare/Crafts/Play/Handmade Toys – Niko 🧸 Childcare/Crafts/Play/Handmade Toys
Here’s how to make a flower using a lollipop.
First, stack several sheets of tissue paper and accordion-fold them, then cut a slit in the center.
Insert the lollipop through the slit to secure it, and peel back the tissue paper sheets one by one to create petals around the candy.
The candy acts as the stamen and the stick as the stem.
Making several and arranging them into a bouquet would be lovely—try using different colors of tissue paper for that.
Colorful coasters made from clear files
https://www.tiktok.com/@pi_chan.sensei__hoiku/video/7372920493227183367Let’s make colorful, cute coasters with your favorite photos.
Prepare clear tape, nano tape, double-sided tape, scissors, a clear file folder, and your memorable photos.
Stick transparent origami onto nano tape and cut it into squares.
Cut the clear file into the base shape of the coaster.
Place the photo inside and secure it with double-sided tape, then attach the nano tape with the transparent origami around the photo to frame and decorate it.
It’s also fun to choose the color order while thinking of the person you’re gifting it to.
They might look great as indoor decorations, too.
Message bouquet
https://www.tiktok.com/@hii_hoiku_seisaku/video/7470135662969195784It’s a gift that lets you share your feelings, with the flower part doubling as a message card.
First, cut construction paper into a square and fold it into a triangle twice.
Next, flatten the pocket-like section into a square and cut the edge into a heart shape.
Write your message on the inside, then attach it to a stem made by rolling origami paper, and your heart-shaped flower is complete.
Wrap the heart flower with wrapping paper made by layering lace paper and tissue paper, add a ribbon, and it’s done.
Make other paper flowers and wrap them together for an even more festive look.
Flowers made with pipe cleaners that even small children can make!
@niconico_mama [Graduation Gift] Since the preschool graduation is coming up soon, I made that thing 🥰#Graduation from kindergartenGraduationGraduation Ceremony
♪ Isn't it enough to be just cute? – First Chorus – CUTIE STREET
Let’s make flowers using heart-shaped packing peanuts and chenille stems (pipe cleaners).
It’s easy enough for kids: simply skewer three peanuts onto the pipe cleaner and roll them up.
After adding the peanuts, curl them into a circle to form petals, then use the pipe cleaner to create the stamens and stem.
Once finished, wrap the flowers with tissue paper or lace paper to make a bouquet.
Heart-shaped packing peanuts come in many colors, so you can make flowers in your favorite shades.
Put your gratitude into each one and craft them with care.
Sparkling Origami Crown
@hoikushi_worker Sparkly Origami Crown ✨ I made a “crown” that’s perfect as a gift, using shimmering origami paper kids love. 👑 It’s great for many occasions like graduation ceremonies and birthday parties. 🌈 It’s easy to make, so it’s also perfect for a fun craft activity to do with children. 😊👑 ✼••┈┈••✼••┈┈••✼••┈┈••✼••┈┈••✼••┈┈••✼ Do you have any challenges in your childcare setting? Even if it’s not related to this post, please share your concerns or things you’re struggling with in the comments! Let’s exchange ideas freely. ♪ ✼••┈┈••✼••┈┈••✼••┈┈••✼••┈┈••✼••┈┈••✼#Childcare Crafting#Nursery School Craft#Wall Creationwall surface#Recital#HomeCraftsGift makingPapercraft#papercraft#kidscraftsOrigami playOrigamiorigami#OuchiMonte#AtHomeMontessoriEarly childhood education materialsChildcare#Nursery schoolNursery teacher / Childcare worker#First year as a nursery teacher#KindergartenKindergarten TeacherKindergarten teacherAspiring childcare worker#NurseryTeacherInTrainingNursery school teacher#NurseryTeacherThingsChildcare student#IWantToConnectWithChildcareWorkersNursery Teacher Worker
♪ Original Song – [Sharing Useful Info for Nursery Teachers!] Hoikushi Worker – [Sharing Useful Info for Nursery Teachers!] Hoikushi Worker
Prepare a sheet of shiny origami paper cut to one-quarter size and let’s make a crown.
Fold the left and right sides toward the center, then fold up the bottom as well.
Inflate the paper slightly as you fold to complete one part.
Make six parts using the same method and connect them together.
Adjust the origami size to fit your child’s head.
Cut the shiny origami into 16 thin strips, fold them into star shapes, and attach them as decorations to the crown.
Give this crown a try—it’s perfect for special occasions.