[Daycare/Preschool] Let’s Make Handmade Hinamatsuri Costumes! An Idea Collection You’ll Want to Copy


As Hinamatsuri approaches, many people may be getting costumes ready for events at daycare and preschools.
Even if you look for ready-made outfits, you might not find a design you like or you may be concerned about the price.
In such cases, handmade costumes are a great option.
In this article, we’ve gathered ideas for handmade costumes perfect for Hinamatsuri.
You’ll find a variety of approaches, including pieces you can easily make without patterns and ones that make use of colored plastic bags.
Create a one-of-a-kind outfit tailored to your child’s body shape and taste!
- Easy! Costume ideas made with colored plastic bags
- [Hinamatsuri] Handmade Costume Ideas: Perfect for First Festival and Girls’ Day Celebrations!
- [Childcare] Perfect for Hinamatsuri! Hanging Hina doll craft ideas you can make with kids
- Childcare: Recommended for Girls’ Day! Handmade Hina Doll Ideas
- [For Preschoolers & Kids] Game, Play, and Craft Ideas to Enjoy on Hinamatsuri (Girls’ Day)
- [Childcare] Wall decoration ideas to make for Hinamatsuri (Girls’ Day)
- [Childcare] Recommended crafts and activities for March, such as Hina Matsuri (Doll’s Festival) and cherry blossoms
- [Childcare] Fun Craft Ideas for Hinamatsuri (Girls' Day)
- For three-year-olds: A collection of craft ideas featuring spring events and creatures that you’ll want to make with your three-year-old
- [Childcare] Fun for Hinamatsuri! Performance ideas perfect for the event
- [Childcare] A Collection of Origami Ideas for Hinamatsuri: Let’s Make Them with Kids!
- [Childcare] Sports day costume ideas: easy-to-make outfits
- [Childcare] Enjoy Setsubun! A collection of handmade ideas you can decorate with and play with
[Daycare] Let's make handmade Hina Matsuri costumes! An idea collection you'll want to copy (11–20)
Hifu (traditional sleeveless kimono vest) made with a sewing machine

Easy to put on and take off thanks to snap buttons and a lining! Here’s an idea for making a hifu vest with a sewing machine.
Instead of finishing it with traditional hand-sewn wasai techniques, you sew it by machine, so it’s recommended.
It’s made with a fabric called Amundsen that has an elegant sheen, and the lining uses sheeting.
You can customize the collar buttons with flower shapes, tassels, or fabric-covered buttons, so it’s nice to tailor it to your child’s preferences.
Give it a try!
Baby hakama made without a pattern

Let’s cut the fabric.
We’ll sew the body pieces together, taking care to make them symmetrical.
For the sleeves, be sure to leave openings for the arms so you don’t accidentally sew them shut.
When joining the body and sleeve pieces, make sure each fabric piece is oriented correctly, pin the shoulders and sleeves with pins, and then sew them together.
When attaching the body and the collar, trim any excess fabric to adjust the fit.
When sewing the inner collar, stitch so that the edge of the body’s neckline and the edge of the inner collar do not shift; this will give you a clean finish.
Attach the inner tie on the inside, and you’re done! Please give it a try.
Hakama haori made with a sewing machine

We’re introducing a stylish haori-hakama to wear over a kimono on cold days.
Cut the fabric into the parts: collar, sleeves, overlay collar, and bodice.
Sew the bodice pieces together with right sides facing.
For the tucks, after sewing, press them outward with an iron to form the shape.
Sew the collar as well, then press it with an iron.
Match the collar to the bodice with right sides facing, pin in place, and sew together.
Add decorations as you like to finish! Attach a lobster clasp and your favorite color of lanyard cord (Lilian) to complete it.
Give it a try!
Hakama made without a pattern
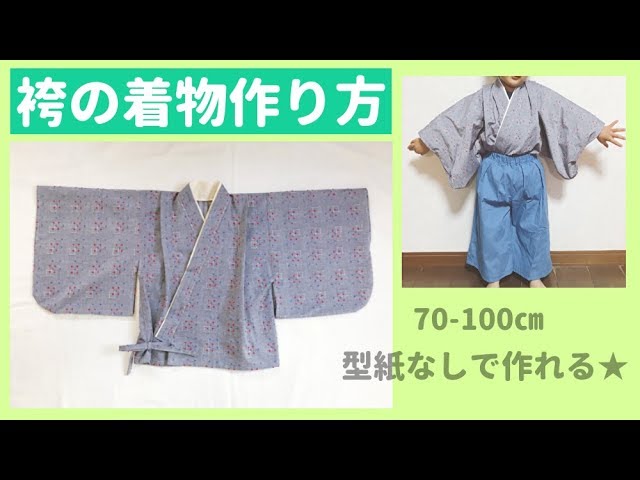
Let’s make a kimono for hakama without using a pattern! This time, we’ll show you how to make a hakama kimono that finishes in sizes 70 to 100.
It’s great because you can adapt traditional kimono sewing methods and complete it with a sewing machine! In the video, the kimono is made using cotton dungaree and sheeting fabric.
This is a perfect idea for those who can’t find a ready-made design they like or are hesitant to buy because of the price.
Give it a try!
Kimono-style dress

I’ll show you how to make a kimono-style dress.
It’s also recommended for children who don’t like the tightness of an obi.
Once you’ve prepared your favorite fabric, start by sewing the bodice and sleeves together.
For the skirt, sew the pieces so they’re symmetrical on both sides.
When attaching the bodice to the skirt, check the fabric direction, place the bodice inside the skirt, and sew them together.
Next, sew the outer waistband and the skirt right sides together.
Thread elastic through the waist to finish! Adding a separate fabric at the waist seam makes it look like an obi, adding a stylish touch and becoming a nice design accent.
hakama-style pants

They’re great as everyday gaucho pants too! Here’s an idea for pants that look like hakama.
The ribbon attached to these hakama-style pants is made from the same fabric, adding a subtle accent.
Plus, the ribbon is removable, so try arranging it on the front or the side! They’re perfect not only for Hinamatsuri (Girls’ Day), but also for New Year’s, birthdays, and other events—so definitely give them a try! If you make them together with a kimono top for hakama, you can create a handmade matching set.
[Daycare] Let's make handmade Hina Matsuri costumes! An idea collection you'll want to copy (21–30)
idol one-piece dress

For Hinamatsuri, where girls are the stars, how about an outfit inspired by a girl idol? To bring out the idol vibe, we recommend pastel-colored fabrics or ones with cute patterns like ribbons, hearts, and flowers.
Add frills to the sleeves in colors that match the main fabric.
For the skirt, you can unify it with the same fabric as the bodice, create about three tiers, or vary the fabric and length on the left and right—feel free to make it to your child’s preference.
Dress up in an idol-style outfit and become the star of Hinamatsuri!