[Daycare/Preschool] Let’s Make Handmade Hinamatsuri Costumes! An Idea Collection You’ll Want to Copy


As Hinamatsuri approaches, many people may be getting costumes ready for events at daycare and preschools.
Even if you look for ready-made outfits, you might not find a design you like or you may be concerned about the price.
In such cases, handmade costumes are a great option.
In this article, we’ve gathered ideas for handmade costumes perfect for Hinamatsuri.
You’ll find a variety of approaches, including pieces you can easily make without patterns and ones that make use of colored plastic bags.
Create a one-of-a-kind outfit tailored to your child’s body shape and taste!
- Easy! Costume ideas made with colored plastic bags
- [Hinamatsuri] Handmade Costume Ideas: Perfect for First Festival and Girls’ Day Celebrations!
- [Childcare] Perfect for Hinamatsuri! Hanging Hina doll craft ideas you can make with kids
- Childcare: Recommended for Girls’ Day! Handmade Hina Doll Ideas
- [For Preschoolers & Kids] Game, Play, and Craft Ideas to Enjoy on Hinamatsuri (Girls’ Day)
- [Childcare] Wall decoration ideas to make for Hinamatsuri (Girls’ Day)
- [Childcare] Recommended crafts and activities for March, such as Hina Matsuri (Doll’s Festival) and cherry blossoms
- [Childcare] Fun Craft Ideas for Hinamatsuri (Girls' Day)
- For three-year-olds: A collection of craft ideas featuring spring events and creatures that you’ll want to make with your three-year-old
- [Childcare] Fun for Hinamatsuri! Performance ideas perfect for the event
- [Childcare] A Collection of Origami Ideas for Hinamatsuri: Let’s Make Them with Kids!
- [Childcare] Sports day costume ideas: easy-to-make outfits
- [Childcare] Enjoy Setsubun! A collection of handmade ideas you can decorate with and play with
[Daycare] Let's make handmade Hina Matsuri costumes! An idea collection you'll want to copy (21–30)
Ribbon belt that won’t slip thanks to elastic

When wearing a kimono, an obi is essential, but it’s natural to worry about the difficulty of tying it and what to do if it comes undone.
In such cases, try making this easy on-and-off obi! Because it contains elastic, you can put it on from the top or bottom, and simply tying it creates a proper-looking obi.
Sew fabric into a tube at the width of a narrow, elongated obi, thread elastic through it, and gather it tightly.
Cover the elastic-filled fabric with another layer of fabric from the outside, and add another piece of fabric for the tying section and sew it on.
After putting it on, tie it at the back like a ribbon.
Dress and headdress
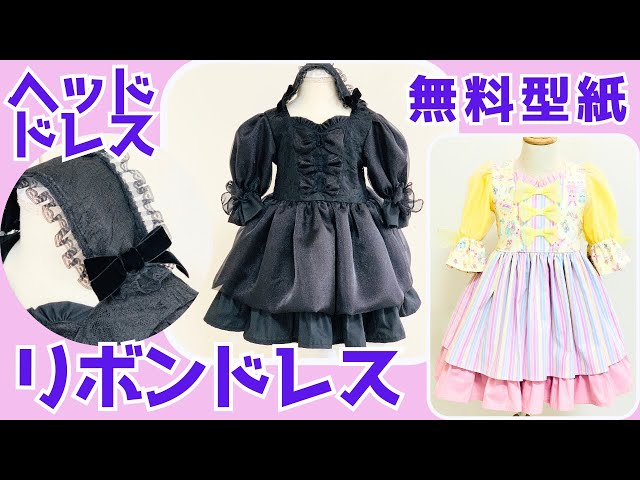
An outfit featuring a cute dress with ribbons and a matching headdress is sure to stand out at Hinamatsuri! You can combine various fabrics with coordinated colors for each part, allowing you to create a dress full of originality.
Attach three ribbons to the chest and six small ribbons to the back.
Pair the sleeves with organza to give a soft, charming look.
For the headdress, it’s recommended to match the dress fabric.
Choose fabric patterns and colors to suit your child’s preferences, and adjust the skirt length to match their growth as you make it.
princess dress

If she wears a princess-style dress—the kind every girl dreams of—she’ll really stand out at the Hinamatsuri festival! When drafting a pattern, it’s best to use items your child actually wears, like a dress or T-shirt.
Once the pattern is ready, prepare fabrics in colors and prints that match the image of the princess she wants to be, and start making the dress.
Incorporate tulle and lace ribbons to finish it as a cute, princess-like dress.
Using plenty of tulle for the skirt will give it an extra fluffy look!
one-touch obi

Tying an obi can be quite difficult if you’re not used to it.
In such cases, let’s make a one-touch, detachable obi.
You can use a tubular half-width obi or any fabric with a pattern you like.
Create the parts separately: the section that wraps around your waist and the sections that form the bow.
For the bow part, make the top and bottom of the bow and the center knot as separate pieces as well.
Insert elastic into the waist-wrapping section and attach Velcro.
Sew the bow pieces together to form the bow shape, then combine it with the waist-wrapping piece to finish.
pure white romper

Hina dolls depict traditional wedding scenes from the past.
So how about celebrating Hinamatsuri with a pure white romper, like a modern wedding dress or a white uchikake worn at contemporary weddings? Once you cut the fabric for each part, simply sew them together.
Add larger frills to the sleeves.
Insert elastic at the legs, and attach snap buttons at the crotch and the back to finish! The back snaps can be replaced with Velcro if you prefer.
Baby hakama made from a furoshiki

You can easily make a hakama using a furoshiki that you can buy even at a 100-yen shop—no need to prepare special fabric! With a roughly 70 cm × 70 cm furoshiki, you can make a hakama that fits a 60 cm baby.
Cut out each part—front body, back body, sleeves—and use the leftover fabric to make a layered collar.
It’s recommended to decide where to sew the waist ties after trying it on your child and seeing where they should be tied at the tummy.
Sew all the parts together, attach the ties, and you’re done! Pair it with a skirt or bloomers and dress them up.
Hakama made from pants patterns
https://www.tiktok.com/@user2573779014796/video/7211521424584887559Let me introduce hakama that are perfect for the male hina doll (Obina).
If you wear this outfit, you might just become the Obina yourself.
Sketch the pattern directly onto the fabric, cut it to shape, then layer the pieces and sew them together.
After sewing the inseam, move on to the front.
For the back, place black fabric as a backing, sew it on, and attach hook-and-loop fasteners.
Be mindful of the fasteners’ orientation.
Thread elastic through the ankle area of the hakama.
When making the obi ties, pressing the seam with an iron is recommended.
Adjust the obi ties to fit the body shape.
Once everything is complete, enjoy getting into the Hinamatsuri spirit.