It moves! You can play with it! Fun origami. How to make origami toys.

Origami is one of those essential activities in early childhood care: it helps develop children’s dexterity and concentration, and lets them experience the joy and sense of achievement that comes from completing a project.
This time, we’ll show you how to make moving toys using origami.
We’re focusing on toys you can make using only origami paper, so there’s very little to prepare—another nice bonus.
You’ll find lots of origami toys with unique, kid-pleasing movements that will spark their curiosity and keep them fully engaged.
Pick the ones that catch your eye, make them, and have fun playing with them!
- [Childcare] Let's make toys you can play with using origami!
- [Childcare] Make and play! Origami ideas
- Simple origami for kids: cute, playable origami ideas
- [Nursery/Kindergarten] Crafts you can play with after making them
- Easy to make! DIY ideas for Whack-a-Gator
- [Childcare] Today’s Fun Origami Play
- [For 5-year-olds] Let’s make origami! A collection of fun folding ideas
- Origami ideas boys will want to make!
- [Age 2] Summer Fun! Simple Origami Toys Perfect for Indoor Play
- [Childcare] Recommended for toddlers! Toy ideas you can make and play with
- Cute Origami Ideas for Girls
- [For 4-5-year-olds] Folding is fun! A collection of January origami ideas to enjoy with preschoolers
- Handmade games: DIY craft ideas you can make and play
It moves! You can play with it! Fun origami. How to make origami toys (61–70)
Infinite spin
Let’s make a toy that you can spin endlessly like an origami kaleidoscope—an Infinite Spinner! Prepare six strips of construction paper.
Using two colors—three strips of each—makes it look extra cute! Glue the ends together at a 90-degree angle, then fold the papers over each other alternately.
When a strip gets short, connect another strip and keep repeating the steps.
Once everything is connected, trim off any excess with scissors.
Glue the end faces together, and you’re done! The process is very simple, so why not make one as a toy for your child?
Rolled-up pill bug

If you look around a park, you’re bound to find at least one—and when it comes to bugs familiar to kids, pill bugs (roly-polies) are at the top of the list.
Here’s an idea for making a pill bug out of origami.
What’s more, this pill bug jumps with a boing when you press and release it, and it curls up into a ball! Children who love pill bugs will of course enjoy it, and even those who aren’t so keen on bugs might have fun with this origami version.
The steps aren’t too difficult.
The key to a neat result is to crease firmly.
Since you’ll be making quite a lot of fine creases, take your time and do each one carefully.
Rabbit BOX

Let’s use it to hold sweets and small items! Here are some ideas for a Bunny Box.
All you need is origami paper in your favorite colors or patterns, a pen, and glue.
It’s an origami idea that’s both practical and cute.
Its perky, straight-up ears are a distinctive and very charming feature.
Once finished, the bunny box is perfect for storing treats or trinkets and also makes a nice gift.
You can draw a face with a pen or decorate it with stickers to give it even more personality.
Give it a try!
A mysterious ring that changes color

I’ll show you how to make a magical ring that changes color when you spin it! Prepare two sheets of origami paper in colors you like.
First, stack the two sheets and fold them in half, then turn them vertically and fold to the thickness you want to make.
Next, cut along the fold line with scissors, open the cut piece, and cut it in half again.
Glue together the two white edges you cut, then fold the strip into thirds to make creases.
Cut it in half down the middle, stack the two cut pieces so that the same colors are together, and tape both ends with clear tape.
Open it up, and your mysterious color-changing ring is complete!
Heart-Pounding Single-Log Bridge Game
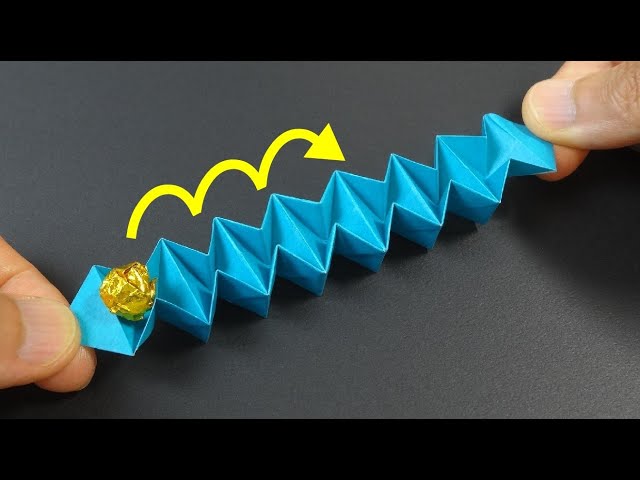
I’ll show you how to fold a balance-bridge game you can make and play with origami.
You’ll use one full sheet of origami paper and a quarter-size piece.
First, fold the full sheet into a triangle twice and unfold.
Fold both side corners toward the center three times.
Unfold everything, rotate the paper 90 degrees so the creases run vertically.
Fold it in the same way three times, then flip it over and, using two creases at a time as guides, add diagonal creases.
Do the same from the opposite direction, then accordion-fold along the creases.
On the back side, open it so that horizontal walls are formed—this completes the main body.
Next, make a ball with the quarter-size piece of paper.
Cut it in half and crumple it into a ball; gold or silver origami paper is easier to shape.
Place the ball at one end of the bridge and flick it toward the other end—that’s the game! Give it a try and have fun.
Paku-Paku Zaurus

Let’s make a cute Pakupaku-saurus with a mouth that opens and closes! First, fold the origami paper in half into a triangle twice and open it to create a cross-shaped crease.
Next, fold all four corners toward the center, flip it over, and again fold all four corners toward the center.
When you open the triangular sections, you’ll see creases; fold all four lower sections up along these lines and unfold them to form a frame-like shape.
Once done, flip it over and fold the top and bottom toward the center, then flip it over again.
Place it vertically, open the top section, gently press down from above to make a square shape, and fold the bottom section the same way.
When you open it, it will look like a mouth; slip your fingers in from the back and it’s complete.
Feel free to draw the face however you like!
An inchworm scurrying along

I’ll show you how to fold an inchworm that moves when you press it! First, flip the origami paper over and fold it in half, then fold both edges to the center twice.
Unfold it, then fold both edges to the first crease and open it again.
Rotate the paper so the creases run vertically.
In the same way, fold both edges to the center twice to set the creases, then roll both edges inward at right angles, 90 degrees, forming square-like wraps.
After rolling all the way, tuck the narrow crease lines at both ends inward.
Hold the areas where you can see gaps, make creases across the two middle blocks, and squash them flat.
Hold the ends and fold the whole piece in half, press the center firmly flat, then fold any parts sticking out inward.
Fold it so that it clamps the folded section, and the body is complete.
Finally, add eyes with round stickers or similar.