It moves! You can play with it! Fun origami. How to make origami toys.

Origami is one of those essential activities in early childhood care: it helps develop children’s dexterity and concentration, and lets them experience the joy and sense of achievement that comes from completing a project.
This time, we’ll show you how to make moving toys using origami.
We’re focusing on toys you can make using only origami paper, so there’s very little to prepare—another nice bonus.
You’ll find lots of origami toys with unique, kid-pleasing movements that will spark their curiosity and keep them fully engaged.
Pick the ones that catch your eye, make them, and have fun playing with them!
- [Childcare] Let's make toys you can play with using origami!
- [Childcare] Make and play! Origami ideas
- Simple origami for kids: cute, playable origami ideas
- [Nursery/Kindergarten] Crafts you can play with after making them
- Easy to make! DIY ideas for Whack-a-Gator
- [Childcare] Today’s Fun Origami Play
- [For 5-year-olds] Let’s make origami! A collection of fun folding ideas
- Origami ideas boys will want to make!
- [Age 2] Summer Fun! Simple Origami Toys Perfect for Indoor Play
- [Childcare] Recommended for toddlers! Toy ideas you can make and play with
- Cute Origami Ideas for Girls
- [For 4-5-year-olds] Folding is fun! A collection of January origami ideas to enjoy with preschoolers
- Handmade games: DIY craft ideas you can make and play
It moves! You can play with it! Fun origami. How to make origami toys (31–40)
finger trap
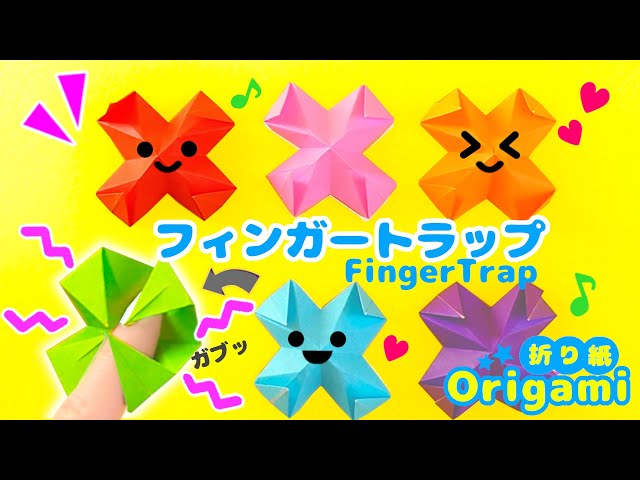
Let’s make a playful origami finger trap that snaps shut when you touch it! All you need is one quarter of a sheet of origami paper and a pair of scissors.
First, fold the paper in half, open it, then fold it in half the other way and open it to create a cross-shaped crease.
Next, fold it into a triangle, open it, and fold into a triangle again from a different angle to add diagonal creases.
Open it up, then use the creases you just made to collapse the paper inward along those lines, with the open side facing down.
Fold both sides toward the center line to make an ice-cream-like shape.
Open it and make small cuts with scissors, then keep folding along the creases.
Continue folding along the lines you made, and you’ll have a cute finger trap that snaps shut without hurting—done!
A well-spinning top made with two sheets of origami!

How about a spinning top made from two sheets of origami, with a beautifully twirling form? For the first sheet, fold it in half into a triangle twice, then fold all four corners toward the center.
Flip it over and again fold the four corners toward the center.
Flip it over once more and repeat the same steps.
Then, make reverse folds from the center out toward the outer corners to complete the base.
Use the second sheet to make the spinning component and combine them to finish.
Spinning tops are toys that people of all ages, from children to adults, can enjoy.
Please try making one together and enjoy a fun time.
Shape-shifting! Magic Triangle

Let’s make a very mysterious push-pop magic triangle out of origami that can change shape over and over again! We’ll use three colors of origami paper, so prepare your favorite colors.
Fold one sheet of origami paper twice to make a triangle, then fold the top and bottom corners in two places toward the center.
Flip it over, fold the sides toward the center line, fold the left and right corners inward, and form a parallelogram shape.
A key tip for success is to crease the square in the middle firmly along its diagonals.
Make three of these, then combine them to finish.
Thanks to its ever-transforming nature, it’s a fascinating toy you’ll want to keep touching forever.
Moving! Origami Tongs

How about origami tongs that really pinch? This is a moving toy you can make from a single sheet of double-sided origami paper.
Fold it twice into a triangle, open it once, then fold the left and right edges along the center line.
Open it up and use the crease lines to collapse-fold.
Fold the longer edges in two places along the center line, open the hollow sections, and flatten them.
After making the folded parts into mountain folds, the tong’s mouth will open and close—your chomp-chomp origami tongs are complete.
They can actually pick up small objects, which is lots of fun.
Give it a try as a toy for your child!
Simple moving caterpillar
Let’s make a simple moving caterpillar out of origami! Use a sheet of origami paper cut into quarters.
Fold the paper in half and open it, then fold both edges to meet the center crease.
Fold both edges to the center once more, and finally fold the whole piece in half along the center line.
If you’ve got creases dividing it into eight sections, you’re good to go! Open the paper, make the creases at both ends into valley folds, and the center into a mountain fold so it pops up.
Draw the caterpillar’s face with a pen, and you’re done! Try blowing on the tail end with a straw to make it move.
It moves! You can play with it! Fun origami. How to make origami toys (41–50)
chatterbox crow

Introducing a chattering crow with a mouth that opens and closes.
The key step is to make a cross fold toward the crease lines, open it up, and pull out just one corner to fold.
Once you’re done, draw eyes with a pen or add stickers, and your chattering crow is complete.
Pinch the sides next to the crow’s face and move them left and right to make its mouth open and close.
If the mouth doesn’t open well, try pinching a spot closer to the mouth, and it will transform into a very talkative crow! It’s also fun to play by chatting with the crow or pretending to feed it.
twirling whistle

Let’s make a twirly whistle that spins back when you blow it! Prepare one straw, a rectangular sheet of paper measuring 8 cm × 17 cm, cellophane tape, and masking tape.
Place the rectangle with the long side at the bottom.
Leave about 1 cm at the top, then fold up from the bottom.
Next, flip the part you left open to the bottom so it overlaps, and finally leave 1 cm at the end and secure everything with cellophane tape.
Turn the paper over and draw any picture you like! Cut the straw in half, insert the cut straw into the 1 cm opening you left earlier, fold both ends, secure with cellophane tape, and add masking tape on top to make it cute.
Finally, curl it up using a pen or pencil, and it’s done.
Please be careful when using the straw!