It moves! You can play with it! Fun origami. How to make origami toys.

Origami is one of those essential activities in early childhood care: it helps develop children’s dexterity and concentration, and lets them experience the joy and sense of achievement that comes from completing a project.
This time, we’ll show you how to make moving toys using origami.
We’re focusing on toys you can make using only origami paper, so there’s very little to prepare—another nice bonus.
You’ll find lots of origami toys with unique, kid-pleasing movements that will spark their curiosity and keep them fully engaged.
Pick the ones that catch your eye, make them, and have fun playing with them!
- [Childcare] Let's make toys you can play with using origami!
- [Childcare] Make and play! Origami ideas
- Simple origami for kids: cute, playable origami ideas
- [Nursery/Kindergarten] Crafts you can play with after making them
- Easy to make! DIY ideas for Whack-a-Gator
- [Childcare] Today’s Fun Origami Play
- [For 5-year-olds] Let’s make origami! A collection of fun folding ideas
- Origami ideas boys will want to make!
- [Age 2] Summer Fun! Simple Origami Toys Perfect for Indoor Play
- [Childcare] Recommended for toddlers! Toy ideas you can make and play with
- Cute Origami Ideas for Girls
- [For 4-5-year-olds] Folding is fun! A collection of January origami ideas to enjoy with preschoolers
- Handmade games: DIY craft ideas you can make and play
It moves! You can play with it! Fun origami. How to make origami toys (41–50)
It’s like it’s alive! Pachi-paku face

A mysterious origami piece that looks like it’s talking when you move the finished face.
Use one sheet of origami for the eyes and nose, and one sheet for the mouth.
First, for the eyes-and-nose sheet, make vertical accordion folds.
Next, add horizontal accordion creases as well, but without unfolding the accordions near the center; instead, create four triangles partway along to form the eyes.
Then, for the mouth sheet, make accordion creases vertically and horizontally in the same way, leaving one of the accordion folds kept folded at the center.
Create a larger bulge for the mouth, shaping the top and bottom, to complete the mouth.
Finally, combine the eye-nose part with the mouth part and you’re done.
If you firmly hold the combined section and move it, the face will move!
Origami with parts that move like a volcanic eruption

It’s a fun idea where moving the leg parts up and down alternately makes the central piece climb.
Fold the origami paper into a triangle twice, then squash the pocket areas to make two squares.
Place it with the flappy side facing down, fold the bottom corner up to meet the top, then unfold.
Using the crease you just made as a guide, roll it up three times.
Do the same on the back side.
Flip the origami so the folded sides are on the inside, then fold the flat sections so the lower left and right edges align with the center line.
Fold the back side the same way.
Flip it again to bring the previously folded-up part to the front, then cut the top with scissors.
Tuck that into the leg parts, and you’re done.
Draw a face on the piece to finish it cutely!
Rolling Origami

Here’s an introduction to a simple rolling origami.
You can make it with a single sheet of origami paper, so give it a try! First, hold the top corners of the paper and fold it into a triangle.
Fold it twice horizontally, then flip it over and fold both sides toward the center.
Crease well and open it up, then fold the bottom corners into small triangles, and it’s done! If you pinch both tips of the corner and let go, it will roll around—it’s really fun.
Because the steps are simple, it’s great for small children, too.
Use your favorite color of origami paper and give it a try!
Spinning paper toy

You’ll definitely get hooked watching it spin around and around! First, cut a 4 cm × 15 cm sheet of origami paper lengthwise into three long strips.
Fold each strip in half at the center.
Start by crossing two strips at a right angle, then thread the remaining strip through the loop created where the first two intersect at a right angle.
Pull all the ends tight to secure them, adjust the shape, and it’s done! Just drop it, and it will spin as it falls.
Try dropping it from different heights and have fun!
Tap-tap hammer

Here’s an introduction to making a “Ton-ton Hammer” out of origami.
First, fold the paper to create crease lines.
For the hammer head, open it to a 45-degree angle and fold it into a box shape.
The key is to crease the base firmly as you fold.
Once the hammer head is done, shape the handle, and your sound-making Ton-ton Hammer is complete! Gently tap it on a desk and have fun playing with it.
It’ll be interesting to hear what kind of sounds it makes.
Give it a try!
Infinite Cube

Introducing the endlessly transformable Infinity Cube! We’ll make it using 7.5 × 7.5 cm origami paper.
First, create six identical pieces from origami paper to form the base of the cube.
Once you’ve made all six, connect them to assemble a cube.
The key is to insert each piece into the pockets one by one.
Take your time and be careful when fitting them into the pockets! After finishing one cube, make a total of eight cubes and connect them with cellophane tape.
Masking tape also works! When connecting them, be mindful of where you place the tape.
Once everything is linked, your Infinity Cube is complete! You can enjoy all sorts of shape transformations.
It moves! A flapping bat
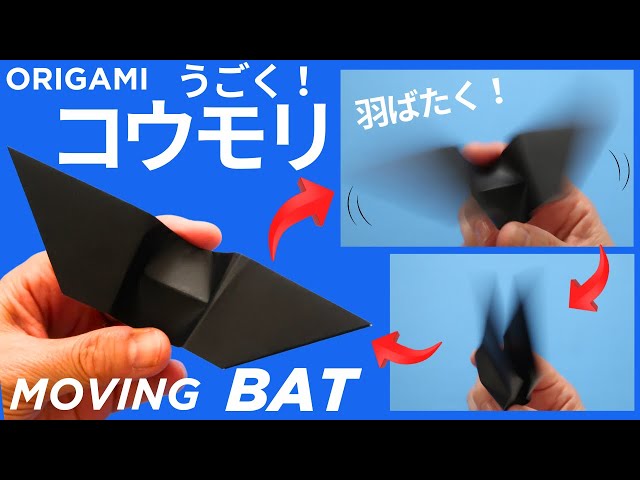
This is perfect for Halloween decorations or toys, with wings that flap amusingly.
First, cut the origami paper into a long rectangle and fold it in half vertically to make a crease.
Then fold both ends into triangles toward the center.
Keeping that shape, fold it in half vertically again, and fold further in the same direction to add a light crease at the center.
Next, flip it over and insert a finger at the center to make two creases.
Reinforce the creases you made earlier, and it’s done! By lightly holding the top and bottom of the center and moving them, the wings on both sides will flap.