It moves! You can play with it! Fun origami. How to make origami toys.

Origami is one of those essential activities in early childhood care: it helps develop children’s dexterity and concentration, and lets them experience the joy and sense of achievement that comes from completing a project.
This time, we’ll show you how to make moving toys using origami.
We’re focusing on toys you can make using only origami paper, so there’s very little to prepare—another nice bonus.
You’ll find lots of origami toys with unique, kid-pleasing movements that will spark their curiosity and keep them fully engaged.
Pick the ones that catch your eye, make them, and have fun playing with them!
- [Childcare] Let's make toys you can play with using origami!
- [Childcare] Make and play! Origami ideas
- Simple origami for kids: cute, playable origami ideas
- [Nursery/Kindergarten] Crafts you can play with after making them
- Easy to make! DIY ideas for Whack-a-Gator
- [Childcare] Today’s Fun Origami Play
- [For 5-year-olds] Let’s make origami! A collection of fun folding ideas
- Origami ideas boys will want to make!
- [Age 2] Summer Fun! Simple Origami Toys Perfect for Indoor Play
- [Childcare] Recommended for toddlers! Toy ideas you can make and play with
- Cute Origami Ideas for Girls
- [For 4-5-year-olds] Folding is fun! A collection of January origami ideas to enjoy with preschoolers
- Handmade games: DIY craft ideas you can make and play
It moves! You can play with it! Fun origami. How to make origami toys (21–30)
Twisting Soap Bubbles

We’d like to introduce a spinning “soap bubble” craft made with holographic origami paper.
Cut your favorite color of holographic origami paper into thin strips and stick them onto a round sticker in eight directions.
Attach a hole-punched sticker to a straw, then press the holographic paper strips onto it.
Since scissors are used, please be mindful depending on the child’s age.
Before threading the bamboo skewer through the hole, cut the straw—but be careful not to cut the holographic paper along with it.
Once it’s finished, try spinning it slowly or quickly; it will look beautiful like soap bubbles and is lots of fun.
Depending on the age, using a thin, long straw instead of a bamboo skewer is also recommended.
Give it a try!
A stag beetle with moving antlers

Let me introduce the Horn-Moving Horned Rhinoceros Beetle.
We’ll fold along creases in the origami paper as we go.
The key is to make firm, well-defined creases in each section.
For the horn, adding V-shaped creases enhances the look and makes it appear cooler.
Folding both the body and horn improves the horn’s movement, so it’s highly recommended.
Once finished, place it on a desk and gently tap the head area to play—the horn will move and it’s adorable.
Give it a try!
fingerboard

Here’s how to fold a skateboard out of origami.
Start by making crease lines on the paper, then rotate it 90 degrees and make more creases.
The key step is neatly rolling the skateboard’s wheel sections using a bamboo skewer; the cleaner the roll, the better the finished skateboard will stand.
You can roll them by hand, but a bamboo skewer makes it easier and is recommended.
Once you’re done, place it on a flat surface and try spinning it sideways or lengthwise with your finger, or lift one side and let it slide to play with it.
It’s also fun to come up with your own original skateboard tricks and give them a try!
pinwheel

Why not try making a pinwheel with origami? Pinwheels are fun twice over—you can enjoy making them and then playing with them.
You don’t need scissors or glue, so give it a try.
The folding method is similar to the yakko-san, hakama, and “trick boat” models.
The key is to gently puff out the blade sections so they catch the wind and spin easily.
Attach it to a stick like a straw to finish it off so it spins well.
If you run while holding it, it spins wonderfully, making it a great item for outdoor play!
Endless Card

We’ll show you how to make an endless card where the picture changes every time you flip it! To prevent pen bleed, we recommend using thick origami paper.
If you don’t have thick origami, you can also cut drawing paper into a square and use that.
Fold horizontally and align the top and bottom edges to the center to make crease lines.
You’ll need scissors partway through, so please use them carefully depending on the user’s age.
Cut the necessary sections with scissors.
When applying glue, be careful not to glue the wrong areas.
Once the glue has dried, lift the center edges and make crease lines so that all four sides can flip continuously.
After it’s finished, use a pen to draw your favorite pictures or letters on each panel and enjoy!
boomerang
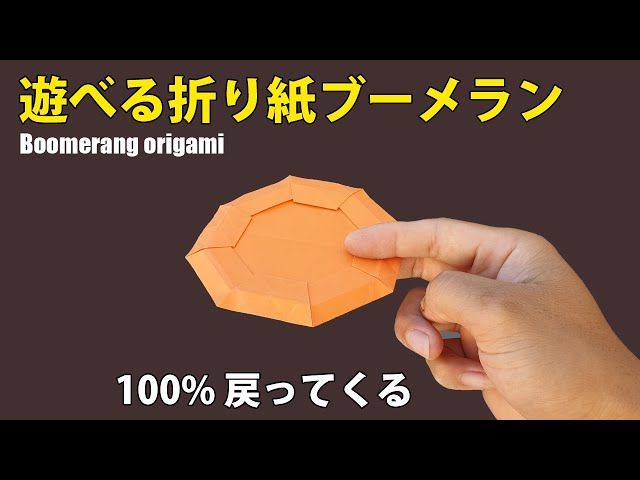
Here’s an introduction to a fun boomerang you can play with that comes back when you throw it.
You can make it with just one sheet of origami paper! When folding the origami, if the finer parts get hard to fold, try using your fingernail to help make the creases.
When you’re looking at the crease lines and adding several marks with a pen toward the center, be careful not to put the marks in the wrong places.
Fold along the marks, shape it into a boomerang, and you’re done.
Once it’s finished, try flying your boomerang in a wide, safe area!
Korokoro Star

Let’s make a fun rolling star that spins and hops around! You only need one sheet of origami paper, so first prepare your favorite one.
Start by folding the paper into thirds.
You can measure with a ruler if you like! After folding into thirds, fold it in half to crease, then open it—you’ll see creases dividing it into six sections.
Rotate the paper 90 degrees and repeat the same steps.
Open it up and accordion-fold along the creases, alternating mountain and valley folds, then keep making mountain folds along the vertical lines.
Tuck one end into the other end, repeat the valley folds, and shape it into a star to finish! If you lay it on its side and flick it, the star will spin around and it’s lots of fun!