It moves! You can play with it! Fun origami. How to make origami toys.

Origami is one of those essential activities in early childhood care: it helps develop children’s dexterity and concentration, and lets them experience the joy and sense of achievement that comes from completing a project.
This time, we’ll show you how to make moving toys using origami.
We’re focusing on toys you can make using only origami paper, so there’s very little to prepare—another nice bonus.
You’ll find lots of origami toys with unique, kid-pleasing movements that will spark their curiosity and keep them fully engaged.
Pick the ones that catch your eye, make them, and have fun playing with them!
- [Childcare] Let's make toys you can play with using origami!
- [Childcare] Make and play! Origami ideas
- Simple origami for kids: cute, playable origami ideas
- [Nursery/Kindergarten] Crafts you can play with after making them
- Easy to make! DIY ideas for Whack-a-Gator
- [Childcare] Today’s Fun Origami Play
- [For 5-year-olds] Let’s make origami! A collection of fun folding ideas
- Origami ideas boys will want to make!
- [Age 2] Summer Fun! Simple Origami Toys Perfect for Indoor Play
- [Childcare] Recommended for toddlers! Toy ideas you can make and play with
- Cute Origami Ideas for Girls
- [For 4-5-year-olds] Folding is fun! A collection of January origami ideas to enjoy with preschoolers
- Handmade games: DIY craft ideas you can make and play
It moves! You can play with it! Fun origami. How to make origami toys (51–60)
How to fold blinking eyes
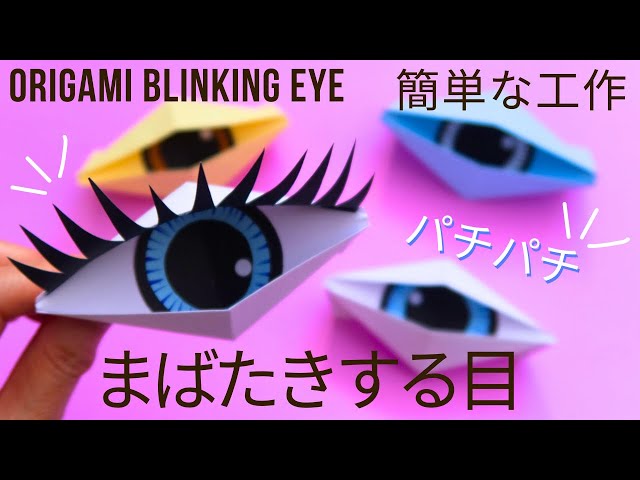
How about some blinking eyes that look a bit eerie in the dark? They’re perfect for Halloween toys, too! First, fold a piece of origami paper in half into a triangle to make a crease, then fold both ends inward toward this crease three times.
Next, fold it in half from the other direction to make another crease, and fold both ends toward the center along that crease.
Shape the whole piece into an eye by folding the straight edges diagonally.
Attach a handle, and the eye is complete! Finish it by adding a separately made drawing of an eye in the center and gluing on eyelashes around it.
Moving is fun! Spring toy

Spring toys with mysterious motions are so captivating that you can keep playing with even store-bought ones forever, right? Let’s make that kind of spring toy with origami.
You’ll need one regular square sheet of origami and another sheet cut in half.
Cut each into long, narrow strips so you have a total of 12 pieces.
Glue two strips together at a right angle, flip them over, and fold them back and forth in an alternating pattern.
When the folding sections start getting short, extend them by gluing on more strips to continue.
The key is to make crisp creases as you fold.
Once you’ve used all 12 strips, you’re done! Try wobbling it or pressing it like a switch to play.
Kurukuru X

Let’s make a Spinning X you can twirl around and bounce up and down like a little jumper! Prepare one sheet of origami paper and a pencil or pen for marking.
First, fold the origami paper in half and open it.
Fold the top and bottom edges to meet the center crease.
Then fold the top and bottom toward the center once more; when you open it, you should have seven vertical creases—perfect.
Rotate the paper and repeat the same folding steps.
Use a pen to mark a zigzag pattern, then crease along those lines.
The folding is a bit tricky, but if you carefully follow the creases, you’ll end up with an X shape.
There are lots of ways to play with it, so coming up with your own games will be fun too!
Zooming Aviator

This zooming airplane is super fun—you just let go and it shoots off with a whoosh! The key is the spring action when you launch it.
Make firm creases, then fold the base of the spring into a triangle and open it up; by adding mountain and valley folds, you’ll build up the spring’s strength.
The origami will get thicker toward the end, but if you press your creases firmly, the shape will come together nicely.
Once it’s finished, try making big and small airplanes by changing the paper size, and have a contest with the kids to see whose flies the best.
It moves! You can play with it! Fun origami. How to make origami toys (61–70)
Magic Triangle

This is a three-dimensional triangular object with an eye-catching, colorful look made up of fine triangles.
A notable feature is that you can repeatedly squash it and open it, so you can enjoy the changing shapes.
You make parts from three sheets of origami and simply assemble them, so be sure to pay close attention to the reverses and the creation of gaps in each piece.
Use the diagonal creases as guides and fold while noting the difference between the front and back colors.
Finish by creating a parallelogram with gaps in various places, insert each part into the gaps, and adjust the shape to complete it.
It also seems fun to play with color combinations and finish it in your own unique palette.
Spinning Kaleidoscope

A kaleidoscope made from origami that kids love! You can create various shapes by increasing the number of parts, but this is the simplest version and uses just three pieces.
There’s a step at the beginning where you make crease lines, but once you get past that, all you do is attach the parts and fold along the creases—nice and simple.
With few steps and an easy folding method, children will enjoy making it, so adults, please try it together with them.
You’ll need three sheets of origami paper, so pick your favorite colors!
soccer game

Here’s an idea for making a soccer game out of origami.
There are many steps to fold, but the folds themselves are simple, so be sure to follow along with the video and give it a try.
You can make the soccer goal and the ground from a single sheet of origami paper, and the result looks so polished that you wouldn’t think it was made from just one sheet! For the ball, we recommend a size that is half of a quarter of the origami sheet, but it’s also fun to adjust it freely to match the size of your goal.
Try playing head-to-head with your friends!