
Make it with wood! A collection of easy DIY toy ideas!

This time, we’re introducing toys made of wood.
These days, there are many toys on the market made from materials that don’t easily break when dropped and with designs that catch children’s eyes.
Amidst that, we’ve focused on traditional wooden toys and gathered lots of ideas for handmade creations.
It’s said that wood’s natural warmth and pleasant feel stimulate children’s senses and give them a sense of security.
You can now easily buy supplies at home improvement stores, so give it a try and make some yourself!
Make it with wood! A collection of easy DIY toy ideas! (1–10)
wooden bamboo-copter (toy helicopter spun by hand)
Do you remember playing as a child to see how high you could make a bamboo-copter fly? Here’s how to make a handmade bamboo-copter using an ice cream stick, a bamboo skewer, a file, and a utility knife.
First, make a hole in the center of the ice cream stick for the bamboo skewer to pass through.
Next, shape the ice cream stick into a propeller using the utility knife and file.
It helps to sketch the areas to be shaved with a pencil beforehand.
Once you finish shaving, refine the shape, insert the bamboo skewer, and secure it with glue so it won’t come loose.
If you’re making it with a child, using a file for the shaving step is safer and recommended.
When it’s done, try flying it as high as you can!
Wooden spoon kalimba

Noisy toys are very popular with kids, aren’t they? Here’s a handmade wooden toy using a wooden box, wooden spoons, disposable chopsticks, and a file.
First, cut the chopsticks and attach round hooks to the box lid.
Next, thread the chopsticks through the round hooks, then insert the handle ends of the wooden spoons between the chopsticks so they’re held in place.
The sound changes depending on the angle when you press and flick the spoons, which makes it fun.
Kids can probably help with parts like drawing on the spoons or attaching them with glue.
ita-gaeshi
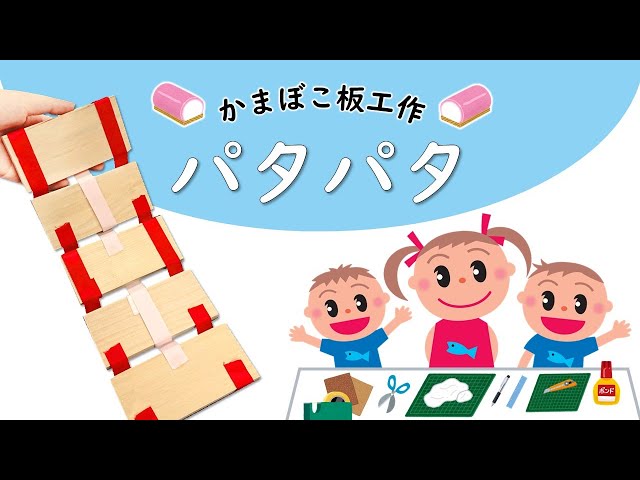
A kamaboko board can be transformed into all kinds of toys.
Let’s make a kamaboko-board toy with changing pictures using five kamaboko boards and a ribbon.
Have your child draw pictures on the boards first.
Next, attach the ribbon to the specified positions on the boards with glue so that the pictures will change.
When you rotate the top board, the picture flips with a spin and you can enjoy the change.
Because kamaboko boards are flat, it’s easy for children to draw on them with colored pens.
Drawing a peekaboo (peek-a-boo) motif would be fun, too.
Wiggly Block Train

Toys that fit comfortably in the hand and move are easy to play with and kids love them.
Here’s how to make a block train using wood, snap fasteners, plastic corrugated board, and toothpicks.
First, draw a train on the wood and attach plastic corrugated board to the back with double-sided tape.
Insert a snap fastener onto one end of a toothpick, pass the toothpick through the plastic corrugated board, then put a snap fastener on the other end as well.
Do the same for the rear wheels, and it’s done.
It might also be fun to make several identical cars and connect them to play.
Handmade dominoes

By making homemade dominoes with your child, you can also increase parent-child bonding time.
This time, we’ll show you how to make DIY dominoes.
Prepare wood, glue, string, and paint.
Cut the wood into domino shapes and drill a hole in the center.
After threading the string through the hole, the key is to press the wood together with glue over the string.
Paint the dominoes together with your child, then drill placement holes in a flat board and attach legs.
Finally, thread the domino strings through and secure them to finish.
Even if the dominoes fall, you can pull the string to make them stand up again, making this a recommended toy for small children.
Wooden Spoon Snake

The snake made from a wooden spoon and clothespin is so cute that kids will want to touch and play with it.
It’s said that fingertips are like a second brain, and activities that use them stimulate the brain and support children’s development.
Let’s make this snake! Prepare a wooden spoon, a wooden clothespin, and some paint.
Paint the spoon and the clothespin, then attach the clothespin to the center so that the tip of the spoon lines up, and glue it in place.
Finally, add a tongue and eyes to finish.
Try picking up small pom-poms or azuki beans and play with them.
Using a wooden spoon makes painting easier, gives a warm feel, and is highly recommended.
See-through tree
https://www.tiktok.com/@n.annlee321/video/7159132828897234178It’s nice when you can make toys from simple, natural materials around you, isn’t it? Here’s how to make a translucent tree using small twigs, glue, double-sided fabric tape, transparent origami paper, and kite string.
Cut the twigs, apply the double-sided tape, then stick on the transparent origami paper.
Trim any excess paper that sticks out from the twigs, thread a string through for hanging, and you’re done.
Fabric double-sided tape is strong and highly recommended.
You can also decorate it with beads or stickers, and it would look fun displayed like a mobile.