Crafts parents and kids can enjoy together. Recommended craft ideas to keep children entertained.


Here are some recommended craft ideas that parents and kids can enjoy together!
When you hear “crafts,” you might think of summer vacation homework.
But crafts are also perfect for everyday play and passing the time at home!
With common household items like plastic bottles, milk cartons, cardboard, and clay, you can make all kinds of fun creations.
You can have a blast making them with your child, play with what you’ve made, or even exchange your creations as gifts with each other…
You’re sure to share lots of fun moments!
These ideas will captivate both adults and kids, so be sure to enjoy them together as a family!
- For summer vacation homework! Simple and amazing crafts for elementary school students that you’ll want to make after seeing them
- Simple yet amazing crafts: craft ideas that elementary school students will want to make
- Craft ideas using plastic bottle caps [for boys]
- Paper cup crafts that elementary school kids will love! A collection of fun project ideas
- Fun crafts using straws
- [For Kids] Today’s Handmade Craft Ideas
- Adults will be hooked! A collection of craft ideas using toilet paper rolls
- [Indoor Activities] A Collection of Craft Ideas Recommended for Elementary School Students
- [For toddlers] Simple but amazing craft ideas — including toys they can play with
- DIY science projects that elementary school boys will love: ideas you can make with everyday materials
- Toys you can make from cardboard crafts! Authentic ideas you can build and play with
- Made of paper! A fun collection of DIY toy ideas you can play with
- [For Kids] DIY Snowman Craft Ideas!
Crafts parents and kids can enjoy together. Recommended craft ideas to keep children entertained (71–80)
Marble coaster with a spiral coil

Let’s make a slightly unusual spiral-type marble run using wire! First, wrap the wire around a rod whose diameter is close to that of the marble.
As you wrap, check to make sure the marble can fall properly through the coiled wire and that the loops aren’t so large that the marble drops straight down in an instant.
Next, create a path out of cardboard that leads the marble to the spiral wire, and combine it with the wire to complete the course! It’s also fun to connect it with other tracks.
Marble run made from cardboard
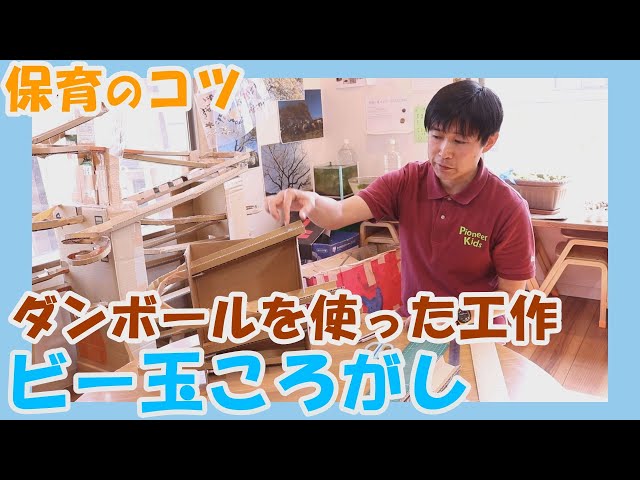
Let’s try making a cool marble run using cardboard.
Prepare a rectangular piece of cardboard that isn’t too thick, and cut off one section on the large face and one section on the narrowest side.
Then, using the pieces you removed and other bits of cardboard, build the pathways for the marble to roll along and attach them to the base cardboard.
Instead of connecting every path all the way through, it’s also fun to leave gaps here and there so the marble drops down to the next level and continues.
Be sure to set up the goal area so the marble stops securely and doesn’t roll out after reaching the finish.
Marble roll with a toilet paper core

This is a simple marble run you can make using toilet paper rolls.
Prepare eight toilet paper rolls.
Cut two of them in half to make two shorter pieces each.
For the remaining six rolls, make a single slit in each so they can be opened up.
Assemble these six into two vertical towers by stacking three each.
Attach the halved rolls diagonally across the openings of the towers to form slide-like chutes, and you’re done! To ensure the marble drops down properly, be careful not to glue one end of each chute completely to the tower—leave a slight gap at the end.
Decorate the toilet paper rolls by drawing on them or adding washi tape or patterned origami paper!
Crafts parents and children can enjoy together. Recommended craft ideas to keep kids busy (81–90)
Marble roll with a toilet paper core
This is a simple marble run you can make using toilet paper rolls.
Prepare eight toilet paper rolls.
Cut two of them in half to make two shorter pieces each.
For the remaining six rolls, make a single slit in each so they can be opened up.
Assemble these six into two vertical towers by stacking three each.
Attach the halved rolls diagonally across the openings of the towers to form slide-like chutes, and you’re done! To ensure the marble drops down properly, be careful not to glue one end of each chute completely to the tower—leave a slight gap at the end.
Decorate the toilet paper rolls by drawing on them or adding washi tape or patterned origami paper!
Marble Rolling Tower

How about a stylish marble run, a Marble Rolling Tower, made from toilet paper cores and colored construction paper? First, stack three toilet paper cores vertically to make one long tube.
Next, let’s create the tracks where the marbles will roll using colored construction paper.
Prepare a rectangular sheet of colored paper, cut it lengthwise in half, then fold the half sheet in half two times.
Unfold the second fold, and along the crease you just made, cut a series of deep, fine slits from one edge to the other.
Once that’s done, fold it into a long, thin triangle to form the track.
Finally, attach the track diagonally to the tube like a slide, and glue a piece of cardboard to the very bottom of the tube as a base—done! Try making it with different colors of paper.
Making instruments with a plastic wrap core

Let’s make a Chilean instrument that sounds like rain using a plastic wrap core! First, mark a bunch of toothpicks at the length of the wrap core so they match its length.
Next, cut the wrap core in a spiral.
Glue the cut toothpicks along the spiral using wood glue or similar adhesive.
Once you return the spiraled core to its original shape, seal the openings with duct tape.
Put in grains like mixed grains, different sizes of rice, beads, or beans.
After you cap it, your Chilean instrument, the rainstick, is complete!
Making instruments with a plastic wrap core
Let’s make a Chilean instrument that sounds like rain using a plastic wrap core! First, mark a bunch of toothpicks at the length of the wrap core so they match its length.
Next, cut the wrap core in a spiral.
Glue the cut toothpicks along the spiral using wood glue or similar adhesive.
Once you return the spiraled core to its original shape, seal the openings with duct tape.
Put in grains like mixed grains, different sizes of rice, beads, or beans.
After you cap it, your Chilean instrument, the rainstick, is complete!