Crafts parents and kids can enjoy together. Recommended craft ideas to keep children entertained.


Here are some recommended craft ideas that parents and kids can enjoy together!
When you hear “crafts,” you might think of summer vacation homework.
But crafts are also perfect for everyday play and passing the time at home!
With common household items like plastic bottles, milk cartons, cardboard, and clay, you can make all kinds of fun creations.
You can have a blast making them with your child, play with what you’ve made, or even exchange your creations as gifts with each other…
You’re sure to share lots of fun moments!
These ideas will captivate both adults and kids, so be sure to enjoy them together as a family!
- For summer vacation homework! Simple and amazing crafts for elementary school students that you’ll want to make after seeing them
- Simple yet amazing crafts: craft ideas that elementary school students will want to make
- Craft ideas using plastic bottle caps [for boys]
- Paper cup crafts that elementary school kids will love! A collection of fun project ideas
- Fun crafts using straws
- [For Kids] Today’s Handmade Craft Ideas
- Adults will be hooked! A collection of craft ideas using toilet paper rolls
- [Indoor Activities] A Collection of Craft Ideas Recommended for Elementary School Students
- [For toddlers] Simple but amazing craft ideas — including toys they can play with
- DIY science projects that elementary school boys will love: ideas you can make with everyday materials
- Toys you can make from cardboard crafts! Authentic ideas you can build and play with
- Made of paper! A fun collection of DIY toy ideas you can play with
- [For Kids] DIY Snowman Craft Ideas!
Crafts that parents and children can enjoy together. Recommended craft ideas to keep kids entertained (21–30)
Fold-only wallet
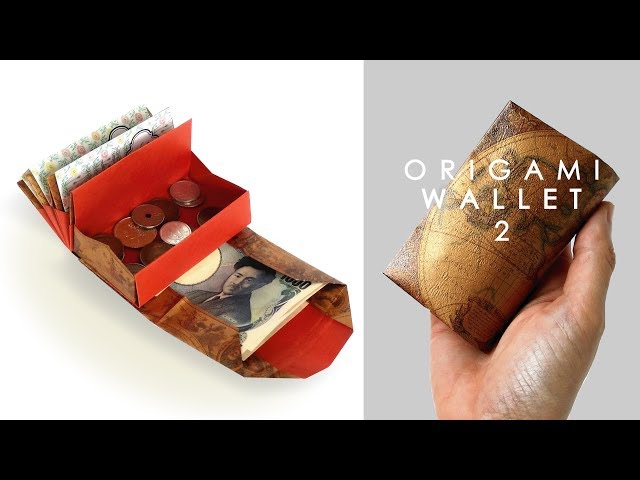
Here’s how to make a wallet using nothing but folded wrapping paper! Carrying a wallet you made yourself is something to be really proud of, isn’t it? All you need to do is fold a sheet of paper cut to half of A3 size, so give it a try with your kids! The steps aren’t very difficult, but since you make the card pocket and the coin/bill pocket separately and combine them at the end, it might take a little time.
Another nice thing about this craft is that you can make it without using any glue! Use wrapping paper with different patterns to create a one-of-a-kind wallet just for you.
A three-step chopstick rubber-band gun

This is a chopstick rubber-band gun that you can make with a simple procedure: use chopsticks as the base and attach a clothespin with a rubber band.
Insert the metal part of the clothespin into the gap between the chopsticks, then secure the clothespin in that position with a rubber band.
After that, to keep the chopsticks from spreading apart, wrap a rubber band around the tips of the chopsticks, and it’s done.
The mechanism is that you launch a rubber band stretched from the tip by opening and closing the clothespin.
The appeal is that you can make a chopstick rubber-band gun easily with only a few materials.
Crafts parents and children can enjoy together. Recommended craft ideas to keep kids entertained (31–40)
gel candle

At 100-yen shops, you can find a product called gel candles, and with them you can easily make homemade candles.
Gel candles are easy to handle, and you can even pour two different colors one on top of the other to create a two-layer candle.
The way the colors blend slightly between the layers also gives it a lovely look.
Plus, by placing items you like—such as colored sand, seashells, or dried flowers—into the glass before pouring in the gel candle, you can create a more stylish and original piece.
Give it a try and make one with your own sense of style.
Easy! A chopstick rubber band gun that can even use hair ties

This rubber band gun made from disposable chopsticks is very simple—you just bundle the chopsticks together and fasten them with rubber bands.
First, stack four chopsticks and secure them in two places with rubber bands.
To catch the rubber band that will serve as the projectile, leave the top and bottom sticks of the four sticking out a bit longer.
Attach a clothespin together with the topmost rubber band at the rear.
The rubber band projectile is gripped by both the clothespin and the chopsticks; when you pull the clothespin, the band shoots out.
Try using a hair tie as the projectile—it won’t hurt much even if it hits you.
Sparkly card with aluminum foil

Let’s make a sparkling, shiny card using everyday items! You’ll need aluminum foil, a permanent marker, cardboard, and scissors.
First, draw any picture you like on the aluminum foil.
Once the drawing is done and dry, crumple the foil.
Crumple it as much as you like.
When you’re finished, simply attach the foil to a piece of cardboard cut to the same size as your drawing.
And that’s it—your glittering, shiny card is complete!
Parachute

Let’s make a fluffy, floating parachute using materials you have at home! You’ll need things like a plastic shopping bag, kite string, a toilet paper roll, newspaper, rubber bands, and cellophane tape—items found in any household.
Cut the plastic bag into a square and tape pieces of kite string of equal length to each corner.
Tie the ends of the strings together and tape them to the toilet paper roll, and you’re done! For the launcher, tightly roll a strip of newspaper, tuck a rubber band into one end, and tape it in place.
Then tape a cut chopstick to the rubber band to complete the launcher.
Decorating the launcher and parachute makes it even more fun!
sand candle

If you’re a stylish girl, you might be interested in candles.
How about making a sand candle as a summer break craft? Just place a candle wick inside a glass and add sand little by little with a spoon.
The trick is to hold the wick in place with your hand so it doesn’t shift.
Try layering different colors or mixing them—both look beautiful.
Light your candle on a summer night and enjoy a romantic atmosphere!