For Seniors: Come, Spring! Recommended March Craft Ideas for Daycare Services


In this article, we introduce March craft ideas recommended for seniors!
When it comes to March events, there are many with a cute image, like Hinamatsuri (Girls’ Day) and White Day.
Using lots of soft colors like pink and white in your crafts can put you in a gentle mood.
It’s the season when spring flowers begin to bloom, so let’s create a bright, festive atmosphere through crafting!
There are plenty of ideas you can use in senior day services and other elder care facilities, so please use them as a reference when making crafts together.
- [For Seniors] Crafts to Make in March! Recommended Project Ideas
- For Seniors: Recommended Wall Decoration Ideas for March
- [Day Service] Spring Take-Home Crafts: Ideas to Warmly Brighten Your Room
- [For Seniors] March Origami: Ideas to Brighten Your Room with Seasonal Flowers and Events
- [For Seniors] Spring Wall Decorations: A Collection of Ideas to Brighten Up Your Room
- [Day Service] Excited for Hinamatsuri! Craft ideas to brighten up your room
- [For Seniors] Brighten Up Hinamatsuri: Wall Decoration Ideas
- [For Seniors] Have Fun Making Things Based on Today’s Mood! Today’s Recommended Craft
- [For Seniors] Color Your Care Facility’s Spring: Wall Decoration Ideas
- [For Seniors] Hinamatsuri Recreation: Fun Ideas for Games, Crafts, and Snack Making
- For seniors: Heartwarming and cozy. Recommended handmade Hina dolls
- [For seniors] Enjoy spring: April craft ideas
- [For Seniors] Making a March Calendar: Introducing Spring-Themed Motifs and Arrangements
[For Seniors] Come, Spring! Recommended March Crafts for Day Service (71–80)
Peach Blossom Wreath

A peach blossom wreath is an origami piece where arranging the flowers into a ring makes the overall cohesion clearly visible.
The work centers on two parts: making the flowers and assembling them by placing them onto the base.
The wreath’s impression changes greatly depending on where you start and how you gauge the spacing.
A notable feature is that you can create variation not only by arranging them evenly but also by intentionally varying the density.
While a single finished piece has a strong presence on its own, combining different sizes expands your options for spatial presentation.
It’s an origami idea that lets you enjoy the process of shaping while considering the placement.
Hina doll chopstick rest
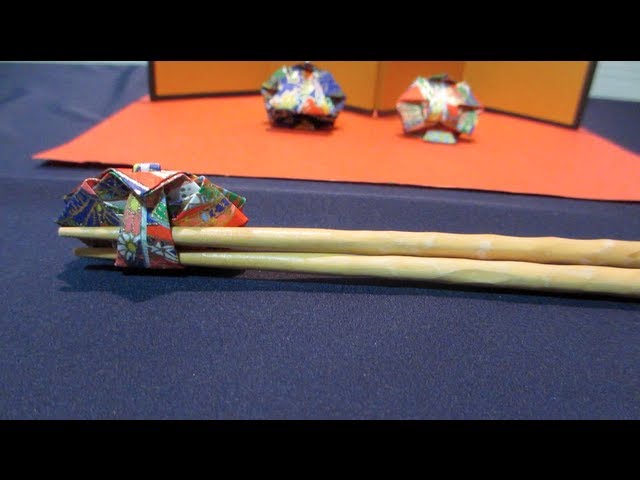
These are chopstick rests made from origami Hina dolls that can also serve as indoor decorations.
Using washi-patterned origami paper brings out even more of the Hina-doll atmosphere.
Origami crafts can be done while sitting in a chair and chatting with those around you.
It’s nice to fold them while talking with seniors about past Hina Matsuri festivals—it might really get the conversation going.
How about using them as chopstick rests for a Hina Matsuri party held at a facility? You can make both the Emperor and Empress dolls and enjoy displaying them as decorations on a small table or shelf.
No-Sew Easy Hina Doll Decorations

It looks like an easy project to make by applying chirimen fabric to craft bands that are even sold at 100-yen shops.
Wrap the craft bands with two types of chirimen fabric—patterned and solid-colored.
Since you attach them with glue, it’s a recommended project even for those who aren’t good at sewing.
Tie the craft bands covered with chirimen fabric together.
Add the face and hair, and it’s complete.
Some older adults may feel that handicrafts using needles or sewing machines are difficult.
With this project, many seniors might find it easier to try.
Three-dimensional Hina dolls made of paper

These Hina dolls are striking for their beaming smiles.
Although they’re three-dimensional, you can make them using tissue paper and construction paper.
Create the Emperor and Empress’s faces and the ornaments above their heads with construction paper.
Draw the facial features with a pen, or make them from construction paper or origami.
Form the base with strips of construction paper and crumpled tissue paper, then attach the face pieces to finish.
Since this craft uses lots of fine hand movements, it’s a fun activity for seniors that also exercises the fingertips and may offer brain-training benefits.
Hinamatsuri dolls made with paper cups and origami

These are Hina dolls made by attaching construction paper or origami to paper cups.
Since there are many gluing steps, it looks like a craft that can also help exercise the fingers.
It may also help cultivate concentration.
By using origami in various colors and patterns, each older adult can create a piece that overflows with individual personality.
Make the Emperor and Empress dolls and seat them on a stand to complete a lovely Hina display.
As they work, older adults may also sense the coming of spring.
Talking about traditions related to the Peach Festival is likely to make for a lively time with older adults.
Mini wreath of rape blossoms

This mini wreath, compactly shaped into a small ring and packed with the bright cheer of rape blossoms, is an origami piece that combines easy display with a touch of splendor.
Its hallmark is the process of making each yellow flower individually and arranging them with an eye for balance, advancing while envisioning the final look.
Rather than a simple repetition of steps, the placement of each flower changes the impression, making it enjoyable to experiment.
Another appeal is that once finished, it can be displayed almost anywhere—on walls, doors, or bulletin boards.
Lining up multiple wreaths creates a cohesive look that brightens the entire space.
It’s a seasonal origami idea that lets you enjoy both the making and the decorating.
Dandelion Wreath

You can make an incredibly realistic dandelion wreath out of origami that could be mistaken for the real thing at a glance! Cut yellow origami paper into narrow strips, fold each strip in half, snip fine cuts along the mountain fold, and roll it up.
Cut green origami paper to create the receptacle (calyx), glue it around the rolled yellow piece, then fluff out the yellow part to complete a soft, puffy dandelion flower.
Next, arrange the dandelion flowers and leaf pieces evenly on a wreath base made by combining origami units, and you’re done! Even just doing the flower-rolling step together gives you plenty of that fun crafting feeling!