For Seniors: Come, Spring! Recommended March Craft Ideas for Daycare Services


In this article, we introduce March craft ideas recommended for seniors!
When it comes to March events, there are many with a cute image, like Hinamatsuri (Girls’ Day) and White Day.
Using lots of soft colors like pink and white in your crafts can put you in a gentle mood.
It’s the season when spring flowers begin to bloom, so let’s create a bright, festive atmosphere through crafting!
There are plenty of ideas you can use in senior day services and other elder care facilities, so please use them as a reference when making crafts together.
- [For Seniors] Crafts to Make in March! Recommended Project Ideas
- For Seniors: Recommended Wall Decoration Ideas for March
- [Day Service] Spring Take-Home Crafts: Ideas to Warmly Brighten Your Room
- [For Seniors] March Origami: Ideas to Brighten Your Room with Seasonal Flowers and Events
- [For Seniors] Spring Wall Decorations: A Collection of Ideas to Brighten Up Your Room
- [Day Service] Excited for Hinamatsuri! Craft ideas to brighten up your room
- [For Seniors] Brighten Up Hinamatsuri: Wall Decoration Ideas
- [For Seniors] Have Fun Making Things Based on Today’s Mood! Today’s Recommended Craft
- [For Seniors] Color Your Care Facility’s Spring: Wall Decoration Ideas
- [For Seniors] Hinamatsuri Recreation: Fun Ideas for Games, Crafts, and Snack Making
- For seniors: Heartwarming and cozy. Recommended handmade Hina dolls
- [For seniors] Enjoy spring: April craft ideas
- [For Seniors] Making a March Calendar: Introducing Spring-Themed Motifs and Arrangements
[For Seniors] Come, Spring! Recommended March Craft Ideas for Day Services (81–90)
Hina dolls swaying in paper cups

Let’s try making heartwarming Hina dolls easily with paper cups! Cut the rim of a paper cup and stick origami paper on the sides.
Gently flatten the cup, fold in the corners, and attach the faces of the Emperor (Odairi-sama) and Empress (Ohina-sama) to finish.
Using the same method, you can also make the three court ladies and the five musicians, and arrange them as a five-tier or seven-tier display—highly recommended! Thanks to the rounded bottom of the paper cup, the Emperor and Empress sway softly, which is irresistibly charming.
By changing the faces, you can adapt this craft into many different creations.
Hina dolls made with two paper plates
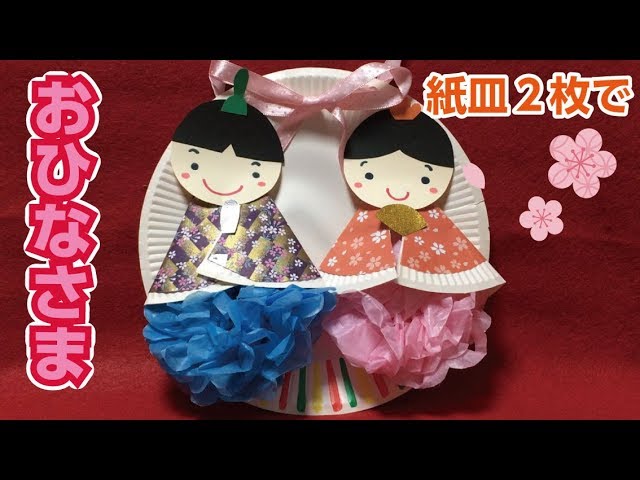
Introducing easy handmade items for Hinamatsuri that you can try casually.
For this fun spring event, why not make Hina dolls using things you already have at home? All you need are paper plates, colored paper, and washi-patterned origami that could serve as kimono designs.
Cut the paper plates, then use origami to create and attach the kimono for the Emperor and Empress dolls to form the bodies.
Add the faces and a fan, and your handmade Hina dolls are complete.
These simple dolls require no difficult techniques, so they’re accessible even for older adults.
Give it a try as a craft activity at day service centers, too.
Pop-up bouquet card

How about a delightful pop-up card where a bouquet is presented by your favorite character? To make the bouquet, fold a square sheet of paper into a triangle, draw three wavy lines, and cut along them.
Next, take a larger sheet, fold it into quarters, and make slits along the bottom fold line.
Cut off the lower-right section, apply glue, and assemble it so it pops up in 3D.
Prepare four identical pieces and glue them together so they overlap—your bouquet is complete.
Make a small handle for the bouquet with a strip of paper, then prepare your chosen character.
It’s best to pick a character the recipient will love.
Glue the bouquet handle onto the card base, then attach the bouquet so it fits neatly.
Layering bouquets of different sizes adds depth when the card is opened.
How about giving this as a heartfelt gift?
Daruma-style Hina dolls

Let me introduce cute, round daruma-style Hina dolls.
Because you use your whole palm, they’re great for finger and hand rehabilitation in places like senior care facilities.
First, make two balls of crumpled newspaper for the base.
Be careful—they can easily become bumpy.
Cut origami paper to the size of the face and glue it on.
Make the hair the same way, adjusting the position as you attach it.
Next is the kimono.
Cut chiyogami into two pieces and glue them onto the newspaper at a diagonal.
Using spring-like colors will make it look bright and festive.
For the collar, use origami in a vivid color to create contrast and a neat finish.
Draw the facial features with a pen to complete the body.
Make a fan, a scepter (shaku), and head ornaments from chiyogami or origami and glue them on to finish.
Try making your very own Hina dolls!
Hina dolls made with toilet paper rolls and origami

This craft uses toilet paper rolls that you might otherwise throw away to make Hina dolls.
It requires very few materials, so if you’re looking for a Hinamatsuri craft, definitely give it a try! The basic method is simply to decorate cut toilet paper rolls with origami or Japanese-patterned paper.
Rounding the corners of the rolls gives them a cute look! You can also make the kimono sleeves three-dimensional to add a touch of elegance.
Since this is a highly flexible craft, try creating your own original Hina dolls!
Full-bloom cherry blossom display

This is a display created by combining pieces of paper to evoke a cherry blossom tree, which is essential to spring in Japan.
The cherry blossoms are made simply by cutting circles into flower shapes, but adding creases to give them dimension at this stage will contribute to a fuller, more voluminous final look.
Once the flowers are finished, arrange them while considering their angles, and install them as if placing them on a tree to complete the whole piece.
Making the flowers in various colors to create a gradient will enhance the three-dimensional effect, so that approach is also recommended.
For Seniors: Come, Spring! Recommended March Craft Ideas for Day Service (91–100)
origami bonbori (paper lantern)

Bonbori lanterns, which even appear first in the classic Hinamatsuri song “Ureshii Hinamatsuri,” are essential for hinadolls, casting a soft light on the Emperor and Empress.
When making them with origami, create the parts—such as the light, base, and post—separately and assemble them at the end.
Since it involves fine work, if you’re crafting with older adults, it may be best to ask them to handle the assembly.
Once you’ve handmade your hina dolls, be sure to try your hand at the supporting decorations too, starting with the bonbori lanterns!